Model KVVB Instructions
Page 4 of 5
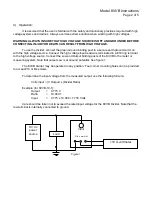
To use the high voltage Wheatstone bridge method, use a calibrated high voltage resistance
standard (such as Ohm-Labs HVS), a calibrated decade box and an isolated null detector.
This method is described in NIST Technical Note 1215, “High-Voltage Divider and Resistor
Calibrations,” M. Misakian, Natl. Bur. Stand. (U.S.).
High Voltage Standard
KVVB input
Null Detector
KVVB output
Rx (Adjustable)
Ground
Figure 2
1) Connect the KVVB and the low side of a calibrated decade resistor (Rx) to a secure ground
using cables of equal length and gauge.
2) Connect the high side of the decade resistor to the low terminal of the high voltage standard
(HVS).
3) Connect an isolated null detector to the high side of the decade resistor and to the KVVB output
terminal.
4) Connect high voltage to the HVS standard and to the input of the KVVB.
5) Apply a low setting of the high voltage supply to verify operation.
6) Apply high voltage to both units. Allow applied voltage to settle for 15 minutes to allow full
stabilization of the KVVB.
7) Adjust the decade resistor for null.
8) Use the value of the standard and the decade box to determine the KVVB ratio.
Example: (HVS = 100.000 megohms)
Voltage
Rx
Ratio = (Rx + HVS)/Rx
2 kV
100,094
1000.06 : 1
4 kV
100,097
1000.03 : 1
6 kV
100,100
1000.00 : 1
8 kV
100,105
999.95 : 1
10 kV
100,110
999.90 : 1
A limited verification of the KVVB's ratio can be performed by connecting a calibrated voltage
source to the input and comparing it to the KVVB output voltage.
The KVVB may be returned to the manufacturer for calibration. The calibration cycle will depend on
the customer’s requirements. Annual re-calibration is recommended.
High voltage
source


