background image

LM3612 PRINT & APPLY SYSTEM


USERS MANUAL 


Page 18   

Made in the U.S.A. 

© 2021 LabelMill 

06/01/2021  Model LM3612 


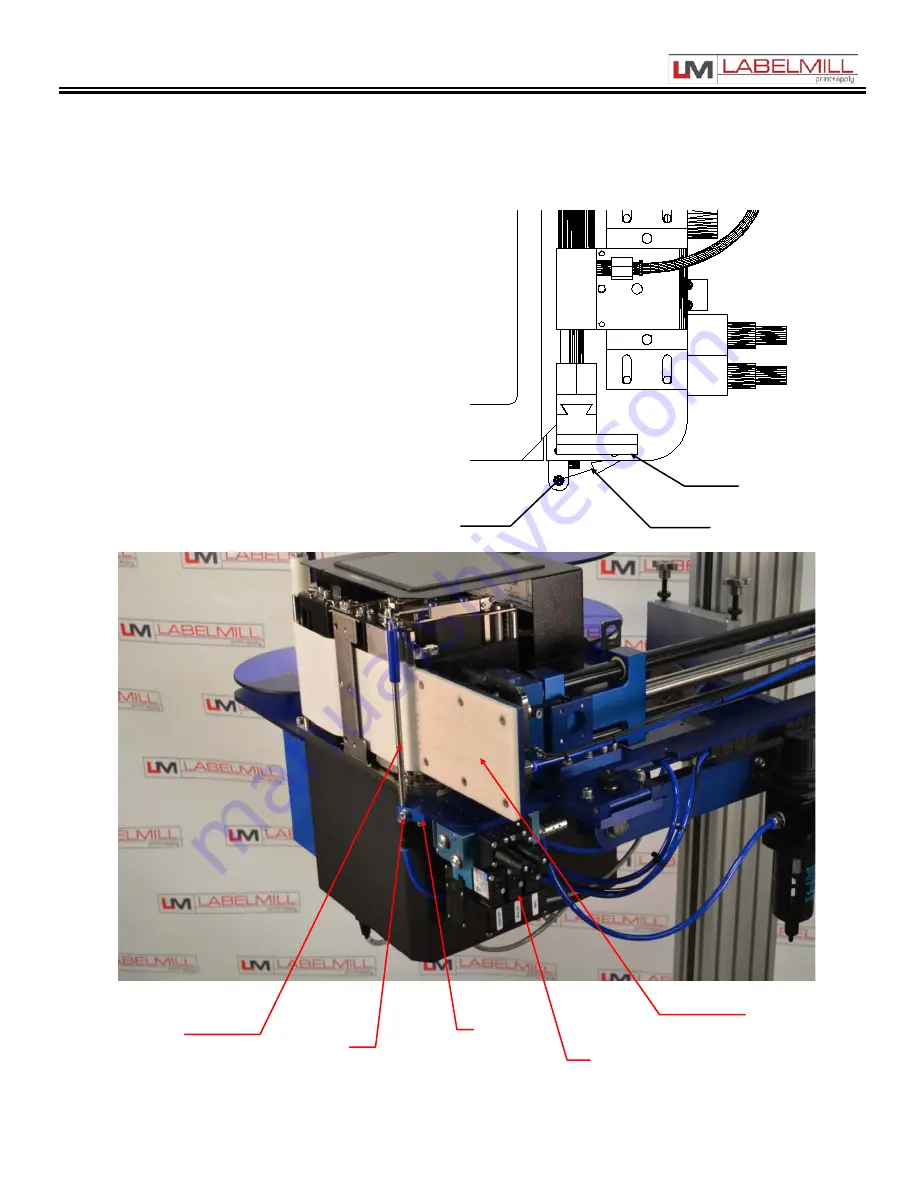
AIR ASSIST TUBE 


2-09 


The Air Assist Tube must be adjusted to  

clear the trailing edge of the printed labels 
and the Label Platen. An adjustment 
screw is used to adjust the position of the 
air holes in relation to the labels. An angle 
of 45 degrees is required. 
   
One slot is provided to make the 
appropriate adjustments desired. 


Air Assist 
Tube 

Label Platen 

Airflow 

Mount  
Bracket 

Air 
Assist 
Tube 

      Clamp screw 

Label 
Platen 

Valve Pack 

Summary of Contents for LM3612

Page 1: ...LM3612 PRINT APPLY OPERATIONS MANUAL Manufactured in USA by LabelMill Inc 2416 Jackson St Savanna IL 61074 800 273 4707 info labelmill com www labelmill com...

Page 2: ...l Sensor Adjustment 2 03 Take Up Unit Assembly 2 04 Clutch Assembly Adjustment 2 05 Hand Held Labeler Interface HLI 200 2 06 Accessory Connections Control Box 2 07 T 52 Photo Eye 2 08 Air Assist 2 09...

Page 3: ...age 3 Made in the U S A 2021 LabelMill 06 01 2021 Model LM3612 SECTION 1 APPLICATOR OVERVIEW Introduction 1 01 General System Specifications 1 02 Inventory List 1 03 Print Apply Component Description...

Page 4: ...igh quality labels and bar codes to your product at print speeds up to 14 sec and apply at speeds up to 90 labels min OPERATION The standard configuration is External Computer Mode The configuration a...

Page 5: ...tion between labels in running direction LABEL SIZE Minimum 0 625 wide x 0 50 long Maximum 6 6 wide x 39 long MAXIMUM PRINT AREA 6 6 wide x 39 long Varies dependent upon system configuration LABEL PLA...

Page 6: ...12 INVENTORY LIST QTY Description 1 Print Apply Assembly 1 U Arm Mount 1 Power Cord 1 Model 3612 Operators Manual USB 1 Extra Cardboard Ribbon Core 1 Product Switch specified a Manual Limit Switch opt...

Page 7: ...abelMill 06 01 2021 Model LM3612 COMPONENT DESCRIPTION LOCATION 1 04 THERMAL PRINTER WEB TAKE UP SPOOL VALVE PACK LABEL SPOOL SPOOL LOCK U ARM TAMP CYLINDER AIR FILTER REGULATOR SWING AWAY HINGE ASSEM...

Page 8: ...controls at the source and lock out in accordance with OSHA Standards Be sure all external electrically conductive parts are connected to a good electrical ground Never handle live electrical equipmen...

Page 9: ...2 04 Clutch Assembly Adjustment 2 05 Operator Interface HLI 200 2 06 Accessory Connector Panel 2 07 T 52 Photo Eye 2 08 Air Assist 2 09 T 150 Mobile Mounting Stand 2 10 T Stand Adjustment 2 11 Tamp Op...

Page 10: ...o the left and around brake arm C to the right of roller D and to the left and below roller guide E 3 Feed the web into the thermal printer 4 Finish the process by loading the waste backing paper onto...

Page 11: ...6 01 2021 Model LM3612 SUPPLY SPOOL SPOOL LOCK REMOVAL To remove the label storage spool turn the spool lock counterclockwise until you reach a stop The spool will now slide off To secure the spool si...

Page 12: ...EFER TO PRINTER MANUAL LABEL RIBBON ROUTING REFER TO PRINTER MANUAL THERMAL RIBBON LOADING REFER TO PRINTER MANUAL NOTE The printer will not operate unless the front cover is in the fully closed posit...

Page 13: ...E UP UNIT ASSEMBLY The Take Up Assembly is located on the backside of the main panel To adjust the clutch the side panels must be removed to gain access The mounting bolts for the Take Up Assembly can...

Page 14: ...ENT To reduce waste web tension move the lock collar 1 32 away from the take up spool To increase web tension move the lock collar 1 32 toward the take up spool CAUTION Too much web tension may cause...

Page 15: ...LM3612 PRINT APPLY SYSTEM USER S MANUAL Page 15 Made in the U S A 2021 LabelMill 06 01 2021 Model LM3612 HAND HELD LABELER INTERFACE HLI 200 2 06 TOUCH SCREEN DISPLAY INTERFACE PORT...

Page 16: ...ONS LOCATED ON BACK OF LABELER CONTROL ENCLOSURE 2 07 MAIN POWER ENTRY HLI 200 PORT PRINTER INTERFACE LOW LABEL WARNING LIGHT KIT AUX AUX 1 PORT START INPUT REMOTE TRIGGER TAKE UP MOTOR FUSE HEAD UP A...

Page 17: ...LM3612 PRINT APPLY SYSTEM USER S MANUAL Page 17 Made in the U S A 2021 LabelMill 06 01 2021 Model LM3612 T 52 PHOTO EYE Remote Trigger Refer to Section 3 for I O details 2 08...

Page 18: ...clear the trailing edge of the printed labels and the Label Platen An adjustment screw is used to adjust the position of the air holes in relation to the labels An angle of 45 degrees is required One...

Page 19: ...LM3612 PRINT APPLY SYSTEM USER S MANUAL Page 19 Made in the U S A 2021 LabelMill 06 01 2021 Model LM3612 OPTIONAL T 150 MOUNTING STAND 2 10...

Page 20: ...LM3612 PRINT APPLY SYSTEM USERS MANUAL Page 20 Made in the U S A 2021 LabelMill 06 01 2021 Model LM3612 T STAND ADJUSTMENT 2 11 Column Crank Column Lock...

Page 21: ...f the unit It also allows for precise adjustments of how close the tamp head comes to the product There is flow control adjustment for the valves It may be necessary to adjust the flow rate on the tam...

Page 22: ...ATOR Controls maximum air pressure available to entire applicator Should be set between 40 and 80 PSI FLAG REGULATOR The flag regulator is used to adjust the pressure that the flag jaws apply to the l...

Page 23: ...LM3612 PRINT APPLY SYSTEM USER S MANUAL Page 23 Made in the U S A 2021 LabelMill 06 01 2021 Model LM3612 OPTIONAL TAMP APPLICATOR Right Hand Configuration Below 2 14...

Page 24: ...LM3612 PRINT APPLY SYSTEM USERS MANUAL Page 24 Made in the U S A 2021 LabelMill 06 01 2021 Model LM3612 OPTIONAL CORNER WRAP APPLICATOR Left Hand Configuration Below 2 15...

Page 25: ...LM3612 PRINT APPLY SYSTEM USER S MANUAL Page 25 Made in the U S A 2021 LabelMill 06 01 2021 Model LM3612 OPTIONAL ADJACENT PANEL APPLICATOR Right Hand Configuration Below 2 16...

Page 26: ...LM3612 PRINT APPLY SYSTEM USERS MANUAL Page 26 Made in the U S A 2021 LabelMill 06 01 2021 Model LM3612 OPTIONAL BLOW ON APPLICATOR Right Hand Configuration Below 2 17...

Page 27: ...LM3612 PRINT APPLY SYSTEM USER S MANUAL Page 27 Made in the U S A 2021 LabelMill 06 01 2021 Model LM3612 OPTIONAL TABLE TOP APPLICATOR 2 18...

Page 28: ...in the U S A 2021 LabelMill 06 01 2021 Model LM3612 SECTION 3 CONTROL BOX Programming 3 01 System Editor 3 02 Programming Menus 3 03 Key Definitions 3 05 Quick Start Set Up of Key Features 3 06 Logic...

Page 29: ...f the screen Error messages or warning will be displayed in the box at the bottom of the screen The top of the screen allows you to Start Stop Enable or Disable the system and also shows the current s...

Page 30: ...1 Model LM3612 SYSTEM EDITOR Press the Program button to enter the system editor Here you will find the following options I O Panel Product Sensor Takeup Tamp Setup Counters Cycle Type Job Storage Set...

Page 31: ...E BLOCKS On Delay Delays x seconds after start print before starting take up motor Off Delay Take up runs x seconds after end print signal is received from printer Jog Takeup Press the JOG TAKEUP butt...

Page 32: ...distance from the trigger point can be set at which the label is to be applied Note optional encoder must be used with this feature PROGRAMMABLE BLOCKS Encoder Used to toggle the encoder option on or...

Page 33: ...roduct encoder and the LabelMill control This is used to match the speed of the applicator to the product conveyor Electronic gearing is similar to mechanical gearing in that there is a gear ratio and...

Page 34: ...Set cycle type to Tamp Before Feed 13 Press EXIT 14 System is now ready for set up of advanced features and options SETUP OF KEY FEATURES HOW TO SET UP AN ASYNCHRONOUS APPLICATION TAMP Determine the...

Page 35: ...move the placement of the FIRST label on the product Product delay will move the label placement in time 00 000 Because the product delay feature utilizes time the speed of the product MUST be constan...

Page 36: ...the light should be wired between pins 1 8 on the Light Bar Aux Connector 3 08 REMOTE TRIGGER CONNECTOR PRODUCT SWITCH P7 PIN I O I O Monitor ADDRESS 24vdc 1 24vdc 2 Trigger Input 1 3 Input X0 0 Pr Pr...

Page 37: ...t 3 Slide Home Input 12 I X1 1 Aux Input 4 Feed Error Input 13 I X1 2 Applicator in cycle output Applicator Busy 14 O Y1 2 Batch Done Aux Output 1 15 O Y1 6 3 09 Take Up P4 PIN I O I O Monitor ADDRESS...

Page 38: ...plicator Busy 14 O Y1 2 Batch Done Aux Output 1 15 O Y1 6 AUXILIARY CONNECTOR 3rd DB 15 MALE DB15 PIN INPUT OUTPUT ADDRESS AUX 232 TXC Port C 1 O RS232 Output GND 2 GND 3 Batch Done Aux Output 1 4 O Y...

Page 39: ...d 1 Input X1 3 Printer Ground 2 Ribbon End 3 Input X1 4 Printer Error 4 Input X1 5 Print Start 5 Output Y0 4 Print End 6 Input X1 6 Reprint 7 Output Y0 5 8 ONLINE Sato Only Zebra Data Ready 9 Input X1...

Page 40: ...01 2021 Model LM3612 E Stop Connection Sample E Stop Wiring Note Internal E Stop Jumper must be removed for this option to be utilized When interfacing to an automated system the reset button is not r...

Page 41: ...3612 PRINT APPLY SYSTEM USER S MANUAL Page 41 Made in the U S A 2021 LabelMill 06 01 2021 Model LM3612 SECTION 4 CLEANING MAINTENANCE Troubleshooting 4 01 Fault Codes 4 02 Replacing the Power Fuse 4 0...

Page 42: ...y Unit will not print or tamp A Unit off line B Incorrect label configuration C No label format downloaded D Wrong interface selected E Interface cable F Error on printer Check printer cover limit swi...

Page 43: ...did not move off of reed switch A Tamp Cylinder Is Not Up B Miss Adjusted Reed Switch C Faulty Reed Switch D Tamp duration too small E Check programming of Tamp switch NOTE Light on reed switch should...

Page 44: ...overload condition must be determined and corrected prior to replacing the fuse NEVER replace the fuse with one of a greater AMP rating The specified rating has been selected to prevent damage and or...

Page 45: ...l LM3612 LM3612 PRINT APPLY OPERATIONS MANUAL Copyright and Trademarks Copyright 2021 All rights reserved All trademarks and brand names are the property of their respective owners LabelMill 2416 Jack...

Reviews: