Model: T83653v2 www.lacrossetechnology.com/support
Page | 4
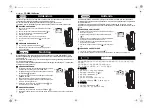
Set Time Alarm
1. Hold the
ALARM
button to enter set mode.
2. Press the
-
or
+
buttons to adjust the values.
3. Press the
ALARM
button to confirm & move to the next item.
Alarm Time setting order:
1.
Hours,
2.
Minutes
Activate/Deactivate Time Alarm
•
Press the
ALARM
button once to view alarm time.
•
Press the
ALARM
button again to activate the alarm.
Once activated, the bell icon appears.
•
Press the
ALARM
button again to deactivate the alarm.
The bell icon will disappear.
Snooze (Silences Alarm Temporarily)
•
When alarm sounds, press the
LIGHT
button to silence the
alarm for 10 minutes.
•
The snooze icon will flash.
•
In snooze mode, press any button except
ALARM
to stop alarm for
one day.
Note:
The alarm is crescendo sound. The alarm sounds for two minutes
and then will shut off completely.
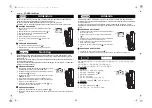
USB Charge Port
Charge a smart phone, camera, or other devices when the projection
alarm is plugged into a power outlet with the included 5.0V AC adapter.
Note:
This is a power-output charging port. It does not supply power to
the projection alarm.
•
Connect your external device’s USB charging cable (not included) to
the USB charging port.
•
Charging times will vary.
•
USB Power Output
: 1A maximum current. Charge 1A devices or
devices that are self-regulating.
Note:
Some USB cables are for data transfer only and cannot be used
for charging. Make sure that the USB cable you use will charge your
device. Most USB cables included with mobile devices will work for
charging.