background image

19

Meaning / Description

Symbol

WARNING / CAUTION

An appropriate safety instruction 

should be followed or caution taken if 

a potential hazard exists. 

!

DANGEROUS VOLTAGE

To indicate hazards arising from 

dangerous voltages. 

PROTECTIVE EARTH (GROUND)

To identify any terminal which 

is intended for connection to an 

external conductor for protection 

against electric shock in case of a 

fault, or the terminal of a protective 

earth (ground) electrode. 

Meaning / Description

Symbol

HEAVY

This product is heavy and reference 

should be made to the safety 

instructions for provisions of lifting 

and moving. 

DISCONNECT MAINS SUPPLY

Disconnect incoming supply before 

inspection or maintenance. 

The following symbols are related to safety and are used on the product and throughout this manual. 

Summary of Contents for C9QP

Page 1: ...AlberTine 36 Dual Fuel Range User Guide Installation Service Instructions U109956 17a AlberTine...

Page 2: ......

Page 3: ...or explosion may result causing property damage personal injury or death WARNING The anti tip device supplied with this range must be installed when the appliance is installed This will reduce the ris...

Page 4: ...ising from dangerous voltages PROTECTIVE EARTH GROUND To identify any terminal which is intended for connection to an external conductor for protection against electric shock in case of a fault or the...

Page 5: ...0 8 Installation safety instructions 21 9 Installation 23 Accessories 24 Positioning the range 25 Moving the range 26 Removing the door 26 Lowering the two rear rollers 26 Installing the flue grille 2...

Page 6: ......

Page 7: ...nd liquids If the range is installed near a window proper precautions should be taken to prevent curtains from blowing over the burners n NEVER leave any items on the range cooktop The hot air from an...

Page 8: ...rom steam NEVER let a potholder touch hot heating elements DO NOT use a towel or other bulky cloth in place of a glove They might catch fire if they touch a hot surface Use dry oven gloves when applic...

Page 9: ...escape before removing or replacing food n NEVER heat unopened food containers Pressure buildup may make the container burst and cause injury n Keep oven vent ducts unobstructed Placement of oven rac...

Page 10: ...e overspill when food is added If you use a combination of oils or fats in frying stir them together before heating or as the fats melt Foods for frying should be as dry as possible Frost on frozen fo...

Page 11: ...ot held in Turn the control to the OFF position and wait one minute then try again this time holding in the control knob for slightly longer Adjust the flame height to suit by turning the knob On this...

Page 12: ...ing elements inside the oven The oven is a multifunction oven Fig 2 9 In addition to convection elements around the fans it is fitted with extra heating elements in the top of the oven and under the o...

Page 13: ...hickens and meat roasts should not be thawed in this way We recommend this be carried out in a refrigerator Thawing should not be carried out in a warm oven Ensure that dairy foods meat and poultry ar...

Page 14: ...an the heat at the base so the oven will be hotter in the top half than the lower half Unless you are cooking food that requires fast intensive cooking we suggest you place it on a lower rack This coo...

Page 15: ...on the oven s wire racks Keep all trays and containers away from the sides of the oven as over browning of the food may occur Always place baking sheets with the widest part across the oven Cooking h...

Page 16: ...rs Slide the telescopic runners forward until they stop Holding the shelf above the runners tilt the front downward and locate into the front of the runners Lay the shelf flat Press on the rear of the...

Page 17: ...trays and other cooking utensils The drawer can be removed completely for cleaning etc n It can get very warm so DO NOT store anything in it which may melt or catch fire n Never store flammable materi...

Page 18: ...positions The racks should not be placed directly one above the other When cooking on more than one rack always leave at least one runner space between them Place baking sheets individual cake tins or...

Page 19: ...300 25 30 minutes per 1 lb 25 30 minutes 375 2 375 20 minutes per 1 lb 20 minutes Turkey fast cook 300 2 300 20 minutes per 1 lb 20 minutes 375 2 375 15 minutes per 1 lb 15 minutes Duck Duckling 300...

Page 20: ...y react together with hazardous results Recommended cleaning materials are shown in Table 4 1 Cleaning the range Daily care Cleaning the range is not a welcomed chore but it has to be done to maintain...

Page 21: ...inish these areas should be cleaned using a gentle brass cleaner Take care the cleaner does not affect surrounding areas Ovens The side panels can be removed for cleaning and for cleaning behind them...

Page 22: ...ur range The knobs get hot when I use the oven can I avoid this Yes this is caused by heat rising from the oven and heating them up DO NOT leave the oven door open 5 Troubleshooting If there is an ins...

Page 23: ...00 C Turn off the power at the circuit breaker Before removing the existing lamp turn off the power supply and make sure that the oven is cool Open the oven door and remove the oven shelves Unscrew th...

Page 24: ...ese instructions is not followed exactly a fire or explosion may result causing property damage personal injury or death WARNING The anti tip device supplied with this range must be installed when the...

Page 25: ...for connection to an external conductor for protection against electric shock in case of a fault or the terminal of a protective earth ground electrode Meaning Description Symbol HEAVY This product is...

Page 26: ...g difficulty please contact Tech Support at 800 914 4799 or email techsupp middlebyresidential com Please note For warranty information or to register your AGA range email customersupport middlebyresi...

Page 27: ...n flame Immediately call your gas supplier n Improper installation adjustment alteration service or maintenance can cause injury or property damage Refer to this manual For assistance or additional in...

Page 28: ...The range is freestanding and should not be placed on a separate base DO NOT locate the range where it may be subject to strong drafts Any openings beneath the range or behind the range should be sea...

Page 29: ...9 Open end or adjustable wrench 10 Pencil and ruler 11 Pipe wrenches 12 13 mm spanner or socket wrench Additional materials you may need Gas line shut off valve Pipe joint sealant or UL approved pipe...

Page 30: ...kit number A060048 Ground strap Hand rail and end pieces page 36 ArtNo 020 0019 Conversion Kit USA 5 burner control knobs A and 2 oven control knobs B page 36 1 set of oven door knob parts page 36 6...

Page 31: ...ces such as unpainted metal or ceramic tiles the gap each side can be reduced from 3 to 1 2 5 cm A minimum space of 31 80 cm is required between the top of the cooktop and a horizontal combustible sur...

Page 32: ...s follows open the door fully Swivel the locking U clips forward to the locking position Fig 9 5 To remove the oven door grip the sides of the door lift upwards and then slide the door forwards Fig 9...

Page 33: ...device 1 A range using a flexible gas connector must be secured with a suitable anti tip device 2 A suitable anti tip device is supplied and shown in Fig 9 12 3 When fitting the anti tip bracket Fig 9...

Page 34: ...Side panel extension 2 M5 screw 4 M5 nut 4 Large washer 4 Shakeproof washer 4 Procedure 1 Place a screw and washer in the top hole in the rear edge of the range side panel Add a shakeproof washer and...

Page 35: ...is required Make sure you are supplying your range with the correct type of gas If the range is to be used on LP gas a qualified LP installer must convert it We recommend that the range be converted b...

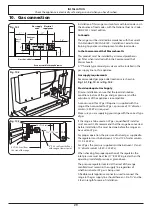
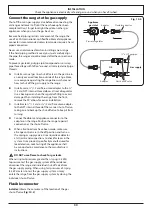
Page 36: ...ling the range from the front remove the 90 elbow for easier installation C Install male 1 5 cm or 2 cm flare union adapter to the NPT internal thread of the manual shut off valve taking care to backu...

Page 37: ...age that may have occurred In the event of damage please consult your electrical installer n Ensure that the power cord is routed so that it cannot become damaged during the installation This applianc...

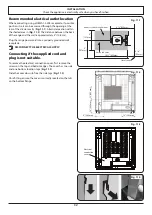
Page 38: ...g the range power cord into a properly grounded wall receptacle DISCONNECT THE ELECTRICAL SUPPLY Connecting if the supplied cord and plug is not suitable To remove the electrical connection cover firs...

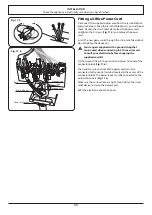
Page 39: ...ed with a ground strap that can be used when connecting to a three wire cord Consult your electrician before changing the supplied cord kit Fit the Ground strap to the ground and center terminal of th...

Page 40: ...reducer plates on the mounting bracket Allow enough slack to easily attach the wires to the terminal block Fig 11 7 NOTE Do not install the conduit without a squeeze connector A Ground strap is suppli...

Page 41: ...range to your conduit Insert the conduit through the reducer plates on the mounting bracket Allow enough slack to easily attach the wires to the terminal block NOTE Do not install the conduit without...

Page 42: ...ion cup Fig 12 5 Turn the tube over and push on the other end cap using the second friction cup making sure that you DO NOT scratch or damage the first end piece and confirm the two end pieces are lin...

Page 43: ...e n MAKE SURE THE FLOW OF COMBUSTION AND VENTILATION AIR TO THE RANGE IS UNOBSTRUCTED n MAKE SURE ALL CONTROLS ARE LEFT IN THE OFF POSITION Customer care Please complete your details in the table at t...

Page 44: ...INSTALLATION Check the appliance is electrically safe when you have finished 38 Removing the drawer Fitting the drawer...

Page 45: ...f Red flag Code Description X06 Left Hand Oven Front Multifunction Switch X08 Left Hand Oven Base Element X09 Left Hand Oven Fan Element X10 Left hand Oven Top Outer Element X11 Left Hand Oven Top In...

Page 46: ...Input Orifice Center burner 49 17 000 btu hr 205 17 000 btu hr 118 Large burner 38 12 000 btu hr 150 12 000 btu hr 99 Right hand front burner 31 6 000 btu hr 112 6 000 btu hr 68 The valves in this ran...

Page 47: ...ation not in accordance with local electrical codes or plumbing codes or improper storage of the appliance 4 Repairs due to other than normal home use 5 Service labor during limited warranty period 6...

Page 48: ...AGA CONSUMER PRODUCTS USA CANADA Middleby Residential 4960 Golden Parkway Buford GA 30518 770 932 7282 www lacornueusa com...

Reviews: