Kyocera TASKalfa 1801 Operation Manual Download Page 69

4-6

Receiving Faxes > Fax reception functions

Fax reception functions

The reception method and fax printing method can be set.

Fax reception settings

Duplex Print Output

When received multiple pages of data are the same width, they can be printed out on both sides of paper having the 
same width as the data.

For more information about configuring settings, refer to 

Default fax settings on page 9-2

.

Reception Date/Time

Reception Date/Time function adds the reception date/time, sender information and number of pages on the top of each 
page when the message is printed out. It is useful for confirming the time of reception if the fax is from a different time zone.

For more information about configuring settings, refer to 

Default fax settings on page 9-2

.

Media Type for Print Output

Specify the paper type to be used for print output of the received fax.

For more information about configuring settings, refer to 

Default fax settings on page 9-2

.

Setting the cassette for the print output of received faxes

By specifying the media type, faxes can be received on the corresponding cassette. 

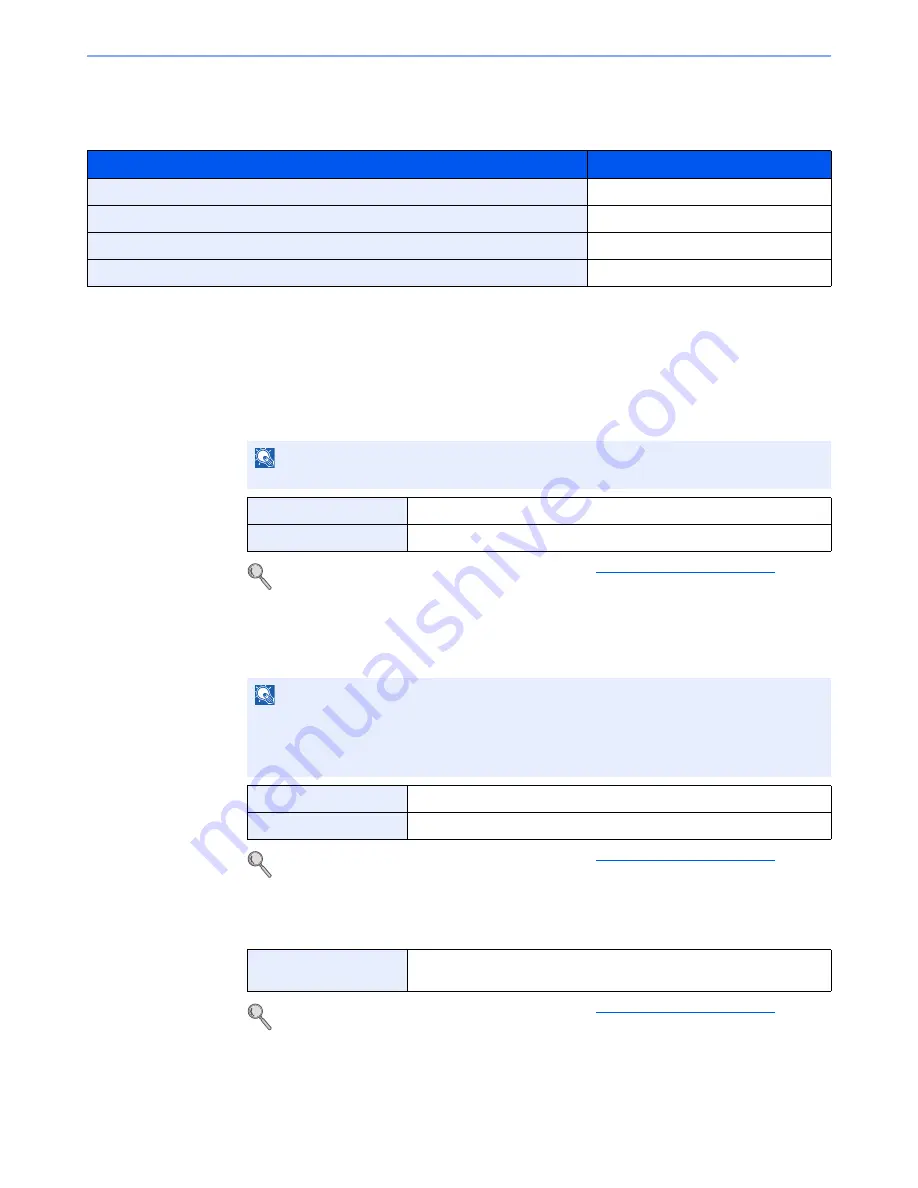
What do you want to do?

Reference Page

Print received faxes on both sides of the paper.

Duplex Print Output 

 page 4-6

Print the date and time of reception and other information.

Reception Date/Time 

 page 4-6

Restrict the type of paper that can be used.

Media Type for Print Output 

 page 4-6

Forward received faxes to another fax machine or a computer.

Forward Settings 

 page 5-2

NOTE

The optional duplex unit is required.

On

Print on both sides.

Off

Do not print on both sides.

NOTE

When the received data is printed on multiple pages, the reception date/time is printed on 
the fist page only. It is not printed on the pages that follow. When the received fax data is 
forwarded after retrieving it from memory, the reception date/time is not added to the 
forwarded data.

On

Print the reception date/time.

Off

Do not print the reception date/time.

Supported paper types

All Media Type, Plain, Rough, Vellum, Labels, Recycled, Bond, 
Cardstock, Color, Envelope, Thick, High Quality, Custom 1-8

Summary of Contents for TASKalfa 1801

Page 1: ...FAX OPERATION GUIDE PRINT COPY SCAN FAX FAX SYSTEM X TASKalfa 1801 TASKalfa 2201...

Page 2: ...or incorrect compliance with the related points Symbols The symbol indicates that the related section includes safety warnings Specific points of attention are indicated inside the symbol General war...

Page 3: ...X Dialing Mode 1 10 ECM TX 1 11 TX Start Speed 1 11 2 Registering Destinations 2 1 Registering Destinations in the Address Book 2 2 Adding a contact 2 2 Adding a Group 2 6 Editing and Deleting Address...

Page 4: ...int Output 4 6 Reception Date Time 4 6 Media Type for Print Output 4 6 5 Using Convenient Fax Functions 5 1 Forward Settings 5 2 Setting Forwarding 5 2 Registering Forwarding Destination 5 3 Forwardin...

Page 5: ...tion 9 12 Setting Reception Restriction 9 13 Unknown Number Reception 9 13 Unusable Time 9 15 Account Management 9 17 Logging in when Job Accounting has been Enabled 9 18 10 Troubleshooting 10 1 Indic...

Page 6: ...iv...

Page 7: ...read the Operation Guide before you start using the machine During use refer to the Operation Guide for your machine for information regarding the sections listed below Environment Precautions for Us...

Page 8: ...ve companies The designations and are omitted in this guide Declarations to European Directives DECLARATION OF CONFORMITY TO 2004 108 EC 2006 95 EEC 93 68 EEC 1999 5 EC and 2009 125 EC We declare unde...

Page 9: ...N for E AN 07R01 AN for D E P and N GR 01R00 National AN for GR AN 09R00 AN for D GR 03R00 National AN for GR AN 10R00 AN for D GR 04R00 National AN for GR AN 11R00 AN for P NO 01R00 National AN for N...

Page 10: ...s 6 Sending Faxes from PC Explains how to send a FAX from a PC 7 Using a Connected Telephone Explains convenient functions that use an external telephone 8 Checking Communication Status and Machine In...

Page 11: ...o select On Regular Indicates a message or setting displayed on the computer screen You can select from the Print size menu Click to move from the current page to the previously displayed page This is...

Page 12: ...ions used in operation procedures Operation panel keys that are pressed are outlined in red Procedures consisting of a sequence of operation panel actions or computer operations are numbered as shown...

Page 13: ...g icons are used to indicate original and paper placement orientations on the message display Orientation Setting Position X Width Y Length Display Indicated Size in this Guide 1 1 Original paper size...

Page 14: ...xii...

Page 15: ...g topics Part Names and Functions 1 2 Machine 1 2 Operation Method 1 5 Setting Date and Time 1 6 Local FAX Information Entry 1 8 TTI Transmit Terminal Identification 1 8 Local FAX Name 1 8 Local FAX N...

Page 16: ...Operation Guide 1 Operation panel Perform the fax operation with this panel 2 Power switch Set this switch to the ON side when performing the fax or copier operation 3 TEL connector When using a comm...

Page 17: ...ammed in the Document Processor 6 Original Width Guides Adjust these guides according to the original width 7 Original Table Stack the sheet originals on this table 8 Original Eject Table Read origina...

Page 18: ...the bottom of the message display Displays Status System Menu or Counter Menu Displays the Program screen Displays the FAX screen Numeric keys Enter numbers and characters Clears entered numbers and...

Page 19: ...enus The directions of usable arrow keys are shown on the screen displayed When the or key is pressed the selection moves line by line When the or key is pressed the selection moves in units of one pa...

Page 20: ...lect Date Settings 5 Press the OK key 2 Set the time difference 1 Press the or key to select Time Zone 2 Press the OK key 3 Press the or key to set the time zone 4 Press the OK key 3 Set the date and...

Page 21: ...key 3 Press the or key to select the display format of year month and date 4 Press the OK key 5 Set the Summer Time 1 Press the or key to select Summer Time 2 Press the OK key 3 Press the or key to se...

Page 22: ...ect FAX 3 Press the OK key 4 Press the or key to select Transmission 5 Press the OK key 6 Press the or key to select TTI 7 Press the OK key 2 Set the TTI 1 Press the or key to select On or Off 2 Press...

Page 23: ...the local fax number to be printed on the fax on the receiving system 1 Display the screen 1 Press the Status System Menu Counter key 2 Press the or key to select FAX 3 Press the OK key 4 Press the o...

Page 24: ...ess the or key to select FAX 3 Press the OK key 4 Press the or key to select Transmission 5 Press the OK key 6 Press the or key to select FAX Dialing Mode 7 Press the OK key 2 Set the FAX Dialing Mode...

Page 25: ...key 4 Press the or key to select Transmission 5 Press the OK key 6 Press the or key to select ECM TX 7 Press the OK key 2 Configure the settings 1 Press or to select On or Off 2 Press the OK key TX St...

Page 26: ...ormation Entry 5 Press the OK key 6 Press the or key to select TX Start Speed 7 Press the OK key 2 Configure the settings 1 Press or to select 9600bps 14400bps or 33600bps 2 Press the OK key TX Start...

Page 27: ...s Registering Destinations in the Address Book 2 2 Adding a contact 2 2 Adding a Group 2 6 Editing and Deleting Address Book Entries 2 9 Printing Address List 2 11 Adding a Destination on One Touch Ke...

Page 28: ...art speed and ECM can be registered for each destination 1 Display the screen 1 Press the FAX key 2 Press the Address Book key 2 Adds a new destination 1 Press Menu 2 Press the or key to select Add Ad...

Page 29: ...umber of the receiving system using the numeric keys Up to 32 digits can be entered as the fax number of the receiving system Pressing the Address Recall Pause key adds about three seconds of waiting...

Page 30: ...t have ECM mode check for errors as they communicate preventing distortion of the image due to noise on the line and other conditions 9 Press the OK key 10Press the OK key 7 Enter the address number 1...

Page 31: ...Destinations Registering Destinations in the Address Book 4 Press the OK key 8 Register the destination 1 Press the OK key Completed is displayed and the destination is registered Detail 3 3 053 Edit...

Page 32: ...st 1 Display the screen 1 Press the FAX key 2 Press the Address Book key 2 Adds a new destination 1 Press Menu 2 Press the or key to select Add Address 3 Press the OK key 3 Select the registration met...

Page 33: ...e 11 2 4 Press the OK key 5 Select the members destinations 1 Press the or key to select Group Member 2 Press Edit 3 Press Menu 4 Press the or key to select Add Member 5 Press the OK key 6 Press the o...

Page 34: ...selected member is deleted from Group Member 7 Confirm the registered member 1 Press the Back key when all members are registered 8 Enter the address number 1 Press the or key to select Address Numbe...

Page 35: ...lete the destinations contacts you added to the Address Book 1 Display the screen 1 Press the FAX key 2 Press the Address Book key 3 Press Menu 4 Press the or key to select Edit Addressbook 5 Press th...

Page 36: ...r key to select the group to edit 2 Press the OK key 3 Press the or key to select Group Member 4 Press Edit 5 Press the or key to select the member you want to delete 6 Press Menu 7 Press the or key t...

Page 37: ...n screen Printing Address List You can print the list of destinations registered in the Address Book 1 Display the screen 1 Press the Status System Menu Counter key 2 Press the or key to select Edit D...

Page 38: ...s selected the Address Book appears Go to the next step When the registered One Touch Key number is selected the Key Edit screen appears Select another key number or edit or delete the One Touch Key R...

Page 39: ...electing the destination from the Address Book Refer to Adding a Destination on page 2 12 for registration of the One Touch Key 2 Edit or delete the destination When checking the registered destinatio...

Page 40: ...keys 3 9 Choosing from the Address Book 3 10 Choosing by One Touch Key 3 12 Fax transmission functions 3 13 Density 3 14 Original Image 3 14 2 sided Original 3 14 Manual Send 3 15 Original Size 3 16 F...

Page 41: ...details refer to FAX Direct Transmission on page 3 17 4 Specifying destination Enter the fax number of the receiving system using the numeric keys For the procedure for selecting a destination in the...

Page 42: ...inals are placed in the document processor After originals placed in the document processor are scanned and stored in the memory the receiving system is dialed When originals are placed on the glass s...

Page 43: ...Information of the destination is displayed 5 Press the OK key when checking of the destination is complete 4 Change the FAX number 1 Press the or key to select the destination that you want to change...

Page 44: ...3 Press the or key to select Delete 4 Press the OK key 5 Press Yes in confirmation screen Completed is displayed and the destination is removed 7 Exit the operation 1 Press Exit NOTE When deleting cha...

Page 45: ...Status 4 Press the OK key Display the send job status screen 3 Check the details of the transmission job 1 Press the or key to select the job you want to check 2 Press Menu 3 Press the or key to selec...

Page 46: ...originals remain in the document processor take them out from the original eject table Cancelling Memory Transmission during communication 1 Press the Stop key 2 Display the send job list screen 1 Pre...

Page 47: ...the same receiving system press the Address Recall Pause key and you can call the receiving system you dialed on the destination list 1 Press the FAX key 2 Press the Address Recall Pause key The previ...

Page 48: ...le when dialing the receiving system on an external line you can use this method to insert a pause before resuming dialing after you dial a specific number 3 Press the OK key Changing the Settings of...

Page 49: ...s Fax machines that have ECM mode check for errors as they communicate preventing distortion of the image due to noise on the line and other conditions 9 Press the OK key 10Press the OK key Choosing f...

Page 50: ...aracter Entry Method on page 11 2 5 Press the OK key The searched destination is displayed 4 Press the OK key To send to multiple destinations repeat steps 2 to 4 You can send to as many as 100 destin...

Page 51: ...FAX key 2 Press the One touch key where the destination is registered When selecting One Touch Key numbers 17 to 32 the One touch Key needs to be pressed after switching on the Shift Lock indicator b...

Page 52: ...to send originals by pressing the Start key after confirming that the telephone line has connected to the receiving system page 3 15 Key Function Description Reference page Original Size Specify the o...

Page 53: ...s Photo Best for photos taken with a camera Text Sharply renders pencil text and fine lines NOTE The optional document processor is required Item Description 1 sided Set when using a 1 sided sheet ori...

Page 54: ...he On hook key 4 Dial the destination Use the numeric keys to enter the number of the receiving system 5 Press the Start key When you hear the fax tone the telephone line has connected to the receivin...

Page 55: ...Ledger Letter R Letter Legal Statement R Statement 11 15 Oficio II 8K 16K R 16K Hagaki Oufukuhagaki Custom 1 1 For instructions on how to specify the custom original size refer to the machine s Opera...

Page 56: ...r the communication has started originals are scanned Off Starts memory transmission After originals are scanned into memory the communication starts NOTE In direct transmission you can designate only...

Page 57: ...1 Press the or key to select the job to cancel 2 Press Cancel 3 Press Yes in confirmation screen The selected job is deleted FAX TX Report You can check whether FAX was transmitted properly by printi...

Page 58: ...ion functions page 3 13 2 Register the program 1 Press the Program key 2 Press the or key to select a program number 01 to 10 to register 3 Press Menu 4 Press the or key to select Add 5 Press the OK k...

Page 59: ...s and press the Start key Transmission starts Overwriting Program Programs can be changed with the same procedures as those for registering programs When selecting the program number to be registered...

Page 60: ...nter a program name using the numeric keys For details on character entry refer to Character Entry Method on page 11 2 4 Press the OK key 5 Press Yes in the confirmation screen The program is register...

Page 61: ...3 22 Sending Faxes Program 2 Delete the program 1 Press the or key to select Delete 2 Press the OK key 3 Press Yes in the confirmation screen...

Page 62: ...Enter the fax number to be added to the chain number When entering the FAX number using the numeric keys continue entering the FAX number When entering the FAX number from Address Book select the FAX...

Page 63: ...3 24 Sending Faxes Using Chain Dial 5 Press the OK key To select the next fax number repeat steps from step 2 6 Press the Start key The transmission will start Chain Detail 2120123456...

Page 64: ...s FAX Automatic Reception 4 2 Reception Method 4 2 Flow of reception 4 3 Manual Reception 4 4 Using the Telephone to Receive 4 4 Fax reception functions 4 6 Fax reception settings 4 6 Duplex Print Out...

Page 65: ...ption methods Auto Normal Auto FAX TEL Refer to 7 2 Auto TAD Refer to 7 4 Manual Refer to 4 4 Checking and Changing the Reception Method 1 Display the screen 1 Press the Status System Menu Counter key...

Page 66: ...guideline about 250 or more A4 size pages at normal resolution can be stored During memory reception FAX Reception Printing Jobs are displayed on Printing Jobs of the Status screen To print the recei...

Page 67: ...o the fax of the sending system When you hear the fax tone The sending system is on fax 1 Press the FAX key 2 Press the On hook key 3 Press ManualRX Reception will start NOTE To use Manual Reception y...

Page 68: ...o the telephone of the sending system When the conversation is over follow steps 1 to 3 above After the sending system has started transmission the machine starts receiving originals 4 When reception...

Page 69: ...tings on page 9 2 Setting the cassette for the print output of received faxes By specifying the media type faxes can be received on the corresponding cassette What do you want to do Reference Page Pri...

Page 70: ...y 5 Press the or key to select Metric or Inch 6 Press the OK key 7 Press the Back key 3 Selecting the paper type 1 Press the or key to select Cassette 1 to 4 Type 2 Press the OK key 3 Press the or key...

Page 71: ...4 8 Receiving Faxes Fax reception settings...

Page 72: ...5 Using Convenient Fax Functions This chapter explains the following topics Forward Settings 5 2 Setting Forwarding 5 2 Registering Forwarding Destination 5 3 Forwarding Time Setting 5 7 Print Setting...

Page 73: ...atus System Menu Counter key 2 Press the or key to select FAX 3 Press the OK key 4 Press the or key to select Reception 5 Press the OK key 6 Press the or key to select Forward Settings 7 Press the OK...

Page 74: ...t Reception 5 Press the OK key 6 Press the or key to select Forward Settings 7 Press the OK key 8 Press the or key to select Forward Dest 9 Press the OK key 2 Registering Forwarding Destination Select...

Page 75: ...E When selecting the destination press Menu and then or key select Search Name and then press the OK key The Search screen is displayed When checking details of the destination press the or key to sel...

Page 76: ...or key to select Forward Settings 7 Press the OK key 8 Press the or key to select Forward Dest 9 Press the OK key 2 Changing Forwarding Destination When the fax number of the destination was entered...

Page 77: ...OK key 5 Press the or key to select Detail Edit 6 Press the OK key 7 Press the or key to check details of the destination 8 Press the OK key To delete the forwarding destination 9 Press the or key to...

Page 78: ...en which forwarding is enabled 1 Display the screen 1 Press the Status System Menu Counter key 2 Press the or key to select FAX 3 Press the OK key 4 Press the or key to select Reception 5 Press the OK...

Page 79: ...t time Press the and key to move the cursor right and left 2 Press the OK key 3 Press the or key to set the hours and minutes of the end time Press the and key to move the cursor right and left 4 Pres...

Page 80: ...6 Press the or key to select Forward Settings 7 Press the OK key 8 Press the or key to select Print 9 Press the OK key 2 Configure the function 1 Press the or key to select On print or Off do not prin...

Page 81: ...the following topics Flow of Sending Faxes from PC 6 2 Setup 6 3 Connection to a PC 6 3 Installing the FAX Driver 6 3 Uninstalling the FAX Driver 6 5 Basic Transmission 6 6 Configuring the Driver Def...

Page 82: ...Address Book in the machine PC can be used to specify a desired destination Addition of a cover page Operation is as simple as printing Flow of Sending Faxes from PC Sending faxes from PC is performed...

Page 83: ...oduct Library disc 2 Display the screen Click View License Agreement and read the License Agreement Click Accept NOTE Plug and Play is disabled on this device when in Sleep Wake the device from Sleep...

Page 84: ...age appears restart the computer by following the screen prompts This completes the FAX driver installation procedure NOTE The machine cannot be detected unless it is on If the computer fails to detec...

Page 85: ...a check in the check box of the driver to be deleted and click Uninstall 3 Finish uninstalling If a system restart message appears restart the computer by following the screen prompts This completes t...

Page 86: ...ar 2 Select settings in the Print dialog box 1 Select the product name of the machine to be used in the printer name list 2 Set the print range and other settings 3 Click Properties to open the Proper...

Page 87: ...settings on the Cover Page tab 6 Set the destination 1 Use the keyboard to enter the destination fax number in the Address Setting tab 2 Click Add to Destination List The destination information will...

Page 88: ...ault Settings Use the FAX Setting tab of the print settings screen to set the original size and other transmission conditions 1 Display the screen 1 From the start button click Control Panel Hardware...

Page 89: ...ferences window 2 Configure the settings 1 Sender Information Tab Enter your own information into fields explained below to send a cover page with your faxes Item Description Page Size Select the size...

Page 90: ...s can be entered Entry is allowed for the characters 0 to 9 and spaces Sender Information List Sender Information can be selected from the Sender Information List The selected item is highlighted Add...

Page 91: ...her Use Specific Account ID or Prompt for Account ID as desired Use Specific Account ID Enter the Account ID Transmission will be performed using the entered Account ID Prompt for Account ID A screen...

Page 92: ...s 00 00 23 59 IMPORTANT If the time that is shown in the message display of this fax machine does not match the current time communications that use the timer may not be accomplished as expected If th...

Page 93: ...a Connected Telephone This chapter explains the following topics FAX TEL Auto Switch Reception 7 2 FAX Answering Machine Auto Switch Reception 7 4 Manual Send 7 6 Manual Reception 7 7 Remote Switch F...

Page 94: ...made a ringing tone for the preset number of times the other party is required to pay phone line charges even if the receiving system does not respond FAX Telephone When the other party has sent origi...

Page 95: ...Answer the call When the call is from a telephone 1 The machine makes a ringing tone urging the user to respond Lift the handset of the telephone within 30 seconds 2 Talk to the other party When the c...

Page 96: ...omes into operation and the machine switches to fax reception NOTE In order to use FAX Answering Machine Auto Switch Reception it is necessary to connect an answering machine equipped telephone set co...

Page 97: ...nt The answering machine plays a response message and starts recording the other party s message When the call is from a fax The machine starts receiving fax originals NOTE If you lift the handset whi...

Page 98: ...e handset and dial the number of the receiving system 3 Check if the telephone line has connected to the fax of the receiving system If the destination is a fax machine you will hear a long high beep...

Page 99: ...handset of the telephone 3 Check if the telephone line has connected to the fax of the sending system If the destination is a fax machine you will hear soft beep sounds If a person answers you can tal...

Page 100: ...eplace the handset When reception starts return the handset to its original position NOTE When using a telephone set that can send tone signals use the telephone to start the reception of originals wi...

Page 101: ...you hear the fax tone from the handset enter the two digit remote switch dial number using the dial button on the telephone set The telephone line switches to the machine and reception starts NOTE In...

Page 102: ...ous Reports for FAX 8 2 Checking FAX Job History 8 3 Send Job Log and Print Job Log 8 3 Outgoing FAX Log and Incoming FAX Log 8 4 Printing Administrative Reports 8 5 FAX TX Result Reports 8 5 FAX RX R...

Page 103: ...FAX Log Incoming FAX Log History of latest 50 send and receipt results stored FAX jobs only Any time 8 4 Send result report Receipt result report Report printing FAX TX Result FAX RX Result Latest se...

Page 104: ...or key to select Status 3 Press the OK key 4 Press the or key to select Print Job Log to check reception results or Send Job Log to check transmission results 5 Press the OK key 6 Press the or key to...

Page 105: ...4 Press the or key to select FAX 5 Press the OK key 6 Check the status of communication 7 Press Log 8 Press the or key to select Outgoing FAX Log to check transmission results or Incoming FAX Log to...

Page 106: ...1 Display the screen 1 Press the Status System Menu Counter key 2 Press the or key to select Report 3 Press the OK key 4 Press the or key to select Result Rpt Set 5 Press the OK key 6 Press the or key...

Page 107: ...eived successfully 1 Display the screen 1 Press the Status System Menu Counter key 2 Press the or key to select Report 3 Press the OK key 4 Press the or key to select Result Rpt Set 5 Press the OK key...

Page 108: ...or received Printing Activity Reports The latest 50 sent or received fax data are printed as a report 1 Display the screen 1 Press the Status System Menu Counter key 2 Press the or key to select Statu...

Page 109: ...ved 1 Display the screen 1 Press the Status System Menu Counter key 2 Press the or key to select Report 3 Press the OK key 4 Press the or key to select Admin Rpt Set 5 Press the OK key 6 Press the or...

Page 110: ...ber Local FAX Name fax line setting etc You can print it out as necessary 1 Display the screen 1 Press the Status System Menu Counter key 2 Press the or key to select Report 3 Press the OK key 4 Press...

Page 111: ...mission Restriction 9 8 Registering Permit FAX No 9 9 Changing and Deleting Permit FAX No 9 9 Registering Reject FAX No 9 10 Changing and Deleting Reject FAX No 9 11 Setting Send Restriction 9 12 Sett...

Page 112: ...name and login password are set as shown below NOTE For settings other than fax settings refer to the Operation Guide for the machine Item Description Reference Page Report Print reports to check the...

Page 113: ...automatically after every 50 faxes received Value Off On Refer to Activity Report on page 8 7 Result Rpt Set FAX TX Result Each time you send a fax you can print a report to confirm whether the fax w...

Page 114: ...achine transmit terminal to be printed out on the fax on the receiving system The information includes transmission date and time the number of transmission pages and the fax number Value Off On Refer...

Page 115: ...x Value All Media Type Plain Rough Vellum Recycled Bond Color Thick High Quality Custom 1 8 Refer to Media Type for Print Output on page 4 6 Rings Normal If the reception method is fax automatic recep...

Page 116: ...they can be printed out on both sides of paper having the same width as the data Value On Off NOTE The optional duplex unit is required For details refer to Duplex Print Output on page 4 6 Unknown Num...

Page 117: ...e of the following functions to each key Value None Original Size FAX Resolution File Name Entry FAX Delayed TX FAX Direct TX FAX TX Report NOTE FAX TX Report is displayed when FAX TX Result is set to...

Page 118: ...er Permitted FAX numbers 1 Refer to Registering Permit FAX No on page 9 9 Send restriction settings are specified in Permit Addr Book in Send Restrictions Refer to Setting Send Restriction on page 9 1...

Page 119: ...or key to select Add FAX Number 3 Press the OK key 4 Use the numeric keys to enter a Permit FAX number 5 Press the OK key 3 To register another permit fax number repeat step 2 Changing and Deleting P...

Page 120: ...K key 3 Use the numeric keys to reenter the Permit FAX number 4 Press the OK key Deleting 1 Press the or key to select the Permit FAX No to be deleted 2 Press Menu 3 Press the or key to select Delete...

Page 121: ...nter a Reject FAX number 5 Press the OK key 3 To register another Reject FAX No repeat step 2 Changing and Deleting Reject FAX No 1 Display the screen 1 Press the Status System Menu Counter key 2 Pres...

Page 122: ...the Address Book To change the sending restriction follow the steps below 1 Display the screen 1 Press the Status System Menu Counter key 2 Press the or key to select FAX 3 Press the OK key 4 Press t...

Page 123: ...y 2 Press the or key to select FAX 3 Press the OK key 4 Press the or key to select TX RX Restrict 5 Press the OK key 6 Press the or key to select RX Restriction 7 Press the OK key 2 Configure the func...

Page 124: ...Press the or key to select Unknown Number RX 7 Press the OK key 2 Configure the function 1 Press the or key to select Reject or Permit 2 Press the OK key To receive faxes from the unknown number sele...

Page 125: ...ess the or key to set the hours and minutes of the end time Press the and key to move the cursor right and left IMPORTANT When Unusable Time is set in addition to fax printing all other printing opera...

Page 126: ...1 Use the numeric keys to enter Unlock Code 0000 to 9999 2 Press the OK key NOTE If the same time is set as the start time and end time you cannot use all day NOTE To use the machine temporarily duri...

Page 127: ...dialed from this machine to the receiving system Sending Faxes from PC Normally the Local FAX Name is printed in the transmit terminal identification TTI However when job accounting has been enabled...

Page 128: ...ns enter the account ID 2 Log in 1 Press the OK key NOTE If you entered a wrong character press the Clear key and enter the account ID again If the entered account ID does not match the registered ID...

Page 129: ...pter explains the following topics Indicators During Sending Receiving Operation 10 2 Responding to an Attention Indicator Flashes 10 2 Precautions When Turning Power OFF 10 3 Messages 10 4 Error Code...

Page 130: ...message display If error information is not indicated on the message display check the following Symptom Checkpoints Corrective Actions Reference Page Cannot send fax Is the modular cord connected cor...

Page 131: ...a fax when the main power switch is turned off Make sure that the Processing indicator and the Memory indicator are off before turning off the main power switch NOTE When the Processing indicator or M...

Page 132: ...ount exceeded the acceptable count restricted by Job Accounting Cannot print any more This job is canceled Press the OK key Refer to the machine s Operation Guide Load paper in cassette 1 Press OK to...

Page 133: ...d again If you still have trouble reduce TX Start Speed and send again NOTE If the communication error occurs frequently change the default setting of TX Start Speed in System Menu U00900 U00910 Page...

Page 134: ...tart Speed in System Menu U01821 Communication error occurred during reception of high speed transmission Designated transmission speed may not be available for this machine Ask the sender to reduce t...

Page 135: ...ignals using buttons Refer to the operation manual of your phone set Is the remote switching number correct Check the registration Default 55 7 9 No print output after reception Is memory forwarding a...

Page 136: ...This chapter explains the following topics Character Entry Method 11 2 Specifications 11 6 Menu Map 11 8 Received FAX Sizes and Paper Priority Metric Model 11 11 Received FAX Sizes and Paper Priority...

Page 137: ...to enter characters and symbols 4 Arrow keys Press to select the entry position or select a character from the character list 5 OK key Press to finalize entry and return to the screen before the entr...

Page 138: ...key changes the character in the order from left to right _ 1 Repeats from the first character on the left 1 During number entry a b c A B C 2 Repeats from the first character on the left 2 During num...

Page 139: ...ts from the first character on the left 9 During number entry _ space 0 Repeats from the first character on the left 0 During number entry Press to change the character in the cursor position between...

Page 140: ...he key Displays the symbol list 5 Press the or key to move the cursor and select 6 Press the OK key is entered 7 Press the 3 key four times D is entered 8 Press the key Account Name Text ABC R Account...

Page 141: ...Error Correction ECM Original Size Max width 297 11 mm Max length 432 17 mm Automatic Document Feed Max 50 sheets with document processor Resolution Scan Horizontal Vertical 200 100 dpi Normal 8 dot m...

Page 142: ...A3 B4 A4 A5 Folio B5 JIS FAX Delayed Transmit Based on settings in the FAX Driver setting is possible to any 1 minute increment within the subsequent 24 hour period Transmit and Print Fax transmissio...

Page 143: ...age 3 19 Address Book page 3 10 Redial page 3 8 Checking and Editing Destinations page 3 4 Manual Send page 3 15 Manual Reception page 4 4 One Touch Key page 3 12 Original Size page 3 16 FAX Resolutio...

Page 144: ...ide Status Page page 8 9 Network Status refer to the machine s Operation Guide Service Status refer to the machine s Operation Guide Admin Rpt Set page 8 7 Outgoing FAX Rpt page 8 7 Incoming FAX Rpt p...

Page 145: ...ion page 9 5 FAX Media Type page 9 5 Rings Normal page 9 5 Rings TAD page 9 5 Rings FAX TEL page 9 5 Forword Settings page 5 2 RX Setting page 9 5 RX Date Time page 9 5 Remote SW Dial page 9 5 Duplex...

Page 146: ...ived Folio size document is reduced to match A4 size paper A3 A4 A3 A3 A3 A4 3 Folio B4 Folio Folio A4 B5 A4 R B4 B4 B4 A4 R 4 A4 A4 A3 A3 A3 B5 R Folio B4 B4 B5 Folio 5 B5 A4 R B4 B4 B4 A4 3 3 If the...

Page 147: ...al Ledger 2 Letter R Letter Letter R Letter R 2 2 Received Legal size document is reduced to match Letter size paper Letter Ledger Ledger Letter 3 Legal Legal Legal Letter Letter R Letter R Ledger Let...

Page 148: ...rm Subject to Job Accounting 9 17 Contents 9 17 Limit 9 17 Login 9 18 L Local FAX Name 9 4 Local FAX Number 9 4 M Machine Names 1 2 Manual Reception 4 4 7 7 Manual Send 3 15 7 6 Media Type for Print O...

Page 149: ...Establishing Requirements 9 8 Permit FAX No 9 9 Prerequisites 9 8 Reception Rejection Requirements 9 8 Reception Restriction Setting 9 13 Reject FAX No 9 10 Send Restriction Setting 9 12 Unknown Numb...

Page 150: ...Index 3...

Page 151: ......

Page 152: ...KYOCERA Document Solutions Inc 2 28 1 Chome Tamatsukuri Chuo Ku Osaka 540 8585 Japan www kyoceradocumentsolutions com 3PAKDEN000 First edition 2014 01 Rev 1 2013 09...

Reviews: