background image

User Guide

11

Phone Overview

Get to Know Your Phone

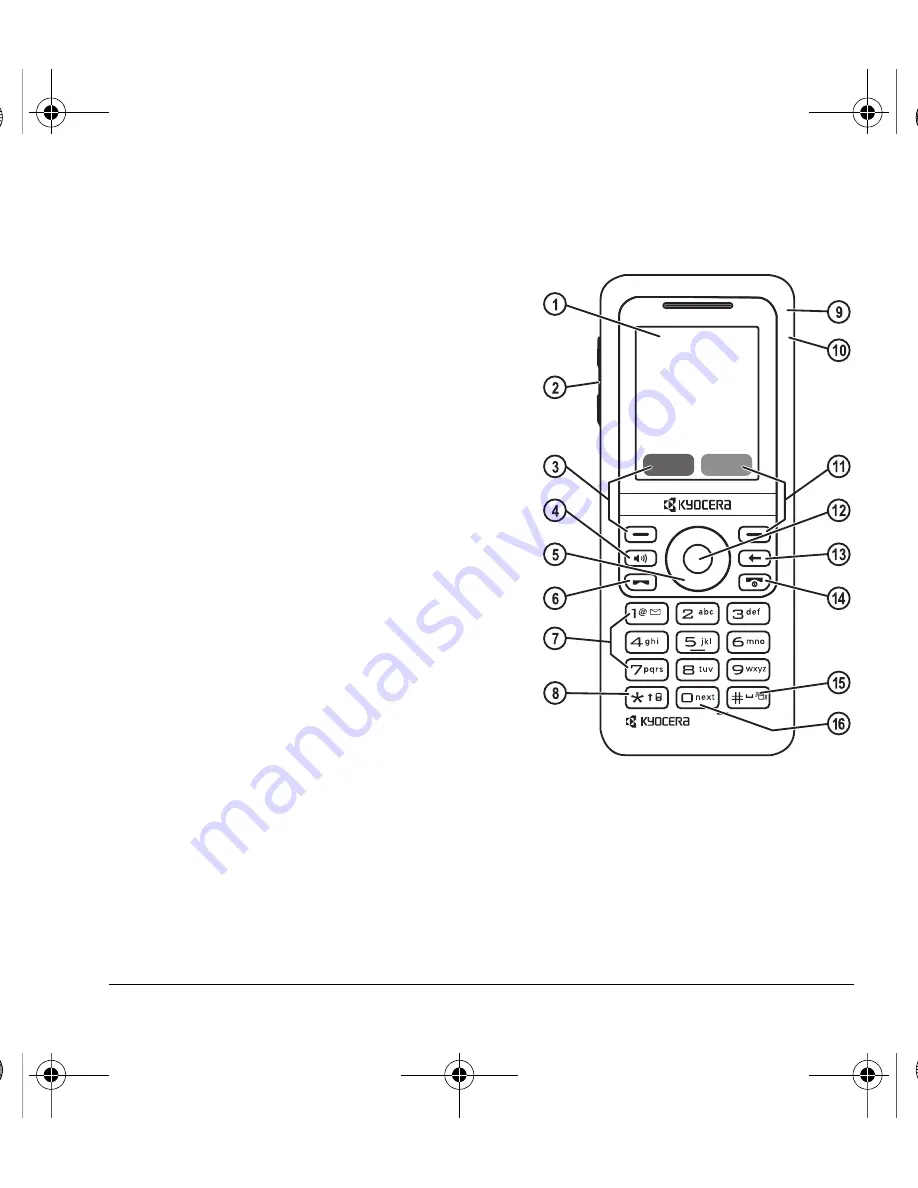
The phone is shown here in the open position.
1.

Home screen.

2.

Volume

 key raises or lowers ringer volume.

3.

Left

 softkey selects items that appear on the lower left of 

the display. At the home screen, you can select 

Menu

.

4.

Speakerphone

 key activates the speakerphone and 

answers incoming calls.

5.

Navigation

 key scrolls through lists and text entry fields 

and accesses the following shortcuts from the home screen.
– Scroll left to launch 

Browser

.

– Scroll right to go to 

Tools & Games > Voice Memo

.

– Scroll up to create a custom menu shortcut.
– Scroll down to go to 

Recent Calls > All

.

6.

Send

 key starts or answers a call. Press once to display the 

All Calls list, and two times to redial the last number dialed.

7.

Keypad for entering numbers, letters, or symbols.

8.

* Shift

 key changes the text mode in text entry. Press and 

hold to activate Keyguard.

9.

Jack for a hands-free headset (sold separately).

10. Jack for AC adapter (included) and microUSB cable 

(sold separately).

11.

Right

 softkey selects items that appear on the lower right of 

the display. At the home screen, you can select 

Contacts

.

12.

OK

 key selects a menu item or option. At the home screen, you go to the main menu when you press the 

OK

 key. 

13.

Back

 key erases characters in text entry and returns you to the previous screen when navigating through menus.

14.

End

 key turns the phone on and off, ends a call or browser session, and returns you to the home screen.

15.

# Space

 key enters a space during text entry. Press and hold to activate or deactivate Silent mode.

16.

0 Next

 key cycles through word choices during text entry.

Warning: 

Inserting an accessory into the incorrect jack will damage the phone.

82-L2609-2EN.book  Page 11  Monday, July 13, 2009  2:48 PM

Summary of Contents for Melo S1300

Page 1: ...User Guide 1 Melo S1300 82 L2609 2EN book Page 1 Monday July 13 2009 2 48 PM ...

Page 2: ...k of Zi Corporation TransFlash is a trademark of SanDisk Corporation All other trademarks are the property of their respective owners Copyright 2009 Kyocera Wireless Corp All rights reserved Ringer Tones Copyright 2000 2009 Kyocera Wireless Corp 82 L2609 2EN Rev 001 IC Notice Operation is subject to the following two conditions 1 this device may not cause interference and 2 this device must accept...

Page 3: ...splay Grant section www fcc gov oet ea after searching on the FCC ID OVF K33BIC03 Additional information on SAR can be found on the Cellular Telecommunications and Internet Association CTIA web site at www ctia org In the United States and Canada the SAR limit for mobile phones used by the public is 1 6 watts kg W kg averaged over one gram of tissue The standard incorporates a substantial margin o...

Page 4: ...ts transfer or storage facilities for fuel or chemicals vehicles using liquefied petroleum gas such as propane or butane areas where the air contains chemicals or particles such as grain dust or metal powders any other area where you would normally be advised to turn off your vehicle engine Use with care Use only in normal position to ear Avoid dropping hitting bending or sitting on the phone Avoi...

Page 5: ...ts will vary depending on the user s hearing device and hearing loss If your hearing device happens to be vulnerable to interference you may not be able to use a rated phone successfully Trying out the phone with your hearing device is the best way to evaluate it for your personal needs M Ratings Phones rated M3 or M4 meet FCC requirements and are likely to generate less interference to hearing de...

Page 6: ...6 82 L2609 2EN book Page 6 Monday July 13 2009 2 48 PM ...

Page 7: ...acts 24 Customize Contacts 25 Erase Contacts 27 Contact Groups 27 Speed Dial List 29 Check Contacts 29 6 Media Gallery 30 Media Gallery Menu 30 Images 30 Sounds 31 Media File Options 31 Erase Media Files 32 7 Settings 33 Settings Menu 33 Create a Custom Menu 34 Convenience 34 Display 37 Sounds 38 Accessories 40 Network 41 Security 43 8 Messaging 44 Messaging Menu 44 Send Messages 45 Handle Receive...

Page 8: ...W Work 61 Download an Application 61 Access Help for BREW Apps 61 12 Phone Info 62 View Version Information 62 View Phone Icons 62 13 Get Help 63 Customer Support 63 Qualified Service 63 Phone Accessories 63 Become a Product Evaluator 64 Index 67 82 L2609 2EN book Page 8 Monday July 13 2009 2 48 PM ...

Page 9: ...g the notches into the openings on the top of the battery casing 5 Snap the cover into place Charge the Battery You must have at least a partial charge in the battery to make or receive calls To charge the battery 1 Connect the AC adapter to the microUSB jack on the side of the phone 2 Plug the adapter into a wall outlet The battery icon in the upper right corner of the screen tells you whether th...

Page 10: ...ins or jewelry to contact the battery s terminals Replace the battery only with another qualified battery Use of an unqualified battery may present a risk of fire explosion leakage or other hazard If you are unsure about whether a replacement battery is compatible contact customer support Promptly dispose of used batteries in accordance with local regulations and recycle if possible Do not dispose...

Page 11: ... numbers letters or symbols 8 Shift key changes the text mode in text entry Press and hold to activate Keyguard 9 Jack for a hands free headset sold separately 10 Jack for AC adapter included and microUSB cable sold separately 11 Right softkey selects items that appear on the lower right of the display At the home screen you can select Contacts 12 OK key selects a menu item or option At the home s...

Page 12: ...iving high speed data Data link is on but the data service is dormant The phone is roaming outside of its home service area New text message New voice message New voice and text message The phone is set to light up instead of ring The phone is set to vibrate or to vibrate and then ring The speakerphone is turned on Position location is set to your service provider and to emergency services Positio...

Page 13: ...s Convenience Display Sounds Accessories Network and Security Messaging Access these options New Text Msg Voicemail Inbox Browser Alerts Sent Msgs Outbox Saved Msgs Drafts Message Groups Msg Settings and Erase Msg Tools Games Access these options Brick Attack Voice Memo Scheduler Alarm Clock Tip Calculator Calculator Timer Stopwatch and World Clock Browser Browse the web BREW Apps Download an appl...

Page 14: ... to make a phone call tells you to physically press the Send key on your phone Scroll means to use the Navigation key to move though a list on the display For example Scroll through your contacts list to choose a contact means to physically press the Navigation key up or down to scroll through the list on the display greater than symbol tells you to select an option from a menu or list For example...

Page 15: ...There are several ways you can make a phone call Call Using a Number 1 Enter a phone number 2 Press the Send key Call Using a Contact 1 From View All highlight a contact 2 Press the Send key Redial a Number 1 Press the Send key to open your call history 2 Highlight a phone number or contact and press the Send key Note To redial the last number called received or missed press the Send key twice Ans...

Page 16: ...you must save a phone number as a contact and assign a speed dial location to it See Assign Speed Dials to Contacts on page 26 To call a contact that has a speed dial location 1 Enter the one or two digit speed dial location 2 Press the Send key Emergency Services Call Emergency Service You can call an emergency code even if your phone is locked or your account is restricted When you call your pho...

Page 17: ...The icon indicates you are in Numbers Only input mode Press and hold the Shift key to switch input modes Enter Letters with Number Keypad From the text entry field select Options Normal Alpha to enter letters You can enter text in the following ways To enter a letter press a key once for the first letter twice of the second letter and so on If your phone is set to Spanish accented letters are avai...

Page 18: ...he Shift key To enter a number press and hold a number key until the number appears on the screen The icon indicates you are in Rapid Entry input mode Press and hold the Shift input key to switch input modes Enter Symbols with Number Keypad While entering text in Normal Alpha mode you can enter symbols by pressing the 1 key until you see the symbol you want Using this method you have access to the...

Page 19: ...he Back key Erase all characters Press and hold the Back key Move the cursor right or left Scroll left or right Move the cursor up or down Scroll up or down Change input mode Press and hold the Shift key Change case mode Press the Shift key Capitalize any letter In Normal Alpha mode press the Shift key Choose uppercase Lowercase any letter In Normal Alpha mode press the Shift key Choose lowercase ...

Page 20: ...e number or select Options to access more features This list contains all calls received Level 1 Level 2 Level 3 Recent Calls All See a list of all voice calls Incoming See a list of all voice calls you have received Outgoing See a list of all voice calls you have made Missed See a list of voice calls you have missed Data See a list of all data calls Erase Call List Access these options All Incomi...

Page 21: ...s and press the OK key To return the call select Calls and press the Send key Call List Options Save Number from Call List 1 At the call list highlight a number 2 Select Options Save 3 Select Save New Contact to create a new contact or Add to Existing to add number to an existing contact View Contact from Call List 1 At a call list highlight a contact 2 Select Options View to see the contact detai...

Page 22: ...racks all roaming calls made and received since you last reset the timer To reset this timer to zero select Reset Yes Your phone can alert with a short beep ten seconds before each minute passes during a call For more information see Enable Minute Alert on page 36 View Incoming Calls Timer Select Incoming to view the number of calls and the total call time Select Done when finished This timer trac...

Page 23: ...tails 1 From View All select a contact 2 At the contact details screen select a number address or note 3 Select the detail you want to view For example to view a phone number select View Number Use Frequent List With Frequent List enabled you can view 15 of your most frequently called contacts See Enable Frequent List on page 36 Level 1 Level 2 Level 3 Contacts View All Access your existing contac...

Page 24: ...primary number for the contact 3 Enter additional phone numbers email addresses and other contact details Scroll up or down to move through the contact fields 4 When done select Save Add a Code or Extension When saving the phone number of an automated service you may include a pause for dialing an extension 1 From the home screen enter a phone number 2 Select Options and a type of pause Time Pause...

Page 25: ...to scroll to the number type dropdown and press the OK key 4 Select a number type The appropriate icon appears next to the number in your contacts list 5 Select Save Assign Ringers to Contacts 1 From View All select a contact 2 At the contact details screen select the contact name 3 Select Ringer Assign Ringer and a ringer from the list Scroll to play the ringers Assign Message Tones to Contacts 1...

Page 26: ...lect a contact 2 At the contact details screen select a number address or note 3 Select Secret Yes Change Primary Numbers When a contact has more than one number the first number becomes the primary number by default To change the contact s primary number 1 From View All select a contact 2 At the contact details screen select a number 3 Select Primary Number Yes Add Contacts to Groups 1 From View ...

Page 27: ...ted information Contact Groups You can assign your contacts to groups Your phone comes with default groups You can also create your own groups View Groups 1 Select Groups to view your preloaded groups followed by the custom groups you have created 2 Highlight a group and do one of the following Press the OK key to view the group details Select New to create a new group Select Options to access mor...

Page 28: ...ll to play the ringers Assign Pictures to Groups 1 From Groups select a group you have created 2 At the group details screen scroll to the group name 3 Select Options Picture Assign Picture to assign a picture Create a Message Group You can create a group specifically for messaging based on a contact group 1 From Groups highlight a group 2 Select Options Create Msg Group 3 Modify the name for the ...

Page 29: ...ct Assign 3 At the contacts list select a contact 4 At the contact details screen select a phone number Clear Speed Dial Numbers 1 From Speed Dial List highlight an assigned number 2 Select Erase Yes Check Contacts Select Contacts Count to check how many contacts you have stored 82 L2609 2EN book Page 29 Monday July 13 2009 2 48 PM ...

Page 30: ...fault Wallpaper 1 From Wallpapers select a wallpaper 2 Select Set Default Done Change the Default Screensaver 1 From Screensavers select a screensaver 2 Select Set Default Done Assign a Caller ID 1 From Caller IDs select an image 2 Select Assign 3 At the contacts list select a contact Level 1 Level 2 Level 3 Media Gallery Images Access these options Saved Images Wallpapers Screensavers and Caller ...

Page 31: ...new name and select Save You can only rename unlocked files Preloaded files on your phone are always locked Assign a File 1 From a media file list highlight a file 2 Select Options Assign and choose how to assign the file 3 Complete the appropriate task Lock a File 1 From a media file list highlight a file 2 Select Options Lock to protect a file from being accidently erased To unlock the file sele...

Page 32: ...From Delete All select Images Only Yes to erase all files in the Images folder Note You can only erase unlocked files Preloaded files on your phone are always locked Erase All Sound Files From Delete All select Sounds Only Yes to erase all files in the Sounds folder Note You can only erase unlocked files Preloaded files on your phone are always locked Erase All Media Files From Delete All select D...

Page 33: ...allpaper Set Screensaver Themes Main Menu View My Banner Backlighting Brightness Contrast Time Date Format and Language Sounds Access these options Ringers Ringer Mode Volume Pwr On Off and Keypad Accessories Access these options Headset Sounds Auto Answer TTY Device Com Port Speed and Hearing Aid Network Access these options Data Calls Privacy Alert Voice Privacy Roam Svc Alert Roam Option Set Ph...

Page 34: ...e OK key to save the date 3 Do the following to change the time Scroll left or right to move between the hour minute and AM PM fields Scroll up or down to change the hour minute and AM PM 4 Press the OK key to save the time 5 Select Done Enable Airplane Mode While in an airplane it is normally required that you turn off your mobile phone because it emits RF signals that interfere with air traffic ...

Page 35: ...Hyphen select Enabled to turn on auto hyphenation Use 1 Touch Dialing The 1 Touch Dialing feature is the fastest way to call a speed dial location To call a contact with speed dial press and hold the speed dialing location If it is a two digit location press the first digit briefly then press and hold the second digit Note To use 1 Touch dialing you must enable 1 Touch dialing on your phone and ha...

Page 36: ...e home screen press the keys corresponding to the letters of the name you want to find A matching contact or speed dial entry appears 3 Scroll to your desired contact and press the Send key to call the number Enable Frequent List From Frequent List select Enabled With Frequent List enabled the last 15 of your most frequently called contacts appear at the beginning of your contacts list Scroll past...

Page 37: ... Theme From Themes select a color theme for the display background Set Main Menu View From Main Menu View select one of the following Grid displays icons of each menu item with its name at the top of the screen List displays a list of all menu items The next time you view the Menu your selected menu style appears Set Greeting Banner The banner is the personal label for your phone appearing on the ...

Page 38: ... brightness level 2 Select Save Set Contrast 1 From Contrast scroll to change the contrast level 2 Select Save Set Time and Date Format From Time Date Format select a time and date format Set Language From Language select a language Sounds Your phone has several settings that control the sound You can select from a variety of ringers and adjust the volume Ringers From Ringers you can modify the fo...

Page 39: ...ress and hold the Space key to toggle between Vibrate Only mode and Normal Sounds mode Note The phone rings when attached to an external power source such as a charger even if all sounds have been silenced Volume From Volume you can modify the following settings Set Ringer Volume 1 From Ringer Volume scroll right or left to set the ringer volume 2 Press the OK key to save Set Speakerphone Volume 1...

Page 40: ... a teletype TTY device for the hearing impaired TTY device sold separately Note Enable TTY only when using the phone with a TTY device 1 Connect the TTY device to your phone 2 From TTY Device select OK to clear the notification 3 Select one of the following TTY Off disables TTY TTY On enables TTY devices TTY On Talk enables TTY devices and voice carry over TTY On Hear enables TTY devices and heari...

Page 41: ...Voice Privacy From Voice Privacy select Enhanced to use enhanced digital CDMA privacy Enable Roaming Service Alert Use this setting if you want the phone to alert you when you roam outside of your home service area From Roam Svc Alert select one of the following Disabled turns roaming service alert off When no svc alerts you with three tones decreasing in pitch when service is lost and three tones...

Page 42: ...gital mode You do have the option of turning off the locator to emergency services From Location select one of the following 911 Only default shares your position information only with emergency services when you call your 3 digit emergency code Location On shares your position information in addition to emergency services Set Web Alerts You can set an alert to confirm the start or exit of the bro...

Page 43: ...1 From the home screen select Unlock 2 Enter your four digit lock code Set Limit Calls You can limit the calls that can be made from your phone to emergency numbers your contacts and your service provider s numbers 1 From Security enter your four digit lock code 2 Select Limit Calls and one of the following No Limit does not limit calls Limit Outgoing limits outgoing calls while incoming calls sti...

Page 44: ...Alerts Shows how many alerts are waiting Sent Msgs Shows a list of messages you have successfully sent Outbox Shows a list of messages you have sent but are pending or failed Saved Msgs Shows a list of messages you have saved Drafts Shows a list of messages that have been started but saved to be completed at a later time Message Groups See a list of your message groups Msg Settings Access these op...

Page 45: ...e to Drafts Enter Message Recipients The following describes how to add recipients to your messages depending on the services provided Check with your service provider for availability Add Recipients from Contacts 1 At the compose message screen select Options Contacts when entering a phone number or email address 2 Select a contact from the contacts list 3 Select a number or address 4 Complete yo...

Page 46: ...Select Edit or Options Edit Complete your message Use Preset Text Add Preset Text 1 At the compose message screen select Options Insert QuickText when entering the text 2 Select a preset text entry 3 Complete your message Save Messages as Preset Text 1 At the compose message screen select Options Save QuickText when entering the text to use it later as preset text 2 Complete your message Save Rece...

Page 47: ... 5 Press the OK key to change the date Scroll left or right to move between the month day and year Scroll up or down to change the month day and year 6 Select Done 7 Complete your message Your phone saves the message and sends it later Set the Validity Period 1 When entering a message select Options Msg Settings Validity Period 2 Select Set Time to set how long to keep your message valid before re...

Page 48: ...n viewing a received message select Options Reply with Copy The original message appears in your reply message 2 Complete your message and select Send Save Received Messages When viewing a received message select Options Save Message to save it to Saved Msgs View Sender Information When viewing a received message select Options Sender to view an existing contact add to an existing contact or creat...

Page 49: ...n remains on top of the screen until you listen to the message When only the voicemail message icon appears on top of the screen select Voicemail and follow the system prompts to retrieve the message Handle Sent Messages Check Message Status in Sent Folder Use the following symbols to check the Sent folder for the status of messages successfully sent Check Message Status in Outbox Use the followin...

Page 50: ...l phones Check with your service provider Handle Browser Alerts 1 From Browser Alerts select an alert 2 Select Connect to launch the browser Message Settings The following message settings affect all messages unless you change them for individual messages Set Message List View From Msg List View select one of the following to set your message list display Msg Preview displays the first part of mes...

Page 51: ... Note You can also save messages you have written or received as preset messages Set Callback Number 1 From Callback Number enter a new number to change your default callback number 2 Select OK to save the number Enable Save to Sent From Save to Sent select Enabled to automatically save outgoing messages to the Sent Msgs folder Enable Auto Erase Use Auto Erase to set your phone to erase messages a...

Page 52: ...wing Press the OK key to view the groups details Select New to create a new group Select Options to access more functions Create a New Message Group 1 From Message Groups select New 2 Enter a name for the group and select Next 3 Select contacts from the list provided A check mark appears next to each selection You can also remove checkmarks 4 When finished select Done Your new group appears the ne...

Page 53: ... you send or read them erase them one at a time or erase them all at once Erase a Single Message When viewing a received message select Options Erase Yes Note You can erase a scheduled message but cannot cancel its delivery Erase Messages from a Folder From Erase Msg select a folder to erase messages from For example to erase received messages select Inbox Yes Note You cannot recover deleted infor...

Page 54: ...s Play Voice Memos 1 From Recorded Memos highlight a memo 2 Select Play to play the memo or Options to access more features Level 1 Level 2 Level 3 Tools Games Brick Attack Play Brick Attack Voice Memo Access these options Record New and Recorded Memos Scheduler Access these options Add New Event View Month View Day Go to Date View All Events and Settings Alarm Clock Set an alarm Tip Calculator Ca...

Page 55: ...n if needed Scroll left or right to move between hour and minute fields Scroll up or down to change hour and minute Press the OK key to save and move to the next field 6 Press the OK key to select a priority from the list 7 Press the OK key to select a reminder from the list 8 Press the OK key to select a reminder sound from the list 9 Press the OK key to select During Event to enable silent mode ...

Page 56: ... Options Sort by Time to sort events by time Sort Events by Type From View All Events select Options Sort by Type to sort events by their assigned type Sort Events by Priority From View All Events select Options Sort by Priority to sort events by their assigned priority Modify Events Edit an Event 1 From View Day select an event 2 At the event details screen select Options Edit 3 Modify the event ...

Page 57: ...d end times Scroll left or right to move between hour minute and AM PM fields Scroll up or down to change hour minute and AM PM 2 Select Save when done Erase Events Automatically From Auto Erase select an option from the list to set when to automatically erase your past events Set Event Priority From Priority select an option to set every event you create with this priority type Set Event Reminder...

Page 58: ...ck Alarm 1 From Alarm Clock scroll to the quick alarm and select Set 2 Choose a time A notification shows the quick alarm is on When the quick alarm rings select Off to turn off the alarm or Reset to set the quick alarm again Use Tip Calculator 1 From Tip Calculator enter the amount of your bill 2 Scroll down to select the percentage you want to tip The total bill with tip is displayed If you are ...

Page 59: ...imer select from the following options Start begins the countdown Stop pauses the countdown Reset clears the timer When the countdown is complete select Off to silence the alarm Use Stopwatch From Stopwatch select from the following options Start begins counting Stop pauses counting Reset clears the stopwatch Press the Back key to exit World Clock Use World Clock to check times in cities around th...

Page 60: ...ge with a list of bookmarks and some browser menu options appear when you are connected to the Web The lock icon appears in a secure session You can do the following To choose a site scroll to the link and press the OK key An underline and an arrow indicate that there is more text Scroll down to view the rest of the text Press the Back key to return to the previous screen Press the End key to exit...

Page 61: ...rmation about BREW capabilities and application pricing contact your service provider Download an Application 1 From BREW Apps select Mobileshop Catalog When a connection is made a list of application types appears 2 Select an application type A list of applications appears Long titles scroll left as you highlight them 3 Select an application A list of usages appears There may be one or more usage...

Page 62: ...Phone Info View Version Information Select Build Info to check your phone s software and hardware information View Phone Icons Select Icon Key to view the icons used in your phone 82 L2609 2EN book Page 62 Monday July 13 2009 2 48 PM ...

Page 63: ...lso available in the following countries India 1 600 121214 or 0124 284 5000 Puerto Rico 1 866 664 6443 Before requesting support please try to reproduce and isolate the problem When you contact the Customer Care Center be ready to provide the following information The name of your service provider The actual error message or problem you are experiencing The steps you took to reproduce the problem...

Page 64: ... Become a Product Evaluator To participate in the testing and evaluation of Kyocera Communications Inc products including cellular or PCS phones visit beta kyocera wireless com 82 L2609 2EN book Page 64 Monday July 13 2009 2 48 PM ...

Page 65: ... which evidences that the subject Product is within the one year warranty period Proof of Purchase After the one year warranty period you must pay all shipping parts and labor charges This limited warranty does not cover and is void with respect to the following i any Product which has been improperly installed repaired maintained or modified ii any Product which has been subjected to misuse inclu...

Page 66: ...TED WARRANTY AND SUBJECT TO THIS WARRANTY THE PRODUCTS ARE APPROVED AND ACCEPTED BY YOU AS IS KYOCERA MAKES NO OTHER WARRANTIES REPRESENTATIONS OR CONDITIONS OF ANY KIND ORAL OR VERBAL EXPRESS OR IMPLIED STATUTORY OR OTHERWISE WITH RESPECT TO THE PRODUCTS INCLUDING BUT NOT LIMITED TO ANY IMPLIED WARRANTY OR CONDITION OF MERCHANTABILITY OR FITNESS FOR A PARTICULAR PURPOSE OR AGAINST INFRINGEMENT OR...

Page 67: ...tion 35 B backlighting 38 banner 37 battery charging 9 drain 10 installing 9 recharging 9 safety guidelines 10 bookmarks 60 BREW 61 browser alerts 42 50 bookmarks 60 launching 60 navigating 60 C calculator 58 calendar see scheduler call history see call lists call lists all 20 data 21 erasing 21 incoming 20 missed 21 outgoing calls 21 saving numbers 21 sending messages 21 viewing contacts 21 call ...

Page 68: ...ng 26 number types 25 sending messages 25 viewing 23 web addresses 26 contacts list 23 conventions using this guide 14 countdown timer 59 customer support 63 D data calls 21 41 data counter 22 display 37 brightness 38 contrast 38 language 38 time and date 38 downloads 61 help 61 drafts folder 46 E earpiece 15 emergency calls 16 emergency services 42 F fast find 36 frequent list 36 G groups adding ...

Page 69: ...essaging 44 recent calls 20 setting main view 37 settings 33 tools 54 message groups 28 52 messages adding addresses 46 adding contacts 45 adding groups 45 adding preset text 46 51 alerts 50 appended 50 callback number 47 51 calling numbers 48 checking status 49 completing drafts 46 creating 45 delivery receipts 46 52 erasing 51 53 forwarding 48 incoming calls 45 list view 50 locking 48 recent cal...

Page 70: ...ower on sounds 39 preset text 46 51 primary number 26 product evaluation 64 Q quick alarm 58 R ringers assigning 31 roaming alerts 38 41 42 restrictions 41 S scheduler 55 alerts 57 auto erase 57 copying events 56 creating events 55 day view 56 editing events 56 erasing events 56 57 event priority 57 event reminders 57 finding dates 56 finding events 56 month view 55 sending events 56 silent mode 5...

Page 71: ...id entry 18 symbols 18 text messages 45 48 themes 37 timer 59 tip calculator 58 tools 54 alarm clock 58 calculator 58 scheduler 55 stopwatch 59 timer 59 tip calculator 58 voice memos 54 world clock 59 V vibrate mode 39 voice memos 54 playing 31 54 recording 54 voicemail alerts 51 changing number 52 checking 49 configuring 49 volume adjusting 16 earpiece 39 keypad 39 ringers 39 speakerphone 39 W wa...

Page 72: ...Kyocera Communications Inc www kyocera wireless com 82 L2609 2EN Rev 001 82 L2609 2EN book Page 72 Monday July 13 2009 2 48 PM ...

Reviews: