KVM-TEC Matrixline 2000 Fiber User Manual Download Page 24

46    |    kvm-tec

kvm-tec    |    47

5. tRoUblEshootING & fIRst aId 

lEd is light 
green

The screen flickers, 

has an incorrect 
display

Install current firmware from our homepage www.kvm-

tec.com/support

lEd is blinking 
green

Different firmware 

or USB is not 

compatible

Please contact the kvm-tec support team via e-mail: 
[email protected] 

or by phone: +43 2253 81912 30

lEd  light 
differently

Different firmware

To enter on screen menu/check firmware version: 

To enter the On screen menu, press the 

scroll lock

 key 

five times in quick succession. The currently installed 
firmware version is displayed below the menu 
If firmware update does not work, please send an

 e-mail 

to

 [email protected]

Error

cause

solution

lEd is not 
lighting

The devices get no 

power

 Is the power supply connected? (white box)

lEd is light in 
red

No connection 

between Loc and 
Rem

Check if the RJ45/network cable is connected well. 
(Clicking noise when plugging in)
Control local and remote , if it does not work -  please 
send an e-mail to [email protected]

lEd is light in 
orange

No picture on the 

monitor

Check if the local (PC) cable is connected well.  
Check if the remote (monitor) cable is connected well. 
If everything is connected well but no function appears, 
reconnect power supply again.
If the menu is visible, press the 

o

 key and choose the 

resolution of the monitor. Then press the assigned 
number on your keyboard.

lEd is light 
green

Screen occurs but 

the keyboard is not 
working

Plug out/in USB of keyboard and wait until driver is 

installed (after few seconds). 

Check all USB connections on both sides (Local and 

Remote)
If it is still not working, plug out/in DC once more

lEd is light 
green

No audio

Establish audio connection:

plug stereo-jack to the audio output of the PC (green) 
connection with local: IN

remote: headset OUT

Establish microphone connection:

plug stereo-jack to the microphone input of the PC (pink)

connection with local OUT. Connect the microphone to 

the Remote IN 

First  

Aid

kvm-tec 

smart connection

We are here for you to answer

your questions about installation? 

Manual download www.kvm-tec.com

or 

kvm-tec Installationchannel on our homepage 

      personally  +43 2253 81912
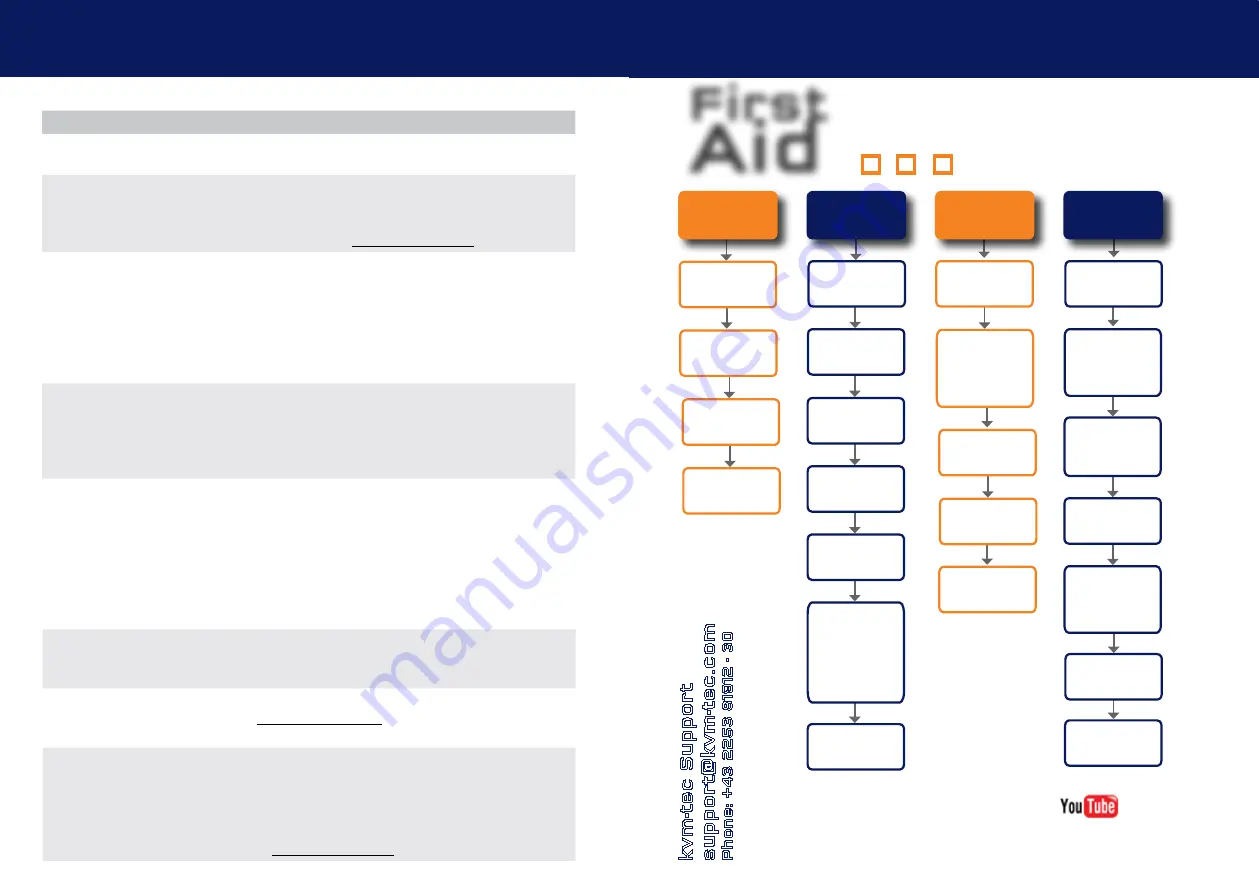
Video error 

(stripes in the 

picture)

USB is not 

working

No Power

(No LED)

Check the  

powerplug

Is the power supply 

ok? Try another Unit.

Try reprogramming the 

Unit by using a JTAG 

programmer

Contact kvm-tec 

support

Are the USB


Devices plugged in 

correctly?

Is the USB cable on the 

Local side plugged into 

the PC?

Are the USB 


Devices working direc-

tly on the PC?

Check if local and 

remote Unit have the 

same firmware

Replace the USB cable 

from PC to the Local 

Extender

Check if the local or 

the remote Unit is 

causing the problem 

by swaping first the 

local and than the 

remote Unit to ano-

ther Unit

Contact kvm-tec 

support

Check if all  

cables are plugged in 

correctly

Check if the PC is 

sending a Image by 

plugging in a  

monitor on the local out 

of the local Unit

Check if the DDC is set 

correctly (in menu under 

point „O“)

Check if both Units 

have the correct 

firmware

No Video

Contact kvm-tec 

support

Check if all  

cables are plugged in 

correctly

Check if the PC is 

sending a Image by 

plugging in a monitor 

on the local out of the 

local Unit

Check if local and remote 

Unit have the correct 

firmware

Check if the DDC is set 

correctly (in the menu 

under point „o“)

Check if the network 

switch is setup cor-

rectly and has enough 

bandwidth

Contact kvm-tec 

support

Check if other units have 

the same  

behaviour

kvm-tec Support [email protected]

Phone: +43 2253 8

19

12 - 30

5. tRoUblEshootING & fIRst aId


Summary of Contents for Matrixline 2000 Fiber

Page 1: ...annel www kvm tec com line matrix kvm tec User Manual Matrixline MX 6711 SET 6711L CPU LOCAL 6711R CON REMOTE Matrixline fiber MX2000 F 6811 SET 6811L CPU LOCAL 6811R CON REMOTE connect collaborate co...

Page 2: ...re with Switching Manager 24 3 5 Defining what DDC data your PC uses 25 3 6 Viewing available devices 26 3 7 Managing favorite devices 27 3 8 Share list 28 3 9 Changing the settings of your extender 2...

Page 3: ...edicine airports air traffic control industry public buildings The KVM Technology over IP benfits from the high security level in PC networks Another feature is the kvm tec feature USB save This featu...

Page 4: ...ngs and instructions Keep all safety information and instructions for future reference and pass them on to subsequent users of the product The manufacturer is not liable for cases of material damage o...

Page 5: ...e the product near heaters Do not drop or hit the product Unplug all connections before cleaning the product Do not use wipes or chemicals as these could damage the surface Wipe the housing with a dam...

Page 6: ...i out DVI connection to monitor 9 Power Status LED displays the status of the extender Remote Extender CON Nr Name Function 10 in audio In from microphone etc 11 RS232 RS232 connector 12 out audio Out...

Page 7: ...en Yes Green V fast Yes Main LED RJ45 Socket LEDs 2 1 Unpacking and checking the contents Before using the product for the first time it should be checked for damage In case of damage due to transport...

Page 8: ...ders It consists of 19 Rack Shelf an alu faceplate and a power supply Rack Mounting Kit RMK FRN Part No 6132 The rack mounting kit RMK FRN is used to mount kvm tec Matrixline extenders It is equipped...

Page 9: ...e included 12V 1A power supply 2 Connect the USB cable to a USB port on your PC and connect the other end of the USB cable to the CPU 3 Connect keyboard and mouse to CON 4 Connect the CPU and the CON...

Page 10: ...the USB cable to the CPU Local Unit 3 Connect keyboard and mouse to the CON Remote Unit 4 Connect the CPU Local and the CON Remote Unit with a fiber cable 5 Connect the DVI cable to the DVI socket of...

Page 11: ...een The monitor will displays your computer s desktop or any open applications 2 5 Replacing the SFP module The MVX1 F is delivered with a multimode SFP module To replace an SFP module with a differen...

Page 12: ...rview of all upgrades O DDC Option DDC Option Fixed ice position 1020 x 1080 W Network Settings Network Settings G ExtenderSettings Settings Extender L Switching List List of all extenders in the swit...

Page 13: ...ough 8 to use a predefined resolution which is saved 4 Press ESC to go back to the main menu In this view all extenders for which a firmware update is to be performed are displayed This function displ...

Page 14: ...Viewing available devices The devices you can connect to are listed on the device list screen In the main screen menu press the L key 3 7 Managing favorite devices A total of 8 favorites can be define...

Page 15: ...r The Extender Settings menu allows the user to change a range of further preferences Three of the selections VGA Audio and RS232 will take you to sub menus The other four can be enabled or disabled b...

Page 16: ...2 Press the V key The VGA menu appears Press F1 to move the display area up Press F4 to move the display area down Press F2 to move the display area to the left Press F3 to move the display area to th...

Page 17: ...ponding key 4 The Enter Parity menu opens 5 Press the appropriate button to select a parity 3 9 4 Setting the audio volume The volume of the audio input microphone on the remote unit can be changed Th...

Page 18: ...Parity No Odd Even Mark Space possible Stopbits 1 2 Remote Unit CON Pinout DTE Pin Function direction 2 RxD IN 3 TxD OUT 4 DTR OUT 5 GND 8 CTS IN RS 232 CONNECTOR PINING 3 Extender settings 3 9 6 Alte...

Page 19: ...the monitor shows the last image received before disconnection to activate or disactivate the function press 5 3 9 8 Using the power saving mode You can choose to enter power save mode if the remote u...

Page 20: ...ing a keyboard layout 1 Press R in the Extender Settings menu The Remote Settings menu appears 2 Press the K key The Keyboard Locale menu opens Press E to select English QWERTY Press D to select Germa...

Page 21: ...To edit the shortcuts 1 From the Extender Settings menu press the R key The Remote Settings menu appears 2 Press the H key The Keyboard Shortcuts menu opens 3 Use the arrows to select a command 4 Pre...

Page 22: ...locks after restart in one minute the time can be set flexibly between one minute and 60 minutes To unlock you have to restart the Extender C Set the password You have to create your own password and...

Page 23: ...n encoder with point to point mode In the main menu press P After logging in the user receives his personalized lists Devices Favorites List 4 1 Network settings and management Switching Systems All n...

Page 24: ...ish audio connection plug stereo jack to the audio output of the PC green connection with local IN remote headset OUT Establish microphone connection plug stereo jack to the microphone input of the PC...

Page 25: ...hat could otherwise be caused by improper treatment of waste equipment The recycling of materials contributes to the conservation of natural resources Therefore do not dispose of your old electrical a...

Page 26: ...he length The shield should be contiguous and connected to both ends A shielded patch cable is allowed for connection to the device Schema EIA TIA 568 B 8 2 Requirements fiber cables 8 2 1 Multi mode...

Page 27: ...mpany network The network switch must fulfil the following specifications 1 Gigabit Switch with true port to port transfer rates of 1 Gigabit second 9 Requirements network switch 9 requirements networ...

Page 28: ...2253 81 912 Fax 0043 0 2253 81 912 99 Email support kvm tec com Web www kvm tec com Find our newest updates and FAQs on our homepage http www kvm tec com support 10 adDress Phone email kvm tec Inc USA...

Reviews: