16 | kvm-tec
kvm-tec | 17
2. extender InstallatIon
2. extender InstallatIon
2. USB from
keyboard and mouse
3. Network
cable CA
T 6a/7 up to 100m/328ft
RS232
UVX1 CPU
dp in
aux
dp out 1
dp out 2
audio
4k displayport 1.2 kvm-extender
power/status
100-240V AC
50-60Hz 24V
A
red. Power
12V
2A
usb 2.0
1. po
wer plug
12V > 2A
Earth
connection
1. po
wer plug
100-240 V
A
C
4. DP in
from PC
2. USB to PC
6. Audio
to PC
5. Audio
to PC
4. DP out
to Monitor
4. DP out
to Monitor
RS232
UVX1 CON
aux
usb 2.0
dp out 2
audio
4k displayport 1.2 kvm-extender
power/status
100-240V AC
50-60Hz 24V
A
red. Power
12V
2A
6. Audio from
microphone
5. Audio to
speaker
1. po
wer plug
100-240 V
A
C
4. DP to
Monitor
4. DP to
Monitor
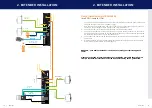
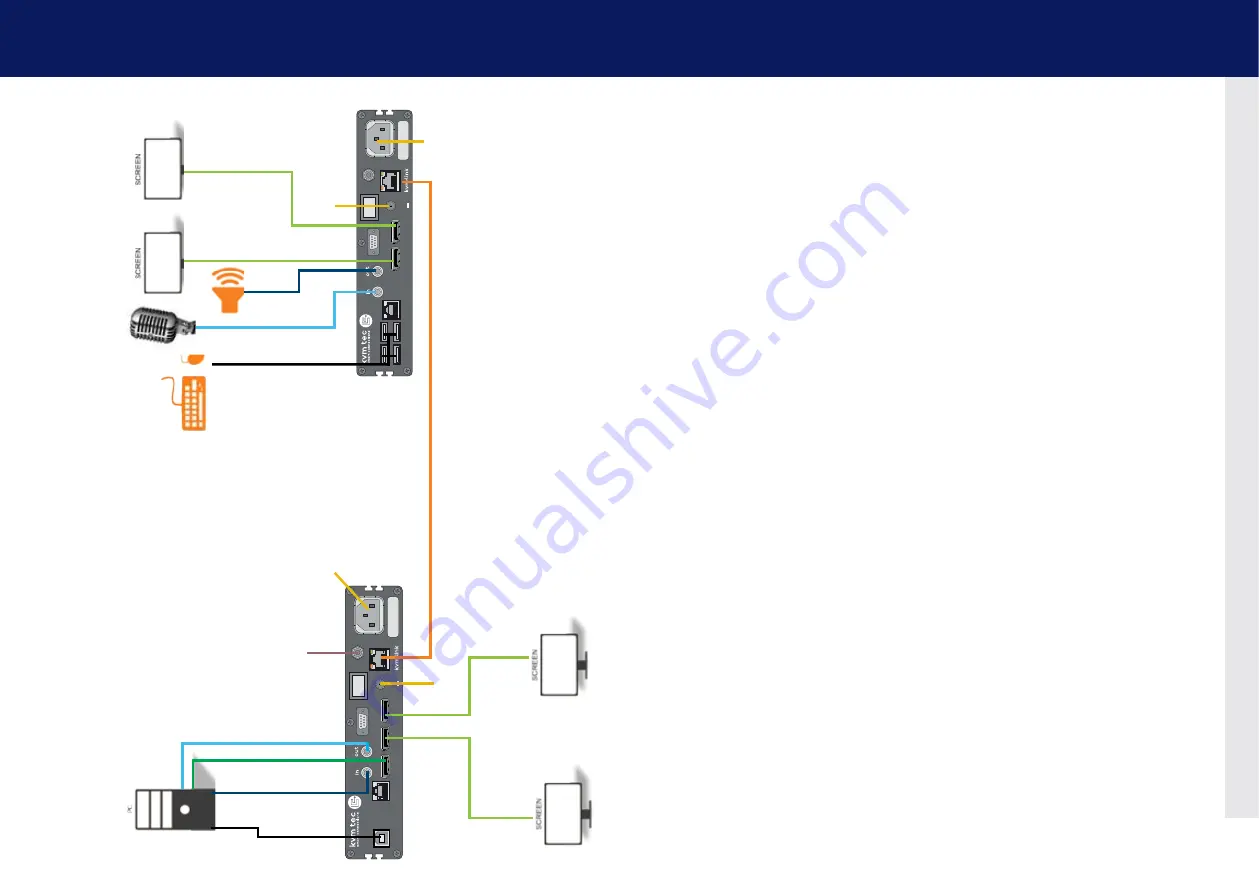
Quick Installation UlTralInE 4K
local / CPU – remote / CON
1.
Connect the CON / Remote and the CPU / Local Unit with the supplied IEC power cable. Optio-
nally, you can also use a 12V
>
2A power supply.
2.
Now connect the USB cable to a USB port on your PC and connect the other end to the CPU /
Local Unit. Connect keyboard and mouse to the CON / Remote Unit.
3.
Connect the CPU / Local and the CON / Remote Unit with a network cable.
4.
Connect the DP cable in the DP socket of the PC -in and to the DP socket DP / in of the local
device and connect the screen on the remote side with the DP cable. Optionally, connect the
DP cable from the Local DP / out to another monitor.
5.
Then connect PC audio/out with the audio cable to Local audio/in. Connect audio/out via the
audio cable
6.
Almost done! Now connect the audio cable Local audio/out to the PC audio/in and Remote
audio/in with the audio cable to the microphone.
HAVE FUN - your kvm-tec Extender is now in use for many years (MTBF approx 10
years)
Please note that the recommended length of the display port cable should be max.
1.8m,5.9 ft otherwise interference-free 4K transmission may not be guaranteed.
1. po
wer plug
12V > 2A


