background image

4.2 Sound Measurements 

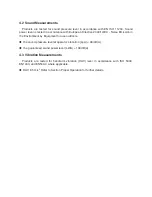
Products are tested for sound pressure level in accordance with EN ISO 11204. Sound 

power level is tested in accordance with European Directive 2000/14/EC - Noise Emission in 
the Environment by Equipment for use outdoors.   

ʎ

the sound pressure level at operator's location (LpA) = 98 dB(A).   

ʎ

the guaranteed sound power level (LWA) = 108 dB(A).   

4.3 Vibration Measurements   

Products are tested for hand/arm vibration (HAV) level in accordance with ISO 5349, 

EN1033, and EN500-4 where applicable.   

ʎ

HAV 6.5 m/s

2

 Refer to Section Proper Operation for further details.   


Summary of Contents for PDR80

Page 1: ...ion and maintenance of these products We have made every effort to ensure the accuracy of the information in this manual We reserve the right to change this product at any time without prior notice Please keep this manual available to all users during the entire life of the Vibratory Rammer ...

Page 2: ...ce Safety 8 3 4 Label Locations 10 3 5 Safety Labels 11 3 6 Operating Labels 12 4 TECHNICAL DATA 14 4 1 Rammer 14 4 2 Sound Measurements 15 4 3 Vibration Measurements 15 5 OPERATION 16 5 1 Application 16 5 2 Recommended Fuel 16 5 3 Before Starting 16 5 4 To Start 16 5 5 To Stop 17 5 6 Low Oil Shutoff Switch if equipped 17 5 7 Proper Operation 18 5 8 Proper Compaction 18 6 MAINTENANCE 19 ...

Page 3: ...6 1 Periodic Maintenance Schedule 19 6 2 Servicing Air Cleaner 20 6 3 Engine Oil 21 6 4 Lubrication 22 6 5 Shoe Hardware 23 6 6 Long Term Storage 23 6 7 Troubleshooting 24 ...

Page 4: ...oration reserves the right to change any portion of this information without notice All rights especially copying and distribution rights are reserved 2 EMISSION CONTROL SYSTEM INFORMATION Source of Emissions The combustion process produces carbon monoxide oxides of nitrogen and hydrocarbons Control of hydrocarbons and oxides of nitrogen is very important because under certain conditions they reac...

Page 5: ...ance The use of replacement parts that are not of the original design and quality may impair the effectiveness of your emission control system A manufacturer of an aftermarket part assumes the responsibility that the part will not adversely affect emission performance The manufacturer or rebuilder of the part must certify that use of the part will not result in a failure of the engine to comply wi...

Page 6: ...performance problems resulting from the use of an oxygenated fuel containing more than the percentages of oxygenates mentioned above are not covered under warranty EMISSIONS COMPONENT DEFECT WARRANTY COVERAGE This emission warranty is applicable in all States Our Corporation N92 W15000 Anthony Avenue Menomonee Falls WI 53051 1504 warrant s to the initial retail purchaser and each subsequent owner ...

Page 7: ...stem if applicable 4 Exhaust manifold if applicable 5 Miscellaneous Items Used in Above Systems i Electronic controls if applicable ii Hoses belts connectors and assemblies iii Filter lock assembly gaseous fuel if applicable OBTAINING WARRANTY SERVICE To obtain warranty service take your engine to the nearest authorized our service dealer Bring your sales receipts indicating date of purchase for t...

Page 8: ...e to the nearest service dealer authorized by us when a problem exists If you have any questions regarding your warranty rights and responsibilities you should contact the our CORPORATION Product Support Department for the information THINGS YOU SHOULD KNOW ABOUT THE EMISSION CONTROL SYSTEM WARRANTY MAINTENANCE AND REPAIRS You are responsible for the proper maintenance of the engine You should kee...

Page 9: ... death DANGER indicates a hazardous situation which if not avoided will result in death or serious injury WARNING indicates a hazardous situation which if not avoided could result in death or serious injury CAUTION indicates a hazardous situation which if not avoided could result in minor or moderate injury CAUTION Used without the safety alert symbol CAUTION indicates a potentially hazardous situ...

Page 10: ... 3 1 11 ALWAYS be sure operator is familiar with proper safety precautions and operation techniques before using machine 3 1 12 ALWAYS wear protective clothing appropriate to the job site when operating equipment 3 1 13 ALWAYS wear hearing protection when operating equipment 3 1 14 ALWAYS keep hands feet and loose clothing away from moving parts of the machine 3 1 15 ALWAYS use common sense and ca...

Page 11: ...2 DO NOT smoke when refueling the engine 3 2 3 DO NOT refuel a hot or running engine 3 2 4 DO NOT refuel the engine near an open flame 3 2 5 DO NOT spill fuel when refueling the engine 3 2 6 DO NOT run the engine near open flames 3 2 7 DO NOT run the machine indoors or in an enclosed area such as a deep trench unless adequate ventilation through such items as exhaust fans or hoses is provided Exha...

Page 12: ... types of fuels or flammable solvents to clean parts especially in enclosed areas Fumes from fuels and solvents can become explosive 3 3 8 ALWAYS replace the safety devices and guards after repairs and maintenance 3 3 9 ALWAYS keep the area around the muffler free of debris such as leaves paper cartons etc A hot muffler could ignite the debris and start a fire 3 3 10 ALWAYS do Periodic Maintenance...

Page 13: ...3 4 Label Locations Graphic 1 ...

Page 14: ...rating information If it becomes illegible the cover must be replaced Refer to the Parts Book for ordering information DANGER Engines emit carbon monoxide operate only in well ventilated area Read the operator s manual for machine information DANGER No sparks flames or burning objects near machine Shut off the engine before refueling CAUTION Use only clean filtered gasoline fuel ...

Page 15: ...hown Refer to Section Proper Operation for further details CAUTION Use only clean filtered gasoline fuel 3 6 Operating Labels The machines use international pictorial labels where needed These labels are described below Label Meaning Turn the engine switch to the ON position Close the choke Pull the rewind starter ...

Page 16: ...Open the choke Turn the engine switch to OFF Throttle control lever Turtle Idle or Slow Rabbit Full or Fast Open fuel flow valve Pull rewind starter ...

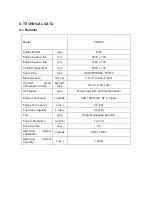
Page 17: ...0 002 0 030 Cylinder Head Compression cold bar cm3 psi 8 0 9 7 120 140 Air Cleaner type Three stage with cyclonic precleaner Engine Lubrication oil grade SAE 10W30 SE SF or higher Engine Oil Capacity L oz 0 6 20 Fuel Tank Capacity L qts 3 6 4 0 Fuel type Regular unleaded gasoline Fuel Consumption L qt hr 1 2 1 3 Running Time hour 2 5 Ramming System Lubrication oil grade SAE 10W30 Ramming System Ca...

Page 18: ...e Emission in the Environment by Equipment for use outdoors ʎ the sound pressure level at operator s location LpA 98 dB A ʎ the guaranteed sound power level LWA 108 dB A 4 3 Vibration Measurements Products are tested for hand arm vibration HAV level in accordance with ISO 5349 EN1033 and EN500 4 where applicable ʎ HAV 6 5 m s2 Refer to Section Proper Operation for further details ...

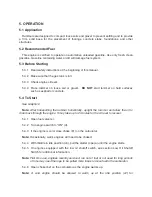
Page 19: ...raphic 2 Note After transporting the rammer horizontally upright the rammer and allow the oil to drain back through the engine It may take up to 2 minutes for the oil level to recover 5 4 1 Open fuel valve e 5 4 2 Turn engine switch to ON d 5 4 3 If the engine is cold close choke b1 on the carburetor Note Occasionally warm engines will need to be choked 5 4 4 With throttle in idle position c3 pull...

Page 20: ...3 5 5 2 Turn engine switch to OFF d 5 5 3 Close fuel valve e 5 6 Low Oil Shutoff Switch if equipped The low oil shutoff switch is designed to prevent engine damage caused by an insufficient amount of oil When starting the machine ʎ if the warning light flashes quickly once this indicates the engine oil level is acceptable ʎ if the warning light flashes slowly the engine will start but shut off aft...

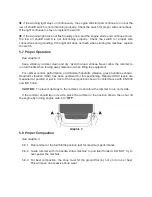
Page 21: ...ay material or when lifting the equipment For optimal control performance and minimal hand arm vibration grasp handle as shown Hand arm vibration HAV has been optimized for this positioning Reported HAV levels are measured at position A just in front of the hand position shown in conformance with EN1033 and ISO 5349 CAUTION To prevent damage to the rammer do not allow the rammer to run on its side...

Page 22: ...re starting After first 5 hours Every week or 25 hours Every month or 100 hours Every 3 months or 300 hours Every Year Check fuel level Check engine oil level ƽ Inspect air filter Replace as needed ƽ Check oil level in sightglass ƽ Check fuel line and fittings for cracks or leaks Replace as needed ƽ Tighten ramming shoe hardware ƽ ƽ Check external hardware ƽ ƽ Clean engine cooling fins ƽ Clean and...

Page 23: ...use gasoline or other types of low flash point solvents for cleaning the air cleaner A fire or explosion could result To service 6 2 1 Release the retaining clip and remove the air cleaner cover 6 2 2 Remove and inspect the air filter elements If the air filter element is dirty clean the air filter elements as described below Replace damaged filter elements Always replace the paper air filter elem...

Page 24: ...to dry Dip the filter element in clean engine oil then squeeze out all excess oil The engine will smoke when started if too much oil is left in the foam 6 2 5 2 Wipe dirt from the inside of the air cleaner case and cover using a moist rag Be careful to prevent dirt from entering the air duct that leads to the carburetor 6 3 Engine Oil See Graphic 6 6 3 1 Drain oil while engine is still warm Note I...

Page 25: ...brication See Graphic 7 Ramming system Check oil level 6 4 1 Place the rammer so it is resting on its shoe on a level surface 6 4 2 Check the oil level through oil sightglass d Proper ramming system lubrication is indicated when approximately 1 2 3 4 of the sightglass is full 6 4 3 If the oil is not visible oil must be filled through the filling oil mouth f then see the technical Data for oil quan...

Page 26: ...pose of this liquid in accordance with environmental protection legislation 6 4 7 Screw in the oil drain plug e Torque to 54 Nm 6 4 8 Remove filling oil plug f and fill with oil See Technical Data for oil quantity and type Wrap the filling oil plug with teflon tape Install the filling oil plug f Torque to 9 Nm 6 5 Shoe Hardware See Graphic 8 On new machines or after replacing shoe check and tighte...

Page 27: ...ning 6 6 4 Pull starter rope slowly to distribute oil in engine 6 6 5 Re install spark plug 6 7 Troubleshooting Problem Symptom Reason Remedy Engine does not start or stalls No fuel in tank Check engine oil level Spark plug fouled Fuel valve closed Engine switch is in the OFF position Engine does not accelerate is hard to start or runs erratically Spark plug fouled Crankshaft seals are leaking Che...

Page 28: ...ly the engine starts but shuts off after 10 12 seconds Engine oil level is low Add oil to the engine See Technical Data for oil quantity and type Problem Symptom Reason Remedy On machines equipped with the low oil shutoff switch the engine starts and continues to run but the low oil warning light stays on continuously Check the switch for proper wire connections Switch is not functioning properly ...

Reviews: