Cleaning and caring for your
appliance
Make sure that the appliance and the fascia have cooled down
completely before cleaning!
Usually it is sufficient to clean the oven with a damp cloth and a little
washing-up liquid each time you use it. Wipe dry afterwards.
Do not use any abrasive or aggressive clea-
ning or scouring agents such as steel wool,
soap-impregnated steel wool, metal or pla-
stic sponges or similar agents with an abrasi-
ve surface.
Do not use any cleaning agents with a ble-
aching effect or containing chlorine.
Remove any deposits of calcium or any spots of grease, starch or
egg-white as soon as possible. If this is neglected, corrosion can
develop under these deposits in stainless steel appliances due to
the lack of oxygen.
When cleaning stainless steel appliances please use the usual cleaning
agents for stainless steel. Please take general note of the instructions of
the respective manufacturers and try out products on small surfaces
first, before spreading the cleaning agent over the entire surface.
After cleaning make sure that all the cleaning agent has been
thoroughly removed.
Cooking surfaces
Never use sharp or abrasive cleaning agents!
Clean a stainless steel hob with normal stainless steel polish. Clean an
enamel hob and the hotplates with a damp cloth and a little detergent.
Remove incrustations and boiled over food from glass ceramic surfaces
with a glass scraper. Remove sugar and melted plastic immediately whi-
le the hob is still hot.
backmobil
®
(special accessory no. 600)
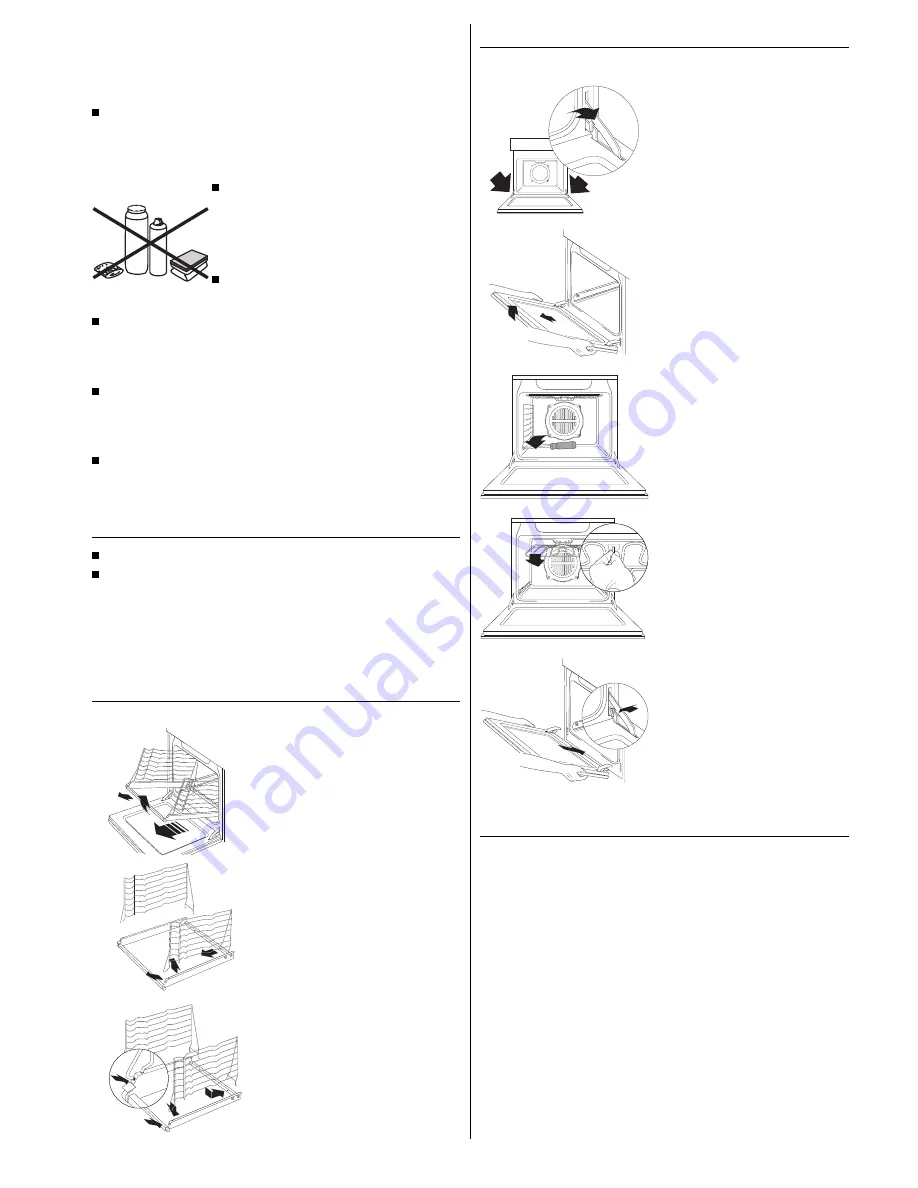
Extending the backmobil
®
Press down the lever at the bottom of
the backmobil
®
frame, extend the back-
mobil
®
until it has gone beyond the
catch and lift it diagonally upwards.
Taking the backmobil
®
apart
Remove the holder rods of the slot-in
gratings first from the front and then
from the back holes on the frame of
the backmobil. The slot-in gratings can
then be removed.
Assembling the backmobil
®
Insert the holder rods of the slot-in gra-
tings back into the holes on the frame
of the backmobil
®
and proceed in the
reverse sequence to the sequence
used when taking the backmobil
®
apart. Push the lever into place.
Oven
From time to time the oven needs to be cleaned thoroughly.
Removing the oven door
Open the oven door as wide as it will
go.
Fold up the clamps on the door hinges.
Take hold of the oven door on the both
sides and close it slowly. When the
oven door is about half-closed, the hin-
ges will fall out of the catches. The
oven door can now be removed.
Loosen the screw to fold down the grill.
Removing the side-grating
Loosen the screws.
Remove the slot-in grating.
To fold down heating element (top
heat/grill)
Loosen the screws and fold down the
heating element.
Fold up the heating element again and
fasten with a screw.
Reassembling the oven door
Take hold of the oven door on both si-
des and push the hinges into the rele-
vant holes on the oven.
Very slowly open the oven door.
Fold down the clamps at the door hin-
ges.
Close the oven door.
Regenerating ökotherm
Heat the empty oven by intensiv hot air convection at maximum temperature
for 60 mins.
10
EEH 635.0


