KUHN GMD883 Operators Manual And Installation Manual Download Page 10

Disc mower

8

GMD883

Safety

Precautions to take before using the 
machine

Do not wear loose clothing which could become caught

up in moving parts.

Wear the appropriate protective clothing for the work in

hand (gloves, shoes, goggles, helmet, ear-protectors,
etc.).

Make sure that all operating controls (ropes, cables,

rods, etc) are placed so that they cannot be set off
accidentally, risking accident or damage.

Before operating the machine, check tightness of nuts

and bolts, particularly on fixing elements (tines, forks,
blades, knives, etc). Retighten if necessary.

Before operating the machine, ensure that all the safety

guards are firmly in place and in good condition.
Immediately replace any worn or damaged guard.

Precautions when driving

Precision steering, tractor adherence, road holding and

efficient braking are influenced by the type of implement,
weight, ballast of front axle, ground or road conditions. It
is therefore of the utmost importance to be cautious in
every given situation.

Groundspeed must be adapted to ground conditions as

well as to roads and paths. Always avoid abrupt changes
of direction.

Be particularly cautious when turning corners, paying

attention to machine overhang, length, height and
weight.

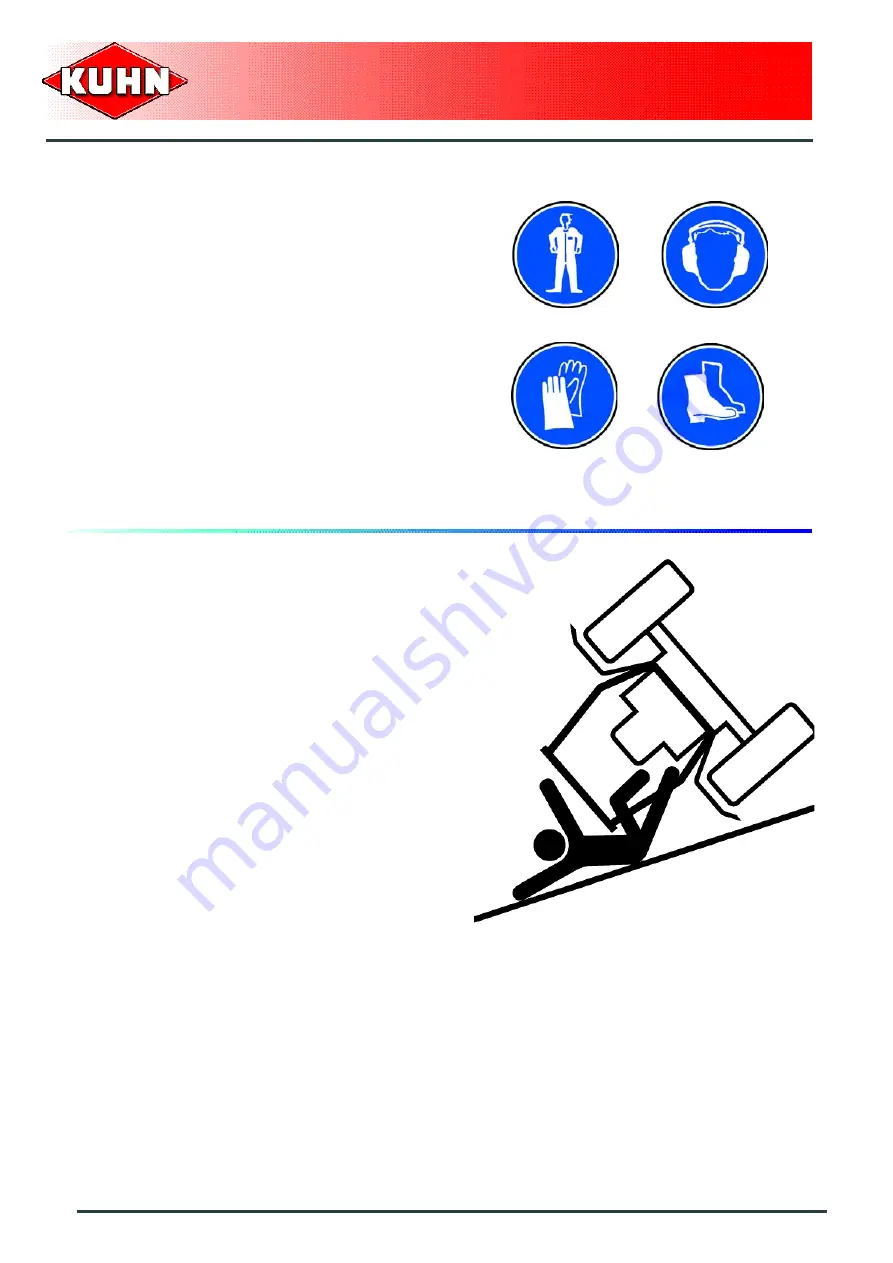
Never use a narrow track tractor on very uneven or

steeply sloping ground.

Never leave the tractor seat while the machine is

operating.

Carrying people or animals on the machine when

working or in transport is strictly forbidden.

Summary of Contents for GMD883

Page 1: ...OPERATOR S MANUAL Disc mower GMD883 KN017CGB D English 03 2007...

Page 2: ......

Page 3: ...RATE AND MAINTAIN YOUR MACHINE before reading this manual carefully KEEP THIS MANUAL AVAILABLE FOR REFERENCE Pass it on to the next owner if you re sell the machine Your KUHN dealer can offer a comple...

Page 4: ...afety instructions 7 Location and description of safety decals on the machine 16 Road safety equipment and recommendations 19 Machine specifications 20 Description and glossary 20 Technical specificat...

Page 5: ...ine in headland turn position 50 Adjustments in working position 51 Machine use 57 Optional equipment 60 Yokes 60 Large cone discs 60 Raised skid shoes 61 Maintenance and storage 62 Frequency chart 63...

Page 6: ...Disc mower 4 GMD883 Identification of the machine IDENTIFICATION OF THE MACHINE 1 Front view 2 Rear view...

Page 7: ...cated to the dealer for all spare parts orders Type GMD883 No 4 Optional equipment Tick box corresponding to the equipment fitted on your machine Part no 4604602 1 3 4 6 spline yoke Part no 4604603 1...

Page 8: ...a potentially hazardous situation that if not avoided could result in serious bodily injury This symbol is used to identify special instructions or procedures which if not followed strictly could resu...

Page 9: ...y be operated maintained and repaired by competent persons who are familiar with machine specifications and operation and aware of safety regulations for preventing accidents The operator must imperat...

Page 10: ...irmly in place and in good condition Immediately replace any worn or damaged guard Precautions when driving Precision steering tractor adherence road holding and efficient braking are influenced by th...

Page 11: ...stances be less than 20 of the tractor s unladen weight If necessary add ballast weights to the front or to the rear to preserve the steering and braking efficiency Transport position Before transport...

Page 12: ...ic circuit To avoid making wrong connections mark hydraulic couplers and corresponding hoses with colours WARNING Functions could be reversed for example lift lower and cause accidents Regularly check...

Page 13: ...the machine disengage the PTO drive turn off the engine remove ignition key and wait for all moving parts have come to a complete stop If the primary PTO shaft is equipped with a slip clutch or a fre...

Page 14: ...se danger zones Hydro pneumatic accumulator A hydro pneumatic accumulator contains nitrogen under pressure risk of suffocation in closed rooms Repairs maintenance or putting into service must only be...

Page 15: ...Always keep the safety decals clean and readable and replace them when they are worn damaged missing or illegible Waste disposal Respect the environment Never spill pollutants oil grease filters etc o...

Page 16: ...ure accumulators etc must only be carried out by competent persons with regulation equipment Wear the appropriate protective clothing for the work in hand gloves shoes goggles helmet ear protectors et...

Page 17: ...mmediately replace any worn damaged or missing cutting tool or element To do this use the tool outfit supplied with the machine For your safety only use genuine parts Regularly check the condition of...

Page 18: ...Disc mower 16 GMD883 Safety 3 Location and description of safety decals on the machine Location of safety decals...

Page 19: ...ge the PTO drive turn off the engine remove ignition key and wait until all moving parts have come to a complete stop and apply park brake Danger accumulator 3 The hydraulic accumulator contains gaz a...

Page 20: ...ine is running the PTO drive engaged and the moving parts have not come to a complete stop Cutting tools 7 The cutting tools and their attachment hardware meet safety and reliability criteria set by s...

Page 21: ...quipment is mounted in the factory or by your authorized dealer according to current safety regulations The rear safety device comprises 2 signalling lights 1 2 signalling panels 2 2 red reflectors 3...

Page 22: ...ion and glossary 1 Side guards 2 Left mowing unit 3 Right mowing unit 4 Lift cylinders 5 Three point hitch coupler 6 Primary PTO shaft 7 Secondary PTO shafts 8 Mowing unit connecting frames 9 Toolbox...

Page 23: ...e 2 Three point hitch coupler 3 Lower hitch attachments 4 Upper hitch attachment 5 Gauges 6 Hoses holder 7 Mowing unit connecting frames 8 Hydraulic valve bank 9 Transport locks 10 Transport stops 11...

Page 24: ...Disc mower 22 GMD883 Machine specifications 0 1 Ground pressure adjustment cylinder 2 Large cone disc 3 Disc 4 Lift cylinder 5 Side guard 6 Cutterbar 7 Side gearbox...

Page 25: ...ion 4 00 m 13 1 Disc rotational speed 2986 min 1 PTO speed 1000 min 1 Weight 2293 kg 5055 lb Minimum PTO power requirement with a front mounted machine 103 kW 140 hp Standard oil flow 30 to 40 L min 8...

Page 26: ...nd maintenance tasks The tractor must be equipped with 1 double acting valve for use in combination with the control box 1 double acting valve for machine offsetting manoeuvres 1 single acting valve f...

Page 27: ...and parking The control box must be easily accessible from the tractor cab Control box mounting Fit support 1 Fit the 4 screws 3 and washers 2 Fit control box using 1 screw diameter D1 M12 Control box...

Page 28: ...lector Toggle switch 1 in position a activates area 2 Toggle switch 1 in position b activates area 3 The warning light is on when the control box is energized The direction of operation of different f...

Page 29: ...mower GMD883 27 Putting the machine from headland turn into transport position and vice versa Fold or unfold mowing units Setting the machine into transport position is carried out with the machine i...

Page 30: ...Putting the mowing units in headland turn position Position switch in the following position Position a Right mowing unit Position b Left and right mowing units Position c Left mowing unit Control box...

Page 31: ...ng The machine adapts to tractors fitted with a 3 point hitch coupler category 2 or 3 Description of coupling elements A PTO shaft 1 3 4 6 splines 1 A release cord 2 2 hydraulic hoses 3 pressurize the...

Page 32: ...ck that the tractor s authorized gross weight as well as its lift capacity and maximum weight per axle are not surpassed The front axle load 1 must never under any circumstances be less than 20 of the...

Page 33: ...the tractor three point linkage Place the lower links as close as possible under the hitch pins Attach the lower links to the hitch pins Category 2 a Category 3 b Secure each hitch pin with lynch pin...

Page 34: ...tractor lift linkage until parking stands no longer rest on the ground Unlock and remove lynch pin 1 Remove pin 2 Raise parking stand 3 Insert pin in hole corresponding to transport position 4 Insert...

Page 35: ...nect offset cylinder hydraulic hoses 3 and 4 to 1 double acting hydraulic outlet Connect front mounted mower hydraulic hose 5 to 1 single acting hydraulic outlet Check that all suspension system valve...

Page 36: ...Disc mower 34 GMD883 Putting into service Electrical CONNECTIONS Connect 7 pin plug to the tractor Connect control box to the 19 pin electric plug...

Page 37: ...ngth of the PTO shaft When the PTO shaft is in its maximum overlap position retracted tubes should not butt against the yokes As a safety measure a clearance L of at least 25 mm 1 must be maintained W...

Page 38: ...lugs using a screwdriver to release the PTO shaft guard b Slide the guard along the PTO shaft c Remove the secondary PTO shaft from the central gearbox d To avoid serious accidents the PTO drive shaf...

Page 39: ...ighten nuts to release the friction discs Let the friction discs slip for a few seconds Thread nuts away until they bottom against the threaded studs The friction slip clutch is ready to function Foll...

Page 40: ...lower links Balance the play on either sides of the lift linkage and lock lower link stabilizers Frame height adjustment Working position Lower the tractor lift linkage so that hitch pins are at a di...

Page 41: ...nsert pin in one of the 3 parking stand upper holes corresponding to parking position 4 Insert and lock lynch pin 1 Lower the tractor three point linkage to rest the machine on the ground Uncouple PTO...

Page 42: ...and electric plug Place hydraulic hoses and electric signalling plug in their respective supports 4 Disconnect and store 19 pin plug in holder 5 Detach the top link from the machine end Uncouple the l...

Page 43: ...e machine 1 Lock guards using bracket 2 and lynch pin 3 Fold stop rod 4 Before placing the machine into transport position Wait until the rotating parts have come to a complete stop Check that nobody...

Page 44: ...2 mowing units using switch 1 Activate tractor hydraulic outlet associated with the control box Putting the machine into transport position Place central switch in position b Maintain switch 2 in posi...

Page 45: ...cks 4 are fully engaged Activate machine offset using the hydraulic offset cylinder to centre the frame Shut off the machine hydraulic circuit supply from the tractor cab Switch the control box OFF Fr...

Page 46: ...rds to the ground Lower the tractor lift linkage so that hitch pins are at a distance H 500 mm 1 8 from the ground The machine is in transport position Never engage the tractor PTO drive when the mach...

Page 47: ...before going on public roads Before driving onto a main road ensure that upper edge of signalling panel is not more than H 1 5 m 4 11 from the ground Check that transport locks 4 are fully engaged Be...

Page 48: ...position From the transport position Lift the machine with the tractor s three point linkage H 600 mm 2 Energize control box using ON OFF switch Before placing the machine in working position Check th...

Page 49: ...ulic valve connected to the control box to release locks Pull release cord until stop pins are released Putting the machine in headland turn position Place central switch in position a Maintain switch...

Page 50: ...h in position b Select the 2 mowing units using switch 2 Activate tractor hydraulic valve connected to the control box to lower the mowing units The machine is in working position During work only use...

Page 51: ...Instructions for work Disc mower GMD883 49 Remove lynch pin 1 to release bracket 2 and unfold guards 3 Lower stop rod 4 The machine is in working position...

Page 52: ...switch in position a Select the 2 mowing units using switch 1 Activate tractor hydraulic outlet associated with the control box The machine is in headland turn position Before putting the machine int...

Page 53: ...ine on the ground to remove weight from the top link Modify the top link length to alter the machine tilt angle Check cutting height If the tractor is equipped with a hydraulic top link the machine pi...

Page 54: ...s its initial position To check the ground pressure Place the machine in working position Check that the chassis height is correct H 600 mm 2 Check pressure indicated on gauges NORMAL operating pressu...

Page 55: ...ral switch in position a Maintain switch 1 in position b Activate tractor hydraulic outlet associated with the control box The following adjustments do not cause the machine to move The direction of o...

Page 56: ...sure is reached close the valve Check that the ground pressure is identical on the 2 mowing units Adjust hydro pneumatic accumulator pressure if necessary Proceed the same way for second mowing unit b...

Page 57: ...Swathing system The swathing system comprises 2 Swath wheels The swath width is 2 40 m 7 10 approximately Right swath wheel The swath wheel s lateral position A and angle X can be adjusted Make sure...

Page 58: ...Disc mower 56 GMD883 Instructions for work Left swath wheel The swath wheel s lateral position A and angle X can be adjusted Make sure that distance J equals at least 15 mm 0 6...

Page 59: ...rking position into headland turn position Before mowing and to reduce risks of projections lower front guards Keep all persons and animals away from the machine danger zone Never lean or step on the...

Page 60: ...s When turning When turning at work the overlap between the mowing units can be insufficient To adjust the overlap Offset the rear machine Shift offset cylinder double acting valve Position the centra...

Page 61: ...pes the mowing unit overlap can be insufficient due to the tractor rear axle side drift To adjust the overlap Offset the rear machine Shift offset cylinder double acting valve Position main frame in l...

Page 62: ...on for tractors equipped with a 1 3 8 6 spline pto stub Part no 4604601 A specific yoke is available as option for tractors equipped with a 1 3 8 21 spline pto stub Part no 4604602 A specific yoke is...

Page 63: ...n 60 and 120 mm 2 4 4 8 Replace the end disk skids by the 2 raised skid shoes Equipment delivered depending on country Follow same procedure on the second mowing unit The use of raised skid shoes is a...

Page 64: ...c mower 62 GMD883 Maintenance and storage MAINTENANCE AND STORAGE Before adjusting maintaining or repairing the machine turn off ignition key and wait until all moving parts have come to a complete st...

Page 65: ...use Every 50 hours Every 200 hours or at the end of the season Lubrication Oil change Cutterbar 3 3 Side gearbox 3 Central gearbox 3 Grease Offset cylinder pivot pins 3 Lift cylinder pivot points 3 O...

Page 66: ...Disc mower 64 GMD883 Maintenance and storage 2 Cleaning the machine Clean the machine thoroughly 3 Lubrication Clean grease zerks before greasing Lubricate with SHELL multi purpose grease grade NLGI2...

Page 67: ...rease zerks of the secondary PTO shaft U joints and guiding bushes are accessible by unlocking the 2 clips of the 2 guard cones 1 The profiled tubes are lubricated by grease zerk 3 Slide the black col...

Page 68: ...quality through the opening of the filler plug Clean and reinstall filler plug 2 and its washer Reinstall inner disc skid 1 on drive side Lower front guard Before draining oil operate the machine for...

Page 69: ...l corresponds to the mark on the dipstick plug The MIN level corresponds to the end of the disptick plug Reinstall dipstick plug 1 Before draining oil operate the machine for a few minutes so that the...

Page 70: ...of the filler plug 2 Check central gearbox oil level The oil level must reach the medium level of sight glass 4 Before draining oil operate the machine for a few minutes so that the oil warms up The a...

Page 71: ...Maintenance and storage Disc mower GMD883 69 Grease Offset cylinder pivot pins 1 Lift cylinder pivot points 2 Offset linkage pivot points 3...

Page 72: ...Disc mower 70 GMD883 Maintenance and storage Transport stops and stop pins 5 Carrying frame pivot points 6 Fold the machine in transport position to access the grease zerks...

Page 73: ...ecrease pressure until gauges indicate 0 bar 0 psi Shut off lock valves Before leaving the tractor or before adjusting maintaining or repairing the machine disengage the PTO drive turn off the engine...

Page 74: ...cutterbar stiffener equals measure A 577 mm 1 10 4 mm 0 15 Stop pins The stop pins enable locking the mowing units for transport Adjustment Place the machine in working position Unscrew the 4 nuts 3...

Page 75: ...r seals 1 and 2 Replace if necessary If in doubt as to the oil quantity contained in the cutterbar fully drain and refill cutterbar respecting recommended oil quantity and quality Before checking that...

Page 76: ...es Damaged knives Very rough conditions can cause knives to crack and become deformed Worn knives Knife length C must exceed 65 mm 2 6 Knife width B measured at a distance A of 10 mm 0 4 from the disc...

Page 77: ...noperational When the bolt head wear reaches the knife contact area When diameter D of the bolt shoulder is less than 15 mm 0 6 After having been removed 5 times Replace nuts in the following cases Wh...

Page 78: ...daN m 89 lbf ft Dull knives require more horse power and have a negative effect on the cut quality Disc replacement Place a wooden wegde 2 between two discs to stop them from moving Remove 2 bolts 1...

Page 79: ...cone covers 2 and 3 6 daN m 44 lbf ft Replace any lost or damaged cover 2 Part no 56803400 3 Part no 56806610 Check if there is still a gap of 1 mm 0 04 between the disc lower part and the cutterbar...

Page 80: ...lts See section Inspection of knives and securing elements Depressurize all hydraulic functions At the start of each season Read through the operator s manual again Pressurize the hydraulic circuit Ch...

Page 81: ...und Bad ground contour adaptation Incorrect main frame setting Adjust main frame height with regards to the ground Excessive ground speed Reduce ground speed Insufficient ground pressure Reduce accumu...

Page 82: ...switches have no effect on the cylinders The control box is not energized Energize control box using ON OFF switch The tractor valve does not supply oil Take hose in hand and feel if oil flows continu...

Page 83: ...Limited warranty Disc mower GMD883 81 LIMITED WARRANTY...

Page 84: ...Disc mower 82 GMD883 Limited warranty...

Page 85: ......

Page 86: ......

Page 87: ......

Page 88: ......

Reviews: