background image

Mower conditioner

38

FC313 RF

Instructions for work

2. Adjustments in working position

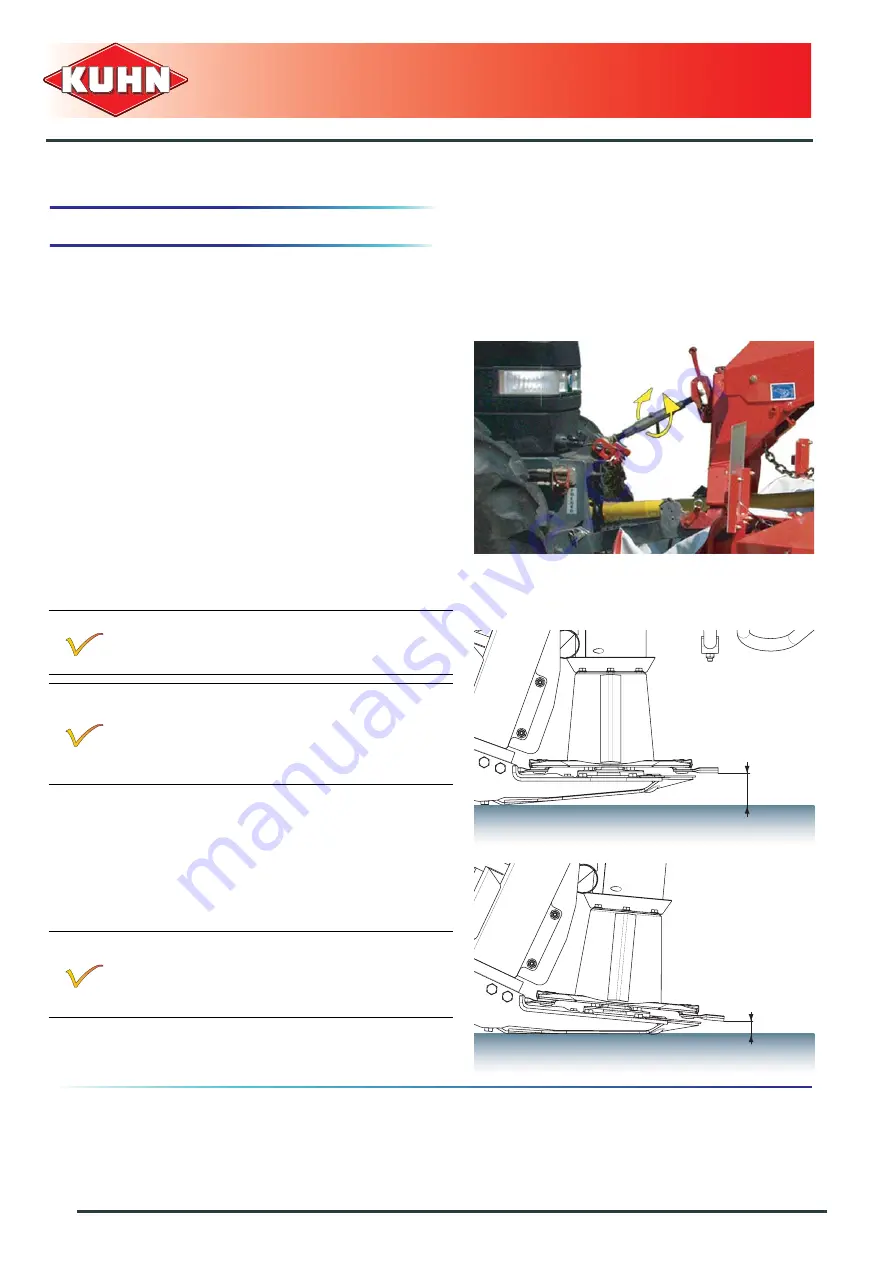
Cutting height

The desired cutting height is obtained directly by

adjusting the top link length. The height can be adjusted
between 30 and 80 mm (1.1’’ - 3.1’’) depending on the
tractors.

To obtain a different cutting height:

- Place the machine in parking position.
- Remove check chains on tractor side.
- Release and lower parking stands.
- Lower tractor front linkage until frame rests on its

parking stands and the machine rests on the ground.

- Modify the top link length to alter the machine tilt

angle.

- Place the machine in working position to check cutting

height.

-

If the tractor is fitted with a hydraulic top link, the
machine tilt angle can be adjusted in working
position. 

The maximum cutting height (L1 = 80 mm (3.1’’))
is obtained when the discs are parallel to the
ground.
The minimum cutting height must not be below
(L2 = 30 mm (1.1’’)).

Too low a cutting height can lead to:

- Excessive disc and knife wear.
- Crop being contaminated by soil.

-

Delay in regrowth

.

L1

L2

Summary of Contents for FC313 RF

Page 1: ...OPERATOR S MANUAL Mower conditioner FC313 RF KN021AGB C English 02 2005...

Page 2: ......

Page 3: ...NTAIN YOUR MACHINE before reading this manual carefully KEEP THIS MANUAL AVAILABLE FOR REFERENCE Pass it on to the next owner if you re sell the machine Your KUHN dealer can offer a complete line of g...

Page 4: ...ment 5 Safety 6 Description of symbols used in this document 6 Safety instructions 7 Location and description of pictorials on the machine 15 Road safety equipment and recommendations 18 Machine speci...

Page 5: ...lations 36 Instructions for work 37 Setting the machine into work position 37 Adjustments in working position 38 Machine use 45 Optional equipment 47 Quick release A frame coupler 47 1 3 8 21 spline y...

Page 6: ...Mower conditioner 4 FC313 RF Identification of the machine IDENTIFICATION OF THE MACHINE 1 Front view 2 Rear view...

Page 7: ...machine This information is to be indicated to the dealer for all spare parts orders Type FC313 RF No 4 Optional equipment Tick box corresponding to the equipment fitted on your machine TYPE MASSE kg...

Page 8: ...ates a potentially hazardous situation that if not avoided could result in serious bodily injury This symbol is used to identify special instructions or procedures which if not followed strictly could...

Page 9: ...cations and operation and aware of safety regulations for preventing accidents The operator must imperatively respect safety instructions in this manual and in the warnings posted on the machine The o...

Page 10: ...are firmly in place and in good condition Immediately replace any worn or damaged guard Precautions when driving Precision steering tractor adherence road holding and efficient braking are influenced...

Page 11: ...rcumstances be less than 20 of the tractor s unladen weight If necessary add ballast weights to the front or to the rear to preserve the steering and braking efficiency Transport position Before trans...

Page 12: ...hose depressurize the hydraulic circuit To avoid making wrong connections mark hydraulic couplers and corresponding hoses with colours WARNING Functions could be reversed for example lift lower and ca...

Page 13: ...k on the machine disengage the PTO drive turn off the engine remove ignition key and wait for all moving parts have come to a complete stop If the primary PTO shaft is equipped with a slip clutch or a...

Page 14: ...Safety warnings to respect are placed in pictorial form on various parts of the machine They are there to warn you of potential dangers and to tell you how to avoid accidents Always keep the pictoria...

Page 15: ...ve clothing for the work in hand gloves shoes goggles helmet ear protectors etc Do not solder weld or use a blow torch near fluids under pressure or inflammable products For your own safety and for co...

Page 16: ...he machine For your safety only use genuine KUHN parts Regularly check the condition of the protection covers Immediatly replace any worn damaged or missing cover Before engaging the PTO rest the cutt...

Page 17: ...Safety Mower conditioner FC313 RF 15 3 Location and description of pictorials on the machine Location of pictorials 1 5 3 4 2 6 599011001 6 599011001 59900800 5 3 59900800 5 3 59900800 59900300...

Page 18: ...o a complete stop Projections 3 Stones and other debris projected by the moving parts can travel a long distance The protection covers must always be in position and in good condition Always stay at a...

Page 19: ...ve engaged and the moving parts have not come to a complete stop Cutting tools The cutting tools and their attachment hardware meet safety and reliability criteria set by standards and by the manufact...

Page 20: ...ized dealer according to current safety regulations The front safety device comprises 2 signalling panels 1 2 white lights 2 2 white reflectors 3 The rear safety device comprises 2 signalling panels 4...

Page 21: ...dstock 2 Mowing unit 3 Parking stand 4 Lateral parking stand 5 Hydro pneumatic accumulators 6 Swath shield 7 Transport lock lever 8 Cutterbar 9 Central gearbox 10 Side gearbox 11 Lift cylinder 12 Pres...

Page 22: ...transport position 1 66 m 5 5 Length in transport position 1 73 m 5 8 Disc rotational speed 2986 min 1 Roller speed 1000 min 1 Roller width 2 45 m 8 PTO speed 1000 min 1 Weight 1356 kg 2989 lb approxi...

Page 23: ...2 Coupling and uncoupling The machine adapts to tractors equipped with a front mounted 3 point lift linkage fitted with a quick release A frame coupler category 2 ISO 11001 Description of coupling ele...

Page 24: ...r front linkage cylinders rather than to the machine lift cylinders Adjust the tractor s front lift linkage height see section Frame height and check chains Rotate the 3 way valve so that oil is direc...

Page 25: ...frame coupler to the tractor s front lift linkage using the hitch pins supplied with the machine Part no 56618200 Attach check chains on hitch pins and secure using washers roll pins and lynch pins A...

Page 26: ...Remove the secondary PTO shaft from the central gearbox Remove the mounting bolts 1 Invert guard cone 2 and input shaft guard 3 Invert drain plug 4 and vent plug 5 Pivot central gearbox 180 Reinstall...

Page 27: ...ferences between swath shields and tractor wheels From the backward position Remove 12 bolts 1 Remove Washers 2 Spacers 3 Position the headstock in line of additional holes located 150 mm 5 9 forward...

Page 28: ...acts latch 4 Check that latch is free to operate by pulling lever If operation is difficult untighten adjusting screw 1 2 half a turn Uncouple machine from tractor Tighten lock nut of adjusting screw...

Page 29: ...the machine headstock using the tractor s front lift linkage Secure the A frame coupler lock using pin 1 Attach the primary pto shaft on the tractor s PTO stub Connect the hydraulic hose to the singl...

Page 30: ...and lower the mowing unit using the machine lift cylinders Repeat the procedure minimum 2 more times The pressure gauge needle moves When the pressure reaches 75 bar 1088 psi on the pressure gauge wi...

Page 31: ...ding the raising lowering circuit With the machine attached Raise and lower the mowing unit using the machine lift cylinders Repeat the procedure minimum 2 more times The pressure gauge needle moves E...

Page 32: ...s in its maximum extended position the tube overlap must be more than 250 mm 10 If this is not the case Mark length H to cut when the transmission is the maximum overlap position Shorten the guard tub...

Page 33: ...friction slip clutch Uncouple the secondary pto shaft on lateral gearbox side Immediately replace any worn or damaged guard 1 Before adjusting maintaining or repairing the machine turn off ignition ke...

Page 34: ...ditioner 32 FC313 RF Putting into service Tighten nuts to release the friction discs Turn the coupler Thread nuts away until they bottom against the threaded studs The friction slip clutch is ready to...

Page 35: ...proximately 500 mm 1 8 from the mowing unit Attach and lock safety chains on the highest tractor attachment position Lower the tractor s lift linkage to tension the check chains Check that measure 500...

Page 36: ...stand 3 Remove check chains on tractor side Uncouple the PTO shaft from the tractor Remove A frame coupler lock pin Disconnect and store electric plug in its holder Lift the mowing unit using the mach...

Page 37: ...Lift mowing unit using machine lift cylinders to engage transport locks The machine automatically locks in transport position The machine is in transport position Before placing the machine into trans...

Page 38: ...meets current highway code regulations Immediately replace any worn or damaged signalling panels or lights Before driving onto a main road employ a person to give the driver indications to manoeuvre...

Page 39: ...lock side guards Make sure all the guards are in place Lift the mowing unit using the machine s lift cylinders to release transport locks Activate machine lift cylinders to rest the machine on the gr...

Page 40: ...ower tractor front linkage until frame rests on its parking stands and the machine rests on the ground Modify the top link length to alter the machine tilt angle Place the machine in working position...

Page 41: ...the machine in working position Lower the tractor s lift linkage to tension the check chains Check that the chassis height is correct 500 mm 1 8 Check the pressure given on the gauge NORMAL operating...

Page 42: ...e in hydro pneumatic accumulators to increase the mowing unit ground pressure Place the machine in working position Shift the mowing unit lift cylinder directional control valve in float position Open...

Page 43: ...tact with support 3 Loosen nut 1 to reduce the conditioning intensity Make sure to keep a minimum distance L of approx 5 mm 0 20 Bad parallelism and roller play Stop 1 located on each side of the cond...

Page 44: ...mmended chain tension is obtained Replace chain when bracket edge 5 comes into contact with inner guard edge 6 Check minimum play between rollers J 2 3 mm 0 08 0 12 Block screw and counter nut The use...

Page 45: ...To replace the chain Remove 4 bolts 1 Remove chain guard 2 Loosen chain Remove quick release link 1 and then chain 2 Place wedge 1 between upright 2 and roller 3 Rotate upper roller to balance the pl...

Page 46: ...3 If the chain is not tensioned a Remove sprocket 3 and turn spline by spline b until proper tension is obtained c Reinstall sprocket 3 with its washer and screw Torque to 8 5 daN m 63 lbf ft Reinstal...

Page 47: ...lift cylinders to lift the machine from working position into headland turn position Drive speed Before mowing and to reduce risks of projections lower side guards and front hood Fit rear cover tensi...

Page 48: ...ating components for damage Lower and lock front hood Check the condition of the friction slip clutch Before carrying out any maintenance or repairs on the machine switch off the tractor engine remove...

Page 49: ...UIPMENT 1 Quick release A frame coupler For tractors not equipped with a quick release A frame coupler ISO 11001 Kit no 1276870 2 1 3 8 21 spline yoke Part no 4603256 A specific yoke is available as o...

Page 50: ...Release and lower lateral parking stand Release and raise the front hood using 18mm box spanner supplied with the machine After having carried out any maintenance or repairs on the machine Release and...

Page 51: ...storage Mower conditioner FC313 RF 49 PTO shaft Primary PTO shaft Every 8 hours U joints 1 transmission tube 2 guide rings 3 Secondary PTO shaft Every 250 hours U joints 1 transmission tube 2 guide ri...

Page 52: ...ng of the filler plug Clean and reinstall filler plug 2 and its washer Reassemble the unit Before draining oil operate the cutterbar for a few minutes so that the oil warms up The cutterbar is lubrica...

Page 53: ...13 RF 51 Every 20 hours Lubricate roller drive chain To lubricate the chain Remove 4 bolts 1 Remove chain guard 2 Lubricate chain 1 using SAE 80W GL4 oil type Reinstall chain guard Tightening torque 1...

Page 54: ...Mower conditioner 52 FC313 RF Maintenance and storage Every 30 hours Grease Lower links 1 Every 50 hours Oil Cylinder pins 1 Top link 1 1 1 1 1 1 1...

Page 55: ...on the dipstick plug The MIN level corresponds to the end of the disptick plug Before draining oil operate the cutterbar for a few minutes so that the oil warms up 2 1 The lateral gearbox is lubricat...

Page 56: ...efore draining oil operate the cutterbar for a few minutes so that the oil warms up 2 1 The lateral gearbox is lubricated with 2 5 L 0 66 US gal litre s SAE 80W grade SHELL oil extreme pressure for me...

Page 57: ...nd reinstall filler plug 2 and its washer replace them if necessary Reassemble the unit Before draining oil operate the cutterbar for a few minutes so that the oil warms up The cutterbar is lubricated...

Page 58: ...g the 2 clips of the 2 guard cones The telescopic tubes are lubricated through a grease zerk Slide the black collar If necessary rotate a disc to access the grease zerk Slide the black collar back in...

Page 59: ...e gauge needle reads 0 Shut off valve Before adjusting maintaining or repairing the machine turn off ignition key and wait until all moving parts have come to a complete stop Before any work is carrie...

Page 60: ...position Give transport stops 1 5 preload turns Tighten counter nuts 2 after adjustment Replacement Replace transport stops 1 when they are worn and no longer act as a suspension device Part no 568645...

Page 61: ...r plugs and their seals 1 and 2 replace them if necessary If in doubt as to the oil quantity contained in the cutterbar fully drain and refill cutterbar respecting recommended oil quantity and quality...

Page 62: ...ses Damaged knives Very rough conditions can cause knives to crack and become deformed Worn knives Knife length C must exceed 65 mm 2 6 Knife width B measured at a distance A of 10 mm 0 4 from the dis...

Page 63: ...worn or inoperational When the bolt head wear reaches the knife contact area When diameter D of the bolt shoulder is less than 15 mm 0 6 After having been removed 5 times Replace nuts in the following...

Page 64: ...isc to use the other cutting edge or replaced On each knife an arrow indicates the disc s direction of rotation Make sure that the securing nut and bolt are in good condition and if necessary replace...

Page 65: ...Remove the 2 other nipple screws and their spring washers Remove the disc When remounting Position their largest diameters at right angles to each other Position conical centre of spring washer at th...

Page 66: ...13 RF Maintenance and storage Outer and inner cones Check torque of attachment bolts 1 of outer and inner cone covers 2 and 3 6 daN m 44 lbf ft Replace any lost or damaged cover 2 Part no 56803400 3 P...

Page 67: ...he conditioning rotor Slacken V belts and check their condition Depressurize all hydraulic functions At the start of each season Pressurize the hydraulic circuit Check the condition of the friction sl...

Page 68: ...otational frequency Increase speed to 1000 min 1 Soil build up in front of the cutterbar Too much cutterbar down pressure Increase pressure in the hydro pneumatic accumulators Adjust main frame height...

Page 69: ...d adjustment Adjust swath shields Insufficient cutterbar ground clearance in headland turn position Incorrect tractor lift linkage setting See machine attachment If the machine transport locks do not...

Page 70: ...nty does not apply to failure through normal wear and tear to damage resulting from negligence or from lack of inspection from misuse from lack of maintenance and or if the machine has been involved i...

Page 71: ...l The quality and quantity of lubricants used must always be in accordance with Company specifications The safety measures mentioned in the Operator s manual and on the machine itself have been follow...

Page 72: ...info kuhnsa com Soci t Anonyme au Capital de 2 530 000 Euros KUHN HUARD S A B P 49 F 44142 CHATEAUBRIANT CEDEX FRANCE T l 33 0 2 40 55 77 00 Fax 33 0 2 40 55 77 10 www kuhnsa com E mail info kuhnsa co...

Reviews: