KUGOO G-Booster User Manual Download Page 14

012

(5) Use of Charger and Precautions

1. Plug the charger's output terminal into charging hole on the battery unit, then connect the charger
to AC 220V/50HZ power supply and make sure the charging indicator is on. To avoid damages to
the controller, power the scooter off during charging time that can last 5-10 hours.
2. Trip distance can decline at a low temperature.
3. Charging mode: it is recommended that the scooter be charged once a day if possible. The whole
charging process is automatically controlled: when the charging indicator turns to green, it means
the battery unit has been fully charged and is in a floating charge state. Floating charge doesn't
cause any damage to batteries. At this point, it is unnecessary to stop charging since very little
energy is consumed during floating charge. 4. In case of damages, avoid violent bump or impact
when using, shipping or carrying the charger. Keep liquid or metal filings away from the charger in
case it is short-circuited or damaged.
5. DO NOT place inflammables under the charger because heat is generated while it is working. It
is prohibited that the charger is covered or surrounded by anything so as not to affect heat
dissipation. The charger shall be used in a well-ventilated place. In the event that there is peculiar
smell, smoke, or excessive temperature (higher than 65

) from/on the charger, stop charging

immediately and have it repaired in the maintenance department.
6. In the event that the charging indicator doesn't turn green for a long time (generally longer than
10 hours) while the charger is in the charging mode all the time, particularly along with a high
battery temperature due to charger failure, battery damage or low voltage, please stop charging
immediately and have the scooter repaired in the maintenance department.
7. For sake of adaptability between the charger and battery, please DO NOT charge your scooter
using chargers other than the dedicated one.

(6) Use of Motor (s) and Precautions

1. Features: new type of brushless low-speed high-power motor that features high efficiency, low
noise, and large mileage at rated load within the normal operating range.
2. Scheduled maintenance: the motor doesn't need any particular maintenance under normal
circumstances.
3. When going uphill with a heavy load, restart the scooter in the event of locked rotor to avoid
damages to the motor or controller.

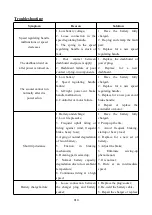
(7) Routine Maintenance and Precautions

1. Rotate the speed regulating handle slowly rather than violently.
2. DO NOT wash the scooter directly to avoid short-circuit of electric/electronic parts due to
moisture/water.
3. For safety sake, turn the main power switch off when parking the scooter.
4. Change into off-the-road tires when riding in complex road conditions, such as mountain road.
5. Replace for a new brake pad when 1/3 of it has been worn out and braking effect is impacted.
6. Remove the contaminants adhered to brake disc or other surfaces.
7. Check whether or not the electric part of power-cut brake is well connected and whether the
fasteners are loose. Make timely adjustment if any.
8. Make periodical examinations and maintenance, generally once every six months.

Summary of Contents for G-Booster

Page 1: ...User Manual for Electric Scooter ...

Page 2: ...ey are handled by your distributor or service provider 4 For sake of your own safety please check whether the braking system functions well before using the scooter 5 For safety reasons DO NOT cover the charger and keep it well ventilated during charging 6 When replacing a failed tire note that the fasteners of the wheel are tightened in case of a secondary accident due to wheel looseness 7 For sa...

Page 3: ...Items 02 4 Structural Diagram 03 5 Improper Use Cases 04 05 6 Legal Statement 06 08 7 Dashboard Instructions 09 8 Parameters 10 9 How to Use and Pre cautions 10 12 10 Troubleshooting 13 11 Overall Diagram 14 12 After sale Services 15 13 Warranty Card 16 ...

Page 4: ...02 Check the Items Electric scooter 1 User manual warranty card 1 Charger 1 User Manual for Electric Scooter ...

Page 5: ...03 Structural Diagram Handle Brake Main tube Folding Front fender handle mechanism Rear Rear Disc brake Rear damper fender drive motor ...

Page 6: ... the elevator high speed DO NOT ride on slopes larger than DO NOT accelerate while riding 20for extended periods of time downhill DO NOT use the front brake while riding at a high speed DO NOT go up down steps or cross DO NOT stand on the footboard after obstacles with the scooter the scooter is powered off and stops ...

Page 7: ...ile riding DO NOT ride with a single hand or foot DO NOT ride on motor way DO NOT rotate the handle violently DO NOT ride in water deeper than 2cm while riding at a high speed DO NOT ride with both hands leaving DO NOT carry passenger s the handle ...

Page 8: ...t time it is recommended that you do this with the guidance of an experienced person or couch Try to practice passing narrow areas turning and stopping as your practice deepens You are not allowed to ride on normal roads until you are able to control your scooter to pass a narrow area precisely and have simulated all types of terrains You may have a different riding experience every time you have ...

Page 9: ...playing by the road holes manhole covers rails expansion joints road sidewalk construction debris and other obstacles other situations that may disperse your attention In those situations the wheel can make involuntary turning or catch on something or some other accident can occur 28 Please ride on the bikeway or at the edge of road along the direction of traffic flow or the direction specified by...

Page 10: ...re temperature is not higher than 45 DO NOT park your scooter outdoor in sunshine for a long time 50 If you use your scooter in winter note that keep your scooter in a safe place where temperature is not lower than 20 keep your scooter at room temperature for at least half an hour before charging it when ambient temperature is lower than 0 51 Any modification to this scooter may undermine your saf...

Page 11: ...it means the battery is exhausting When the battery completely runs out all five bars will be off and the scooter will naturally stop after freewheeling for a certain distance Gear indication A five gear indicator is provided in the dashboard Shift gear using the upshift downshift buttons on the right side of dashboard Three gear indicates the fastest speed and first gear means slowest speed Power...

Page 12: ...rage speed of 20km h with a load of 75kg Gradient 25 25 for a rider weighing 60kg Applicable temperature 10 40 Most applicable temperature range is 20 30 Battery 48V 10Ah 48V 20Ah Max motor power 1200w single motor 2400w double motor Max load 150KG Charge input voltage AC 110V 220V 50 6Hz Charging time 5h single motor 10h double motor 5h for single motor 10h for double motor fast charge available ...

Page 13: ...e riding which helps prolong the battery s service life When decelerating release the speed regulating handle until motor power is cut off In the event of an emergency that requires emergency braking hold left right power cut brake handles tightly and the power will be cut off along with braking to make sure the scooter stops immediately Max speed of this scooter is 55km hour on the flat road Doub...

Page 14: ...ator doesn t turn green for a long time generally longer than 10 hours while the charger is in the charging mode all the time particularly along with a high battery temperature due to charger failure battery damage or low voltage please stop charging immediately and have the scooter repaired in the maintenance department 7 For sake of adaptability between the charger and battery please DO NOT char...

Page 15: ... or motor failure 1 Have the battery fully charged 2 Replace for a new speed regulating handle 3 Replace for a new power cut brake handle 4 Repair or replace the controller or motor Short trip distance 1 Battery undercharge 2 Low tire pressure 3 Frequent uphill riding or riding against wind frequent brake heavy 1oad 4 Aging or normal degradation of li ion battery 5 Friction in braking mechanism 6 ...

Page 16: ...sponding solutions In case the faults cannot be solved following those solutions please contact our sales department or have it repaired in our after sale service department DO NOT disassemble the product arbitrarily 2 DO NOT disassemble important parts within the warranty period otherwise they won t be covered by warranty ...

Page 17: ...iod Exception Note Li ion battery Six months 1 Damage due to long term power lack 2 Waterlog Replacement out of the warranty period will be charged at cost price Controller One year 1 Waterlog 2 Damage by strong deliberate impact Replacement out of the warranty period will be charged at cost price Motor One year 1 Waterlog 2 Damage by strong deliberate impact Replacement out of the warranty period...

Page 18: ...structions 4 Damages or quality issues due to accidental impact crash and contact with corrosive substance 5 Purchase invoice is inconsistent with the warranty card 6 Parts damaged by unauthorized disassembly or modification or cases where technical evaluation and analysis cannot be conducted since the initial fault conditions are destroyed due to such unauthorized disassembly or modification 7 By...

Reviews: