ENGINE
GL6000A-AU-B, GL6000D-AU-B,GL9000A-AU-B, GL9000D-AU-B, WSM
1-S57
(5) Cylinder
Cylinder Wear
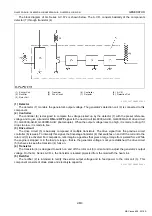
1. Measure the cylinder liner I.D. at the six positions (see figure)
with a cylinder gauge to find the maximum and minimum I.D.'s.
2. Get the difference (Maximum wear) between the maximum and
the minimum I.D.'s.
3. If the wear exceeds the allowable limit, bore and hone to the
oversize dimension. (Refer to
"Correcting Cylinder"
.)
4. Visually check the cylinder wall for scratches. If deep scratches
are found, the cylinder should be bored. (Refer to
"Correcting
Cylinder"
.)
9Y1211607ENS0097US0
Correcting Cylinder (Oversize)
1. When the cylinder is worn beyond the allowable limit, bore and
hone it to the specified dimension.
2. Replace the piston and piston rings with oversize ones.
NOTE
• When the oversize cylinder is worn beyond the allowable
limit, replace the cylinder block with a new one.
9Y1211607ENS0098US0
Cylinder I.D.
Factory specification
67.000 to 67.019 mm
2.6378 to 2.6385 in.
Allowable limit
67.169 mm
2.6444 in.
(A) Top
(B) Middle
(C) Bottom (Skirt)
(a) Right-angled to Piston Pin
(b) Piston Pin Direction
Cylinder I.D. [Oversize]
Factory specification
67.250 to 67.269 mm
2.6477 to 2.6483 in.
Allowable limit
67.400 mm
2.6535 in.
Finishing
Hone to 2.2 to 3.0 µmRz.
(0.000087 to 0.00011 in. Rz.)
Oversize
Part Name
Marking
0.25 mm
0.0098 in.
Piston
025
Piston ring assembly
025
(1) Cylinder I.D. [Before Correction]
(2) Cylinder I.D. [Oversize]
KiSC issued 06, 2016 A


