background image


37 

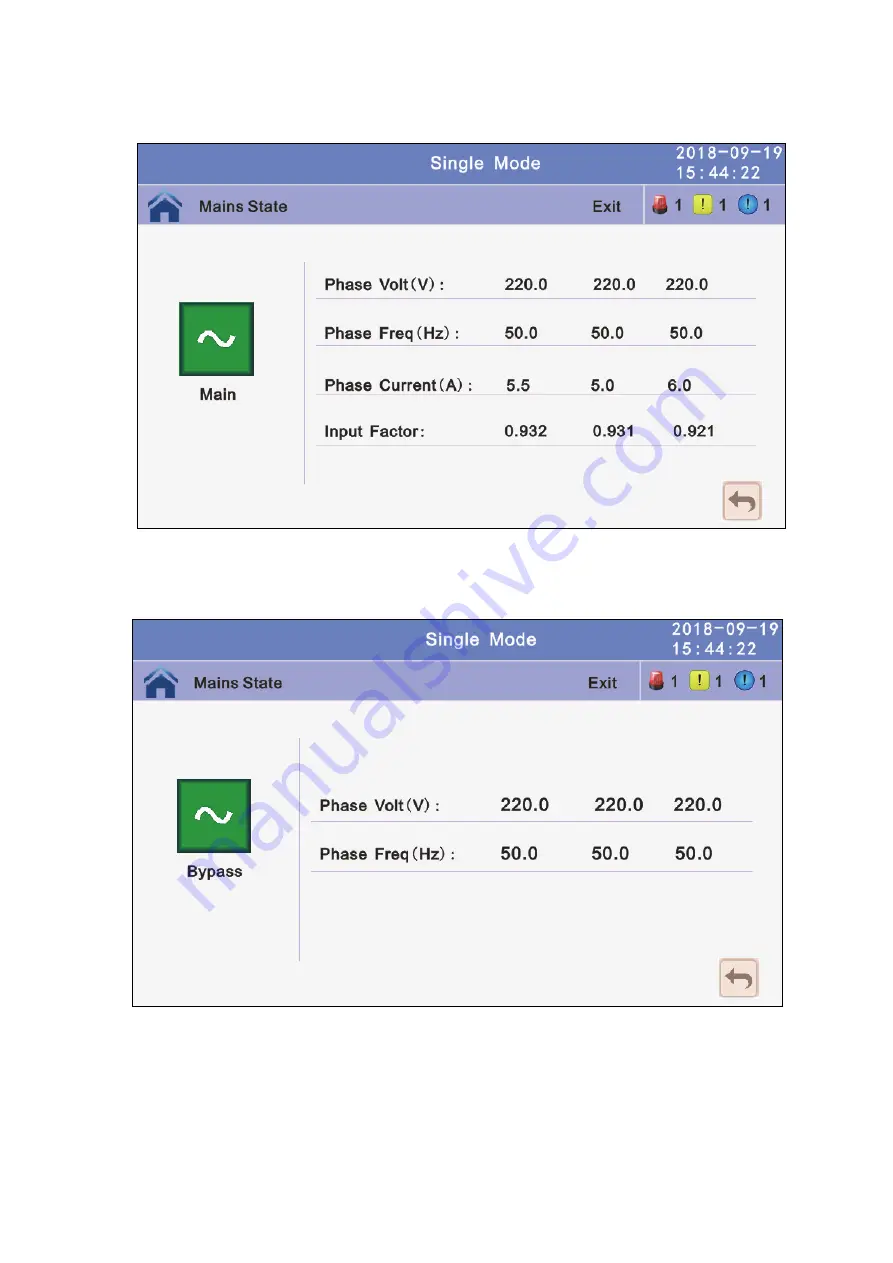
4.3.2.1 Main: 

Click the main block to enter the main data display window, click return to 

return to the previous window, click home page to return to the main page.   


4.3.2.2 Bypass: 

Click the bypass block to enter the bypass data display window, click 

return to return to the previous window, click home page to return to the 
main page.


Summary of Contents for YMK3300-200k

Page 1: ...150 600kVA 4256 4774 A...

Page 2: ...t high frequency online UPS designed by our R D team who is with years of designing experiences on UPS With excellent electrical performance perfect intelligent monitoring and network functions smart...

Page 3: ...le installation 28 3 12 LBS installation optional 28 3 12 1 LCD setting 28 3 12 2 LBS cable installation 29 3 12 3 UPS installation 29 4 Operation 30 4 1 Operation Modes 30 4 2 Turn on off UPS 32 4 2...

Page 4: ...strongly poisonous and do harmful to body 4 Please avoid short circuit between anode and cathode of battery otherwise it will cause spark or fire 5 Don t disassemble the UPS cover or there may be an e...

Page 5: ...density design The height of the single module is 3U N X parallel redundancy This series UPS adopts N X parallel redundancy design user can set different redundancy according to the importance of the...

Page 6: ...urations 50kVA 100kVA and 150kVA 250kVA The models provide 5 configurations 50kVA 100kVA 150kVA 200kVA and 250kVA 200kVA The models provide 4 configurations 50kVA 100kVA 150kVA and 200kVA 300kVA The m...

Page 7: ...ged or not during the transportation do not switch on the UPS if any damage found Please contact the dealer right away 3 Check the accessories according to the packing list and contact the dealer in c...

Page 8: ...6 200kVA 250kVA Full configuration bottom entry Front View Side View Rear View 200kVA Full configuration bottom entry Front View internal Front View Copper bar...

Page 9: ...7 250kVA Full configuration bottom entry Front View internal Front View Copper bar 200 300 400kVA Standard and Full configuration top or bottom entry Front View Side View Rear View...

Page 10: ...8 200kVA Standard and Full configuration top entry standard configuration full configuration Connect copper bar...

Page 11: ...9 200kVA Standard and Full configuration bottom entry standard configuration full configuration Connect copper bar...

Page 12: ...10 300kVA Standard and Full configuration top entry standard configuration full configuration Connect copper bar...

Page 13: ...11 300kVA Standard and Full configuration bottom entry standard configuration full configuration Connect copper bar...

Page 14: ...12 400kVA Standard configuration top entry Standard configuration Connect copper bar 400kVA Standard configuration bottom entry Standard configuration Connect copper bar...

Page 15: ...13 400 500 600kVA Standard and Full configuration top and bottom entry Front View Side View Rear View 400kVA Full configuration top and bottom entry Full configuration...

Page 16: ...14 Connect coppper bar Mains bypass common copper bar 500kVA Standard and Full configuration top and bottom entry Standard configuration Full configuration...

Page 17: ...15 Connect coppper bar Mains bypass common copper bar 600kVA Standard and Full configuration top and bottom entry Standard configuration Connect copper bar...

Page 18: ...4 Power module 5 Control unit 6 Mains switch 7 Output switch 8 Maintenance switch 9 Bypass switch 10 Bypass module 11 Mains A input copper bar 12 Mains B input copper bar 13 Mains C input copper bar...

Page 19: ...s C input copper bar Wiring must be used when mains bypass separation 25 Phase A mains bypass common input connect copper bar 26 Phase B mains bypass common input connect copper bar 27 Phase C mains b...

Page 20: ...reaker driver singnal output port SPD 0V SPD detect singnal input port GEN 0V generator detect singnal input port 4 BP_FEEDBACK PIN1_NC PIN2_NO PIN4_common 5 Optional dry contacts 6 ports can optional...

Page 21: ...om high room temperature a system of room extractor fans is recommended to be installed Optional air filters are available if the UPS operates in a dusty environment The environment temperature around...

Page 22: ...er of the UPS Altitude m 1500 2000 2500 3000 3500 4000 4500 5000 Load coefficient 100 95 90 85 80 75 70 65 The UPS cooling is depending on fan so it should be kept in good air ventilation area There a...

Page 23: ...364 5 52 or local regulations If the rated voltage is 400 V multiply the currents by 0 95 If the rated voltage is 415 V multiply the currents by 0 92 If primary loads are non linear loads increase the...

Page 24: ...rounding connector Crimped OT terminals M10 10 5mm 26N m 250k Mains input connector Crimped OT terminals M10 10 5mm 26N m Bypass input connector Crimped OT terminals M10 10 5mm 26N m Battery input con...

Page 25: ...M16 18mm 120N m Output connector Crimped OT terminals M16 18mm 120N m Grounding connector Crimped OT terminals M12 14mm 470N m 3 6 3 Recommended input front end and output back end circuit breakers UP...

Page 26: ...WARNING FAILURE TO FOLLOW ADEQUATE EARTHING PROCEDURES MAY RESULT IN ELECTROMAGNETIC INTERFERENCE OR IN HAZARDS INVOLVING ELECTRIC SHOCK AND FIRE 3 7 Power cable connect Before equipment has been ins...

Page 27: ...tery connection The UPS adopts positive and negative double battery framework total 30 optional 32 34 36 38 40 42 44 46 48 50 in series A neutral cable is retrieved from the joint between the cathode...

Page 28: ...attery cell links in each tier Do not reconnect these links and do not close the battery circuit breaker unless authorized by the commissioning engineer 3 10 Online UPS Modules Replacement For the UPS...

Page 29: ...le module system The following sections introduce the installation procedures specified to the parallel system 3 11 1 Cabinet installation Connect all the UPS needed to be put into parallel system as...

Page 30: ...d compare the current sharing 3 11 2 Parallel cable installation Shielded and double insulated control cables available must be interconnected in a ring configuration between UPS modules as shown belo...

Page 31: ...3 12 2 LBS cable installation The two ports of one mesh wire should be plug into RJ45 interface of any one UPS of both master and slave system 3 12 3 UPS installation The whole systems are showed bel...

Page 32: ...er to the inverter while floating and boosting charge the battery simultaneously Then the inverter converts the DC power to AC and supplies to the load Battery mode Stored Energy Mode If the AC mains...

Page 33: ...This is to avoid paralleling of unsynchronized AC sources This interruption is programmable but typically set to be less than an electrical cycle e g less than 15ms 50Hz or less than 13 33ms 60Hz ECO...

Page 34: ...ad is not ready to receive power from the UPS make sure that it is safely isolated from the UPS output terminals Turn ON the bypass and input switches of the UPS make sure that Bypass module insert th...

Page 35: ...will supply to the load It is suggested to use Dummy loads for testing The UPS can be loaded up to its maximum capacity during load test 4 2 3 Cold start procedure CAUTION Follow these procedures when...

Page 36: ...Never attempt to switch the UPS back to normal operation until you have verified that there are no internal UPS faults Open the front and rear doors of the UPS to be easily access to the main power sw...

Page 37: ...g to the startup procedure for single unit set the operation mode of each UPS single mode is changed to parallel mode set the parallel number for each UPS up to 4 units can be parallel set the ID of e...

Page 38: ...data by clicking on the block 4 3 2 Status View the voltage and current of the main bypass output battery can also be entered through by real time data block view the status of the switches dry contac...

Page 39: ...ay window click return to return to the previous window click home page to return to the main page 4 3 2 2 Bypass Click the bypass block to enter the bypass data display window click return to return...

Page 40: ...38 4 3 2 3 Output Click the output block to enter the output data display window click return to return to the previous window click home page to return to the main page...

Page 41: ...39 4 3 2 4 Battery Click the battery block to enter the battery data display window click return to return to the previous window click home page to return to the main page...

Page 42: ...40 4 3 2 5 Status info Click the status info block to enter the status data display window click return to return to the previous window click home page to return to the main page...

Page 43: ...41 4 3 2 6 Module Click the module block to enter the module data display window click return to return to the previous window click home page to return to the main page...

Page 44: ...arm and history of the UPS and open or close the buzer 4 3 3 1 Curr Alarm Click the curr alarm to enter the current alarm display window click return to return to the previous window click home page t...

Page 45: ...w click home page to return to the main page 4 3 3 1 Buzzer Click the buzzer mute then the buzzer will mute and the red block will change to green if the buzzer is on then click the block buzzer will...

Page 46: ...44 4 3 4 Setting There are two levels the basic setting for user settings advanced setting for technical personnel please contact the relevant technical personnel to enter advanced settings...

Page 47: ...45 4 3 4 1 Basic Setting Click basic setting enter by input the correct password The user password is 111111...

Page 48: ...Password Click password block enter user password setting page input old password and new password then click save confir to save the change Password format is six number click return to return to th...

Page 49: ...and click the save config block to save Value range is 1 63 default value is 63 Click return to return to the previous window click home page to return to the main page Backlight time LCD backlight de...

Page 50: ...e Date format has 3 format Date current date Time current time 4 3 4 1 5 Communication setting Click the text to select other value or input new value and click save config block to save Click return...

Page 51: ...49 4 3 4 2 Advanced Setting Click advanced setting enter by input the correct password The user password is 191210...

Page 52: ...le No output Aging Load Rate The value can be 18 100 default value 60 Alternate Cycles Select the cycles after set the UPS work mode to Master or Slave The value can be 1 6 default value 1 Rreq Conv M...

Page 53: ...when load less than the software setting value same power module will turn to standby mode and if the load more than the setting value some power module will turn to inverter mode after setting the sl...

Page 54: ...t Regu Inverter voltage regulated The value can be 5 0 5 step is 0 5 default value 0 Power Walk in this is enable the UPS to control the interval that each module transfers from battery mode to normal...

Page 55: ...conversion boost charge and float charge alternate time The value can be 0 20 Chg cur limiting coef The charging current limit is a multiple of the battery capacity The value can be 0 05 0 15 and is 0...

Page 56: ...et disable and is enable by default Bypass Volt Prot Lower Limit When the difference between the bypass voltage and the rated voltage exceeds the lower threshold for the bypass voltage the system dete...

Page 57: ...nd that the bypass is unavailable The value range is 1 2 4 5 10 default Bypass rate tracking rate Inverter frequency tracking to bypass frequency rate The value range is 0 5 2 and is 1 by default Bypa...

Page 58: ...ker connection detection The default value is Disable Output Swtich Enable or disable output breaker connection detection The default value is Disable Bypasss Switch Enable or disable bypass breaker c...

Page 59: ...s Disable OUT01 OUT06 Output dry contact port modify on the LCD The default value is Disable Setting value No Item No Item 1 URGENT_ALARM 8 BATTERY_SUPPLY 2 MINOR_ALARM 9 NO_SUPPLY 3 MAIN ABNORMAL 10...

Page 60: ...58 4 3 5 Maint Software update Touch corrention history download and battery self test...

Page 61: ...59 4 3 5 1 USB Wizard History Outpput download history and setting record by USB 4 3 5 1 1 Alarm Log Output...

Page 62: ...60 4 3 5 1 2 Setting Log Output 4 3 5 2 Battery Self Check can select check by Timing Daily Timing Weekly Cycle mode The default value is Timing Self Check Close...

Page 63: ...61 4 3 5 2 1 Timing Daily modify the check date time and check time 10S default 10min EOD 4 3 5 2 2 Timing Weekly modify the check date time and check time 10S default 10min EOD...

Page 64: ...62 4 3 5 2 3 Timing Cycle mode modify the cycle date and check time 10S default 10min EOD 4 3 6 Common INV ON OFF Battery test and Fault clear...

Page 65: ...S Single ON Inverter ON location UPS Parallel OFF Inverter OFF all parallel UPSs Parallel ON Inverter ON all parallel UPSs 4 3 6 2 Battery Test 10S battery test for 10s 10min battery test for 10min EO...

Page 66: ...bout check the software version 4 3 7 1 Monitor and LCD software version 4 3 7 2 Internal software version Power module software version PFC DSP PFC CPLD INV DSP and INV CPLD Center control unit ECU s...

Page 67: ...Temp Beep continuously Fault LED lit 11 013 Soft Start Failed Beep continuously Fault LED lit 12 014 BAT Charger Fault Beep continuously Fault LED lit 13 016 REC Comm Fault Once per 2 seconds Fault LE...

Page 68: ...CD Bypass connected fault Beep continuously Fault LED lit 53 0D2 Bypass Fan Fault Beep continuously Fault LED lit Alarm Information No Alarm Cord UPS Alarm Warning Buzzer LED 1 103 Battery Over Voltag...

Page 69: ...tion and use refer to the separate user manual Network Management Card with Environmental Monitor shipped with the CARD Network Management Card replacement SNMP card internal SNMP external SNMP option...

Page 70: ...5 optional 10 20 30 Frequency protection range 10 Output Phase 3 Phase 4 Wires and Ground Rated Voltage 380 400 415Vac Power Factor 1 Voltage Regulation 1 Frequency Utility Mode 1 2 4 5 10 of the rate...

Page 71: ...ing On the LCD Input Voltage Input Frequency Output Voltage Output Frequency Load Percentage Battery Voltage parameter set history record Other Standard cabinet Dimensions W D H 600 850 2000 Full cabi...

Page 72: ...pability Temperature 30 C load 135 run for a long time Temperature 40 C load 125 run for a long time 1000 load run for 100 ms Battery Voltage Optional Voltage 180V 192V 204V 216V 228V 240 252 264 276...

Page 73: ...ial number which can be found in LCD display 2 Try to describe the fault with more details such as LCD display info LED lights status etc Read the user manual carefully it can help a lot for using thi...

Page 74: ...battery switch If batteries are damaged need to replace whole group batteries Connect the battery cables correctly Go to LCD setting of the battery number and capacity set the correct data 10 Buzzer...

Page 75: ...BMS Communicate to remote LCD Appendix 4 RS485 communication port definition Definition of port Connection between the Device s RS485 port and UPS RS485 port device RJ45 UPS RJ45 Description Pin 1 5 P...

Page 76: ...rity check none Appendix 6 LBS port definition Definition of port Connection between the UPS LBS port UPS RJ45 UPS RJ45 Description Pin 1 2 3 Pin 1 2 3 LBS Pin 5 7 8 Pin 5 7 8 GND Available function o...

Page 77: ...than 3 second the UPS also supports a remote emergency stop REPO A remote emergency stop switch Dry contact signal and normally open not provided can be installed in a remote location and connection...

Reviews: