19
18
TROUBLESHOOTING
LIMITED WARRANTY
KASSEL SANITÄR S.L. warrants that its electronic products will be free of defects
in material and workmanship during normal use for two years from the date the
product is purchased.
If a defect is found in normal use, KASSEL SANITÄR S.L. will, at its discretion,
repair, provide a replacement part or product, or make appropriate adjustments.
Damage caused by accident, misuse, or abuse is not covered by this warranty.
Improper care and cleaning will void the warranty. Proof of purchase (original sales
receipt) must be provided to KASSEL SANITÄR S.L. with all warranty claims.
KASSEL SANITÄR S.L. is not responsible for labor charges, installation, or other
incidental or consequential costs other than those noted above. In no event shall
the liability of KASSEL SANITÄR S.L. exceed the purchase price of the product.
If you believe that you have a warranty claim, contact your Kassel Distributor,
Dealer or Plumbing Contractor. Please be sure to provide all pertinent information
regarding your claim, including a complete description of the problem, the product,
model number, the date the product was purchased, from whom the product was
purchased and the installation date. Also include your original invoice.
KASSEL SANITÄR S.L. AND/OR SELLER DISCLAIM ANY LIABILITY FOR SPECIAL,
INCIDENTAL OR CONSEQUENTIAL DAMAGES. This warranty excludes product
damage due to installation error, incorrect maintenance, wear and tear, battery,
product abuse, or product misuse, whether performed by a contractor, service
company, or the consumer. This warranty does not cover product damage caused
by the following:
- Incorrect installation.
- Inversions of supply pipes.
- Pressures or temperatures exceeding recommended limits.
- Improper manipulation, tampering, bad or lapsed maintenance.
- Foreign bodies, dirt or scale introduced by the water supply or soap tank.
- Use of the soap outside of viscosity specifications.
- Alteration of the original soap/foam dispenser components (including pipes).
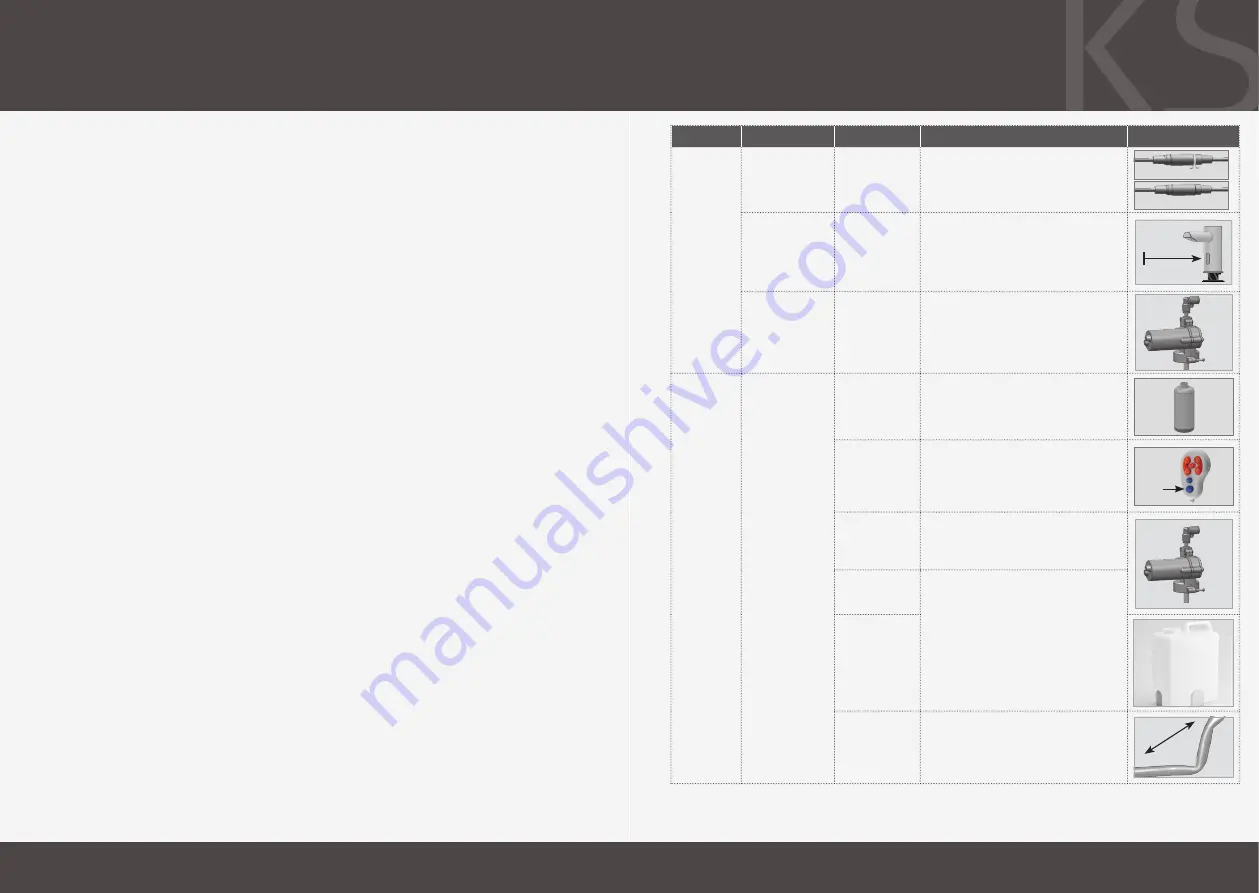
Illustration
Solution
Cause
Investigation
Indication
O-RING VISIBLE –
NOT CONNECTED PROPERLY
ONLY THE GROOVES ARE VISIBLE –
CONNECTED PROPERLY
The connector should be inserted fully
until white o-ring is not visible. Remove the
o-ring if necessary
AUX connector
not fully inserted
Continuous
discharge from the
nozzle
False
activation:
Soap/Foam
dispensing
Min 1.5 M
Eliminate any cause of reflection and if
necessary use appropriate remote control to
shorten detection range.
Reflection issue
from basin or
other object
Random discharge
from the nozzle
Replace the Pump. Rinse warm water
through the pipe and the body of the soap
dispenser all the way to the nozzle.
Damaged pump
due to high
viscosity or
debris in pipes
Soap discharging
from pump
housing.
Fill with soap with correct viscosity
(100 - 3800 cPs for liquid soap and up to 100
cPs for foam) and prime pipes using the fill
button on remote control.
Soap tank is
empty
Pump and/
or compressor
making sounds
when sensor is
activated
Soap/
Foam not
dispensing
Press
FILL
Button
Prime the soap dispenser by pressing the
fill button on the remote or by pressing the
refill button located at the bottom of the
pump, until soap exits the nozzle.
Soap dispenser
has not been
primed
Replace the Pump
Damaged pump
(discharge from
housing)
Run warm water through pipe, pump, and
body all the way to the nozzle. Replace with
soap of correct viscosity.
NOTE: Using the soap dispenser with
high viscosity soap may cause permanent
damage to the pump and shorten the
lifecycle.
Debris or dried
soap in the pipe
or tank
Soap Viscosity
(100 - 3800 cPs
for liquid soap
and up to 100 cPs
for foam)
High viscosity
soap
(> 3800 cPs for
liquid soap or
> 100 cPs for
foam)
Unbend or straighten pipes.
Bent pipes


