background image

KREMLIN REXSON

Page 1

Manual : 574.035.112

INSTRUCTION MANUAL

TWO COMPONENT GUN

TABLE OF CONTENTS

01. WARRANTY ...........................................................................................................................................................2

02. SAFETY INSTRUCTIONS......................................................................................................................................2

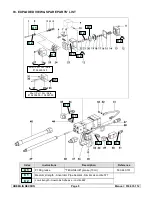
03. EXPLODED VIEW & SPARE PARTS’ LIST..........................................................................................................5

04. MAINTENANCE .....................................................................................................................................................9

05. DISASSEMBLY......................................................................................................................................................9

06. GUN ASSEMBLY.................................................................................................................................................10

Dear Customer,

You are the owner of our new equipment and we would like to take this opportunity to thank you.

To make sure your investment will provide full satisfaction, special care has been taken by KREMLIN
REXSON during all designing and manufacturing processes.

To obtain the best result, safe and efficient operation of your equipment, we advice you to read and
make yourself familiar with this instruction and service manual. Indeed, the non-compliance with
instructions and precautions stated in this manual could reduce the equipment working life, result in
operating trouble and create unsafe conditions.

Summary of Contents for 106 036 00

Page 1: ... THE ORIGINAL MANUAL IMPORTANT Before assembly and start up please read and clearly understand all the documents relating to this equipment professional use only THE PICTURES AND DRAWINGS ARE NON CONTRACTUAL WE RESERVE THE RIGHT TO MAKE CHANGES WITHOUT PRIOR NOTICE KREMLIN REXSON l 150 avenue de Stalingrad 93 245 STAINS CEDEX France 33 0 1 49 40 25 25 Fax 33 0 1 48 26 07 16 www kremlin rexson com ...

Page 2: ...unity to thank you To make sure your investment will provide full satisfaction special care has been taken by KREMLIN REXSON during all designing and manufacturing processes To obtain the best result safe and efficient operation of your equipment we advice you to read and make yourself familiar with this instruction and service manual Indeed the non compliance with instructions and precautions sta...

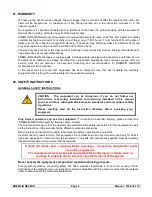
Page 3: ... to the suppliers warranty 02 SAFETY INSTRUCTIONS GENERAL SAFETY INSTRUCTIONS CAUTION The equipment can be dangerous if you do not follow our instructions concerning installation and servicing described in this manual and in accordance with applicable European standards and local national safety regulations Please carefully read all the instruction literature before operating your equipment Only t...

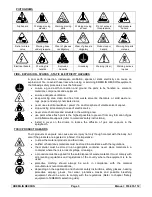
Page 4: ...e of electrical arcs never store chemicals and solvents in the working area use paint whose flash point is the highest possible to prevent from any formation of gas and inflammable vapours refer to materials safety instructions install a cover on the drums to reduce the diffusion of gas and vapours in the spraybooth TOXIC PRODUCT HAZARDS Toxic products or vapours can cause severe injury not only t...

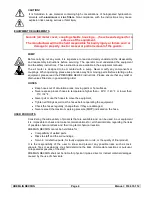
Page 5: ...ny relief or drain valves fitted are in good working order HOSES Keep hoses out of circulation areas moving parts or hot surfaces Never expose product hoses to temperature higher than 60 C 140 F or lower than 0 C 32 F Never pull or use the hoses to move the equipment Tighten all fittings as well as the hoses before operating the equipment Check the hoses regularly change them if they are damaged N...

Page 6: ...ion Reference PTFE grease TECHNILUB grease 10 ml 560 440 101 Medium strength Aneorobic Pipe Sealant Similar as Loctite 577 Low strength Aneorobic Adhesive Loctite 222 Pour For Für Para 154 599 140 Pour For Für Para 106 036 00 106 067 00 A 1 C 2 A 1 C 2 C 2 C 1 A 1 C 1 C 2 C 1 C 1 C 1 C 1 C 1 A 1 C 1 C 2 ...

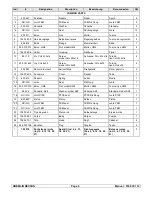
Page 7: ...ube CHc 6x35 Tornillo tipo CHc 6x35 4 12 552 261 Raccord tournant Swivel fitting Drehgelenk Racor giratorio 2 13 106 036 02 Couvercle Cover Deckel Tapa 1 14 630 612 Ressort Spring Feder Muelle 1 15 NC NS Joint Seal Dichtung Junta 1 16 953 010 019 Ecrou HM8 Nut model HM8 Mutter HM8 Tuerca tipo HM8 1 17 88 404 Rondelle AZ8 Washer model AZ8 Scheibe AZ8 Arandela model AZ8 1 18 NC NS Joint PTFE PTFE se...

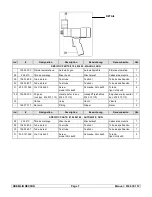
Page 8: ... 6x50 Schraube CHc 6x50 Tornillo tipo CHc 6x50 4 32 106 094 00 Poignée voir doc 574 073 110 Handle refer to doc 574 073 110 Handgriff siehe Dok 574 073 110 Empuñadura consultar doc 574 073 110 1 33 Vanne Valve Ventil Válvula 1 106 073 77 Raccord Fitting Nippel Racor 2 Ind Désignation Description Bezeichnung Denominación Qté SPECIFIC PARTS 106 067 00 AUTOMATIC GUN 28 204 410 Tête de mélange Mixer h...

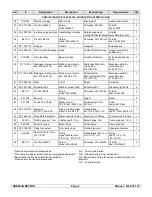
Page 9: ...l Horquilla 1 42 963 210 064 Rondelle WZ5 Washer model WZ5 Scheibe WZ5 Arandela tipo WZ5 2 43 88 127 Vis CHc M5x8 Screw model CHc M 5x8 Schraube CHc M 5x8 Tornillo tipo CHc M 5x8 2 44 551 218 Raccord Fitting Nippel Racor 2 45 551 008 Coude FF 400 bar Elbow model FF 400 bar 5801 2 psi Winkelnippel IG IG 400 bar Codo tipo HH 400 bar 1 46 905 160 212 Mamelon M 1 4G x M 3 4 JIC Nippel model double mal...

Page 10: ...otor cover coupling shields housings have been designed for safe use of the equipment The manufacturer will not be held responsible for bodily injury or failure and or damage to property due to removal or partial removal of the guards A DISASSEMBLY OF THE FLUID PART Shut off air Carry out the depressurize procedure Unscrew the fixing nut of the static mixer change the mixer Unscrew the 4 screws 10...

Page 11: ...sequence using grease or glue when necessary When assembly change the seals refer to package of seals and other parts if necessary For the assembly of the heads 26 or 28 Insert the M washers 3 and the seals into the heads 26 or 28 ensure seals are correctly positioned V point tightening side screw the nut of the cup without using tools only to position correctly the seals Insert the needles 1 in e...

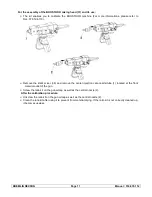
Page 12: ...e static mixer 39 and remove the center injection cata nozzle tube 1 located at the front material outlet of the gun Screw the ratio kit on the gun aircap as well as the central nozzle 2 After the calibration procedure Unscrew the ratio kit on the gun aircap as well as the central nozzle 2 Clean the ratio kit after using it to prevent from material drying If the ratio kit is not correctly cleaned ...

Reviews: