KREMLIN REXSON
Page 9
Manual : 574.035.112
04. MAINTENANCE
Guards (air motor cover, coupling shields, housings …) have been designed for safe use of
the equipment.
The manufacturer will not be held responsible for bodily injury or failure and / or damage to
property due to removal or partial removal of the guards
Before any removal or intervention on the gun, you must isolate it by means of a safety valve (compulsory
upstream of the gun) and ensure that the working pressure has been drained to avoid risks of serious
injuries : spatters especially in eyes or injections under the skin can cause a blood poisoning when using
such material.
The maintenance consists in checking seals as well as the parts of the gun following fluid leaks or only for a
preventive maintenance.
We advice you to change the parts with an unfair wear and tear.
DO NOT SOAK THE GUN INTO SOLVENT
TO PREVENT FROM DAMAGING THE SEALS OF THE PNEUMATIC PART.
05. DISASSEMBLY
Guards (air motor cover, coupling shields, housings …) have been designed for safe use of
the equipment.
The manufacturer will not be held responsible for bodily injury or failure and / or damage to
property due to removal or partial removal of the guards
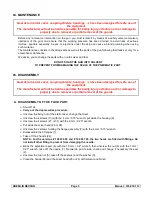
A. DISASSEMBLY OF THE FLUID PART
Shut off air.
Carry out the depressurize procedure.
Unscrew the fixing nut of the static mixer, change the mixer.
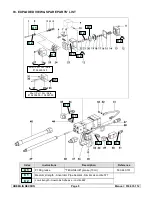
Unscrew the 4 screws (10) with the 4 mm / 0.15" wrench; put aside the housing (9).
Unscrew the 4 screws (27 or 31) with the 6 mm / 0.23" wrench.
Put aside the mixer head (26 or 28).
Unscrew the 2 screws holding the flange assembly (7) with the 4 mm / 0.15" wrench.
Disassemble the 2 flanges (7).
Take off the 2 heads (24).
NOTA : For the versions # 106 036 00 and # 106 067 00, the two heads are fitted with fittings. Do
not install other fitting to prevent from damaging the needle.
Block the adjustment part (6) with the 10 mm / 0.4" wrench, then unscrew the nut (8) with the 7 mm /
0.27" wrench, take off the needle (1) frontwards, put it aside, check and change if necessary the seal
(2).
Unscrew the cup nut (5), take off the seals (4) and the washer (3).
Clean the heads (24) and the mixer head (26 or 28) with solvent and brush.


