KREMLIN REXSON
Page 10
Manual : 574.035.112
B. DISASSEMBLY OF THE PNEUMATIC PART
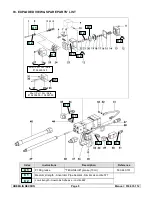
Take off the screws (11) by means of the 6 mm / 0.23" wrench.
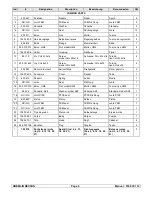
Remove the cover (13), then the seal (15), the spring (14) and the seal (20), change if necessary.
Push and take off the piston assembly backwards and put aside the body (23).
Take off the nut (16) and the washer (17).
Put aside the piston (19) and check the seals (18, 20 and 21), change them if necessary.
Take off the piston rod (22).
06. GUN ASSEMBLY
Guards (air motor cover, coupling shields, housings …) have been designed for safe use of
the equipment.
The manufacturer will not be held responsible for bodily injury or failure and / or damage to
property due to removal or partial removal of the guards
Carry out the gun assembly in the reverse order of the disassembly sequence using grease or glue when
necessary. When assembly, change the seals (refer to package of seals) and other parts if necessary.
For the assembly of the heads (26 or 28) :
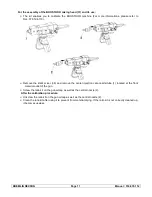
Insert the "M" washers (3) and the seals into the heads (26 or 28), ensure seals are correctly positioned
("V" point tightening side), screw the nut of the cup without using tools, only to position correctly the
seals.
Insert the needles (1) in each head and be careful not to damage the seals. Install the adjustment piece
(6) and the nut (8) without blocking them.
Remount the flanges (7), without blocking them; install the mixing head (26 or 28); do not forget the O
Rings (2), lock with the screws (27 or 31).
Adjustment of the needles :
The end of the needles must stick out of the nut (8) of 3 mm / 0.12".
When the gun is working, ensure the tightness of the mixer head. If a leak appears, unscrew the nut (8)
and the adjustment (6). Push the needle on the seat until the leak is eliminated. Install the adjustment
pieces (6), the nuts (8) and the screws.


