7
KRAUSMANN POWER TOOLS
9952
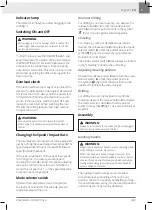
Indicator lamp
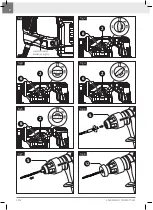
The indicator lamp lights up after plugging in the
tool (fig 1).
To start the tool, press the ON/OFF
1
switch and
keep it depressed. To switch off
the tool, release
the ON/OFF
1
switch. For low temperatures, the
tool reaches the full hammer / impact capacity
only after a certain time. This start-up time can be
shortened by striking the drill / chisel against the
floor one time.
WARNING:
Before plugging in the tool, always check to see that the
switch trigger actuates properly and returns to the OFF
position when released.
Overload clutch
Switching ON and OFF
If the tool insert becomes caught or jammed, the
drive to the drill spindle is interrupted. Because of
the forces that occur, always hold the power tool
firmly with both hands and provide for a secure
stance. If the tool jams, switch the tool OFF and
loosen the tool insert. When switching the tool
ON with the drilling tool jammed, high reaction
torques can occur!
For drilling in concrete, masonry, etc., depress the
release button
2
and rotate the mode selector
switch
6
so that the pointer points to the symbol
bb
(fig 2)
.
Use a tungsten-carbide tipped bit.
Depress the release button
2
and rotate the mode
selector switch
6
so that the pointer points to
the symbol
(fig 4), flat chisel position can be
adjusted to facilitate the chisel cut jobs.
Mode selector switch
Operate the mode selector switch only when
the tool is at a standstill. This will help prevent
premature wear of the tool.
WARNING:
A
s soon as the power tool jams, switch the tool off
immediately. This will help prevent premature wear of
the tool.
Hammer drilling
Adjusting chiseling position
Changing the Speed / Impact Rate
The rated speed and impact rate can be adjusted
just by turning the speed adjustment wheel
3
. The
speed adjustment wheel is marked MIN (lowest
speed) to MAX (fullspeed).
Ιf the to
ok is operated continuosly at low speeds
for a long time , the motor get overloaded ,
resulting in tool malfunction. The speed adjusting
dial can be turned only as far as 6 and back to 1.
do not force it past 6 or 1 , or the speed adjusting
function may no longer work.
For chipping, scaling or demolition operations,
depress the release button
2
and rotate the mode
selector switch
6
so that the pointer points to the
symbol
(fig 3)
. Use a chisel of your preference
(bull point or cold chisel).
The mode selector switch
6
must always be locked
in the “Chiselling” position when chiselling.
Chiseling
For drilling in wood, metal, plastic or synthetic
materials, depress the release button
2
and rotate
the mode selector switch
6
so that the pointer
points to the symbol
(fig 5)
. Use a twist drill bit or
wood bit.
Drilling
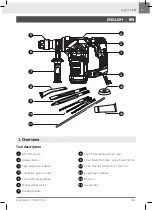
The auxiliary handle swings around to either
side, allowing easy handling of the tool in any
position. Loosen the auxiliary handle
7
by turning
it counterclockwise, swing it to the desired position
and then tighten it by turning clockwise.
Assembly
Auxiliary handle
WARNING:
A
lways be sure that the tool is switched off and unplugged
before carrying out any work on the tool.
WARNING:
Always use the auxiliary handle to ensure operating safety
when drilling in concrete, masonry etc.
When the bit begins to break through concrete or if the
bit strikes reinforcing rods embedded in concrete, the tool
may react dangerously. Maintain good balance and safe
footing while holding the tool firmly with both hands to
prevent dangerous reaction.
English |
EN


