background image

Connecting the TP-145 and the TP-146 


4.2.1  Internal Polarity and Sync Mode Switches 
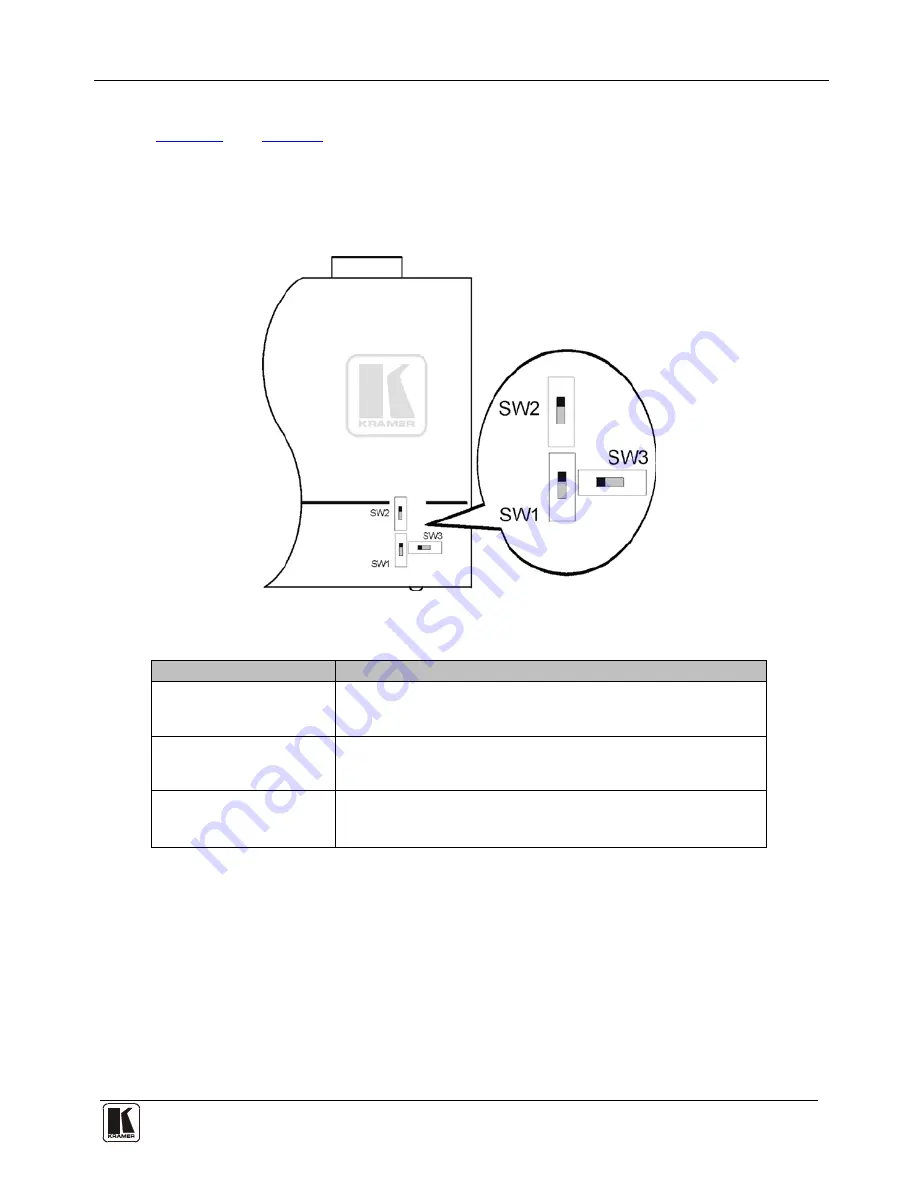
Figure 3

 and 

Table 3

 define the internal horizontal and vertical polarity switches of 

the 

TP-146

Note

: You need to open the 

TP-146

 unit to gain access to the Hs and Vs polarity 

and video selection switches which are located on the lower part of the printed 
circuit board next to the ON LED. After setting the switches, close the 

TP-146


Figure 3: TP-146 Internal Polarity Switches 

Table 3: TP-146 Internal Polarity Switches and Descriptions 

Switch/Jumper 

Function 

SW1

 Horizontal Sync Switch 

Slide up to set the H Sync to positive polarity  
Slide down to set the H Sync to negative polarity  

Default = up (positive polarity) 

SW2

 Vertical Sync Switch 

Slide up to set the V Sync to positive polarity  
Slide down to set the V Sync to negative polarity  

Default = up (positive polarity) 

SW3

 Video Selection Switch


Slide left to set the video to RGBHV/VGA 
Slide right to set the video to Component/Composite video with sync 
Default = left (RGBHV/VGA video) 

Connecting the TP-145 and the TP-146 

You can use the 

TP-145


UXGA/Audio/Data Line Transmitter

 and the 

TP-146


UXGA/Audio/Data Line Receiver

 to configure a TP transmitter and receiver system 

that transmit video, audio, and RS-232 control signals via TP cable. 

Summary of Contents for TP-145

Page 1: ...Kramer Electronics Ltd USER MANUAL Models TP 145 XGA Audio Data Line Transmitter TP 146 UXGA Audio Data Line Receiver...

Page 2: ...Acquiring the EDID 10 7 Technical Specifications 11 Figures Figure 1 TP 145 XGA Audio Data Line Transmitter Front and Rear Panels 5 Figure 2 TP 146 UXGA Audio Data Line Receiver Front and Rear Panels...

Page 3: ...apter 12V DC output This user manual3 This user manual describes the following Kramer TOOLS TP 145 XGA Audio Data Line Transmitter see Section 4 1 TP 146 UXGA Audio Data Line Receiver see Section 4 2...

Page 4: ...rformance Twisted Pair TP transmitter and receivers for computer graphics video including HDTV unbalanced stereo audio and RS 232 control commands The TP 145 converts computer graphics video unbalance...

Page 5: ...elded Twisted Pair UTP skew free cable Kramer BC XTP may be used Bear in mind though that we advise using STP cables where possible since the compliance to electromagnetic interference has been tested...

Page 6: ...see Section 4 1 TP 146 UXGA Audio Data Line Receiver see Section 4 2 4 1 Defining the TP 145 XGA Audio Data Line Transmitter The TP 145 is a high performance transmitter that accepts A computer graph...

Page 7: ...ector Connect to the LINE IN RJ 45 connector on the TP 146 6 RS 232 Terminal Block Connect to the PC or the Remote Controller see Section 5 1 7 AUDIO IN 3 5mm Mini Connector Connect to the analog audi...

Page 8: ...the output signal level 3 EQ 1 Adjusts the cable compensation equalization level Trimmer 4 ON LED Lights green when the unit receives power 5 UXGA OUT 15 pin HD F Connector Connect to the UXGA accepto...

Page 9: ...Function SW1 Horizontal Sync Switch Slide up to set the H Sync to positive polarity Slide down to set the H Sync to negative polarity Default up positive polarity SW2 Vertical Sync Switch Slide up to...

Page 10: ...er C GMA GMA cable VGA 15 pin HD M Audio jack to VGA 15 pin HD M Audio jack 1 An RS 232 cable with a 9 pin D sub connector at one end to the laptop and a 3 pin terminal block connector at the other en...

Page 11: ...ontal sync switches vertical sync switches and the sync mode jumpers see Section 4 2 1 5 1 Transmitting via RS 232 It is possible to transmit data for example using a PC between the TP 145 and TP 146...

Page 12: ...the default EDID 1 Plug the 12V DC power adapter into the power socket on the TP 145 and connect the adapter to the mains electricity 2 With no display device connected to the TP 145 press the EDID C...

Page 13: ...PDIF RCA connector 1 Analog 3 5mm mini connector PORTS 1 RS 232 bidirectional terminal block RESOLUTION Up to WUXGA 1080p MAX OUTPUT LEVEL Video 1 6V Audio 2 3V CONTROLS EDID capture button Level 7 5...

Page 14: ...er lightning orotheractsofnature ii Product modification orfailureto followinstructions supplied with theproduct iii Repairorattemptedrepairby anyonenot authorized byKramer iv Anyshipment oftheproduct...

Page 15: ...st information on our products and a list of Kramer distributors visit our Web site www kramerelectronics com where updates to this user manual may be found We welcome your questions comments and feed...

Reviews: