background image


840Hxl - Serial Protocol 

25 


25 

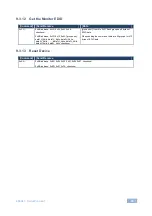
9.3.12  Get the Monitor EDID      


Command   Send/Receive  

Data  

0xFD   

0xEB, address, 0xFD, 0x02, 0x03, 0x00, 

checksum  


0xEB, address, 0xFD, 0x12, 0x03, [group num],  

data1H_4bits, data1L_4bits, data2H_4bits, 

data2L_4bits, ……, data7H_4bits, data7L_4bits, 

data8H_4bits, data8L_4bits, checksum 

[group num]: from 0 to 0x3f. Each group has 8 bytes of 

EDID data  


When sending the command, there are 64 groups for 512 

bytes of EDID data  

9.3.13  Reset Device      


Command   Send/Receive  

0xED   

0xEB, address, 0xED, 0x04, 0x03, 0x01, 0x02, 0x07, checksum  


0xEB, address, 0xED, 0x01, 0xFA, checksum  


Summary of Contents for 840Hxl

Page 1: ...KRAMER ELECTRONICS LTD USER MANUAL MODEL 840Hxl Pattern Generator P N 2900 300032 Rev 2 ...

Page 2: ......

Page 3: ... Serial Protocol 21 9 1 Command Format 21 9 2 Device Response 21 9 3 Commands 22 Figures Figure 1 840Hxl Pattern Generator Front Panel 4 Figure 2 840Hxl Pattern Generator Rear Panel 5 Figure 3 Connecting the 840Hxl Pattern Generator 6 Figure 4 Found New Hardware Wizard Window 11 Figure 5 File Location Selection Window 11 Figure 6 Insert Disk Window 12 Figure 7 Connection Method Window 13 Figure 8 ...

Page 4: ...at are clearly defined by function GROUP 1 Distribution Amplifiers GROUP 2 Switchers and Matrix Switchers GROUP 3 Control Systems GROUP 4 Format Standards Converters GROUP 5 Range Extenders and Repeaters GROUP 6 Specialty AV Products GROUP 7 Scan Converters and Scalers GROUP 8 Cables and Connectors GROUP 9 Room Connectivity GROUP 10 Accessories and Rack Adapters and GROUP 11 Sierra Products Congra...

Page 5: ...s to avoid interference deterioration in signal quality due to poor matching and elevated noise levels often associated with low quality cables Avoid interference from neighboring electrical appliances that may adversely influence signal quality Position your Kramer 840Hxl Pattern Generator away from moisture excessive sunlight and dust Go to http www kramerelectronics com to check for up to date ...

Page 6: ...onboard EPROM that saves the last settings 3 1 Defining EDID The Extended Display Identification Data EDID is a data structure provided by a display to describe its capabilities to a graphics card that is connected to the display s source The EDID enables the 840Hxl to know what kind of monitor is connected to the output The EDID includes the manufacturer s name the product type the timing data su...

Page 7: ... Resolution or HDCP functions 3 PAT DC Press to select either the Pattern or Color Depth functions 4 CS ASF Press to select either the Color Space or Audio Sample Frequency functions 5 H D ASD Press to select either the HDCP DVI or Audio Sample Depth functions 6 2 digit 7 segment Display Indicates the current setting The display flashes if there is a problem communicating with the display for exam...

Page 8: ...tern Generator Rear Panel Feature Function 10 HDMI OUT Connector Connect to the HDMI acceptor 11 RS 232 9 pin D sub Connector Connect to the serial port on a PC for remote control see Section 5 1 1 12 USB Connector Connect to the USB port on a PC for remote control 13 5V DC Connector Connect to the power adapter ...

Page 9: ...nnect the HDMI OUT connector to an HDMI acceptor for example a flat panel LCD display 2 Optional connect a PC to control the 840Hxl via the RS 232 or USB ports 3 Connect the power adapter to the 5V DC socket and to the mains electricity not shown in Figure 3 Note The device must be connected to the 5V supply or it will not function correctly If connected to a PC via the USB the device might appear...

Page 10: ... connect to the product via RS 232 Connect the RS 232 9 pin D sub rear panel port on the product unit via a 9 wire straight cable only pin 2 to pin 2 pin 3 to pin 3 and pin 5 to pin 5 need to be connected to the RS 232 9 pin D sub port on your PC 5 1 2 Connecting a PC via the USB Port To connect the 840Hxl via a USB port 1 Using a USB cable connect the 840Hxl to a USB port on the PC 2 Install the ...

Page 11: ...z 32 2880 x 288 50Hz 10 WSXGA 1680 x 1050 60Hz 33 2880 x 480 60Hz 11 SXGA 1280 x 1024 75Hz 34 2880 x 480i 60Hz 12 HD 1080 1920 x 1080 60Hz 35 2880 x 576 50Hz 13 WUXGA 1920 x 1200 60Hz 36 2880 x 576i 50Hz 14 UXGA 1600 x 1200 60Hz 37 1920 x 1080 25Hz 15 720 x 480i 60Hz 38 1920 x 1080 30Hz 16 HD 1080 1920 x 1080i 60Hz 39 1920 x 1080 50Hz 17 Output native resolution 40 1920 x 1080i 50Hz 18 720 x 480 1...

Page 12: ...lor Depth DC 24 bit 30 bit 36 bit Auto Audio Sample Rate ASF 44kHz 48kHz 88kHz 96kHz 176kHz 192kHz Auto Audio Sample Depth ASD 16 bit 20 bit 24 bit Auto 6 1 Operating the 840Hxl Using the Front Panel Buttons To activate the top row of functions RES PAT CS and H D Press the Function ON OFF button the button LED lights To activate the bottom row of functions HDCP DC ASF and ASD Press the Function ON...

Page 13: ...l the USB driver and the 840Hxl Control Application 6 2 1 Downloading and Installing the USB Driver and Control Application Note The driver only works on 32 bit systems To install the USB driver and Control Application 1 Navigate to the Kramer Electronics Web site http www kramerelectronics com and search for the product 840Hxl 2 Click on the Downloads tab 3 Download the 840Hxl Windows USB Driver ...

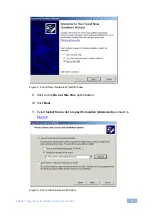
Page 14: ... Generator 11 Figure 4 Found New Hardware Wizard Window 9 Click on the No not this time option button 10 Click Next 11 Select Install from a list or specific location Advanced as shown in Figure 5 Figure 5 File Location Selection Window ...

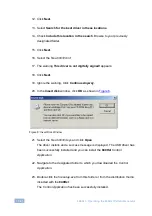
Page 15: ...ck Continue Anyway 20 In the Insert disk window click OK as shown in Figure 6 Figure 6 Insert Disk Window 21 Select the file atm6124 sys and click Open The driver installs and a success message is displayed The USB driver has been successfully installed and you can install the 840Hxl Control Application 22 Navigate to the designated folder to which you downloaded the Control Application 23 Double ...

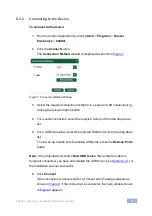
Page 16: ...n button 4 For a serial connection select the required Com port from the drop down list 5 For a USB connection select the required USB device from the drop down list To view an up to date list of available USB ports press the Refresh Ports button Note If the drop down list shows No USB Devices then either the cable is faulty not connected you have not installed the USB driver see Section 6 2 1 or ...

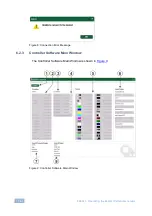
Page 17: ...l Operating the 840Hxl Pattern Generator Figure 8 Connection Error Message 6 2 3 Controller Software Main Window The Controller Software Main Window is shown in Figure 9 Figure 9 Controller Software Main Window ...

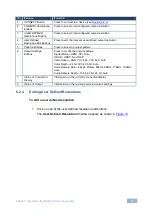
Page 18: ...attern 6 Output Settings Buttons Press to modify the output settings Signal Mode HDMI DVI Auto HDCP HDCP No HDCP Color Space RGB YUV 444 YUV 422 Auto Color Depth 24 bit 30 bit 36 bit Auto Audio Sample Rate 44kHz 48kHz 88kHz 96kHz 176kHz 192kHz Auto Audio Sample Depth 16 bit 20 bit 24 bit Auto 7 Status of Connected Display Information on the currently connected display 8 Status of Output Informatio...

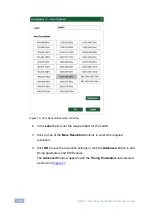
Page 19: ... the required label for the button 3 Click on one of the More Resolution buttons to select the required resolution 4 Click OK to save the resolution settings or click the Advanced button to edit timing parameters and EDID values The Advanced Window appears with the Timing Parameters tab selected as shown in Figure 11 ...

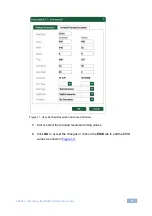
Page 20: ...Pattern Generator 17 Figure 11 User Defined Resolution Advanced Window 5 Edit or select the required resolution timing values 6 Click OK to accept the changes or click on the EDID tab to edit the EDID values as shown in Figure 12 ...

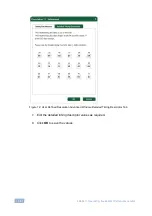
Page 21: ...xl Operating the 840Hxl Pattern Generator Figure 12 User Defined Resolution Advanced Window Detailed Timing Descriptor Tab 7 Edit the detailed timing descriptor values as required 8 Click OK to save the values ...

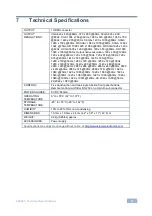
Page 22: ...100Hz 1280 x 720 120Hz 1440 x 288 50Hz 1440 x 480 60Hz 2880 x 240 60Hz 2880 x 288 50Hz 2880 x 480 60Hz 2880 x 480i 60Hz 2880 x 576 50Hz 2880 x 576i 50Hz 1920 x 1080 25Hz 1920 x 1080 30Hz 1920 x 1080 50Hz 1920 x 1080i 50Hz 1920 x 1080 60Hz 1920 x 1080i 60Hz 1920 x 1080i 100Hz 1920 x 1080i 120Hz 2K 2048 x 1080 50Hz 2K 2048 x 1080 60Hz CONTROL Five dual function and two single function front panel bu...

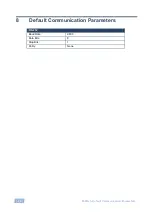
Page 23: ...20 840Hxl Default Communication Parameters 8 Default Communication Parameters RS 232 Baud Rate 9600 Data Bits 8 Stop Bits 1 Parity None ...

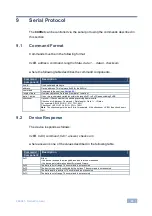
Page 24: ... Optional Checks whether the sending receiving frame is valid Check sum Address Command Data length Data 1 Data n For example EBH 90H 01H 01H F3H 85H Check sum 90H 01H 01H F3H 185H Note The checksum gets the low 8 bits for example if the check sum EBH then check sum 14H 9 2 Device Response The device responds as follows 0xEB 0x90 command 0x01 answer check sum where answer is one of the values desc...

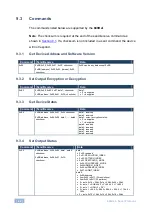
Page 25: ...ice Status Command Send Receive Data 0xE4 0xEB address 0xE4 0x01 0x00 checksum 0xEB address 0xE4 0x08 data1 data8 checksum data1 reserved data2 reserved data3 output encryption status 0 encryption 1 decryption data4 reserved data5 reserved data6 reserved data7 reserved data8 reserved 9 3 4 Set Output Status Command Send Receive Data 0xE6 0xEB address 0xE6 0x02 data1 data2 checksum 0xEB address 0xE...

Page 26: ... 3 6 Get Output Status when the Device is in Auto Mode Command Send Receive Data Auto Setup Data Not Auto Setup 0xE7 0xEB address 0xE7 0x01 0x01 checksum 0xEB address 0xE7 0x08 data1 data8 checksum data1 Deep Color 0x18 24bit 0x1E 30bit 0x24 36bit Setup value data2 Color Space 1 RGB444 2 YUV444 3 YUV422 Setup value data3 Audio sample 1 44k 2 48k 3 88k 4 96k 5 176k 6 192k Setup value data4 audio bi...

Page 27: ..._4bits As 0xfa apart to 0x0f and 0x0a 6 The 18 data are the detailed timing of the EDID Example 1 1600 1200 60 VESA DMT 10 Frame of Command as EB 90 EA 26 00 00 04 08 03 0F 04 00 03 00 06 02 0B 00 03 02 04 00 04 00 0C 00 01 03 00 00 06 0F 01 03 01 01 00 00 00 00 01 0E 00 Example 2 720p Frame of Command as EB 90 EA 26 00 00 00 01 01 0D 00 00 07 02 05 01 0D 00 01 0A 02 00 06 0E 02 08 05 05 00 00 07 ...

Page 28: ...4bits data1L_4bits data2H_4bits data2L_4bits data7H_4bits data7L_4bits data8H_4bits data8L_4bits checksum group num from 0 to 0x3f Each group has 8 bytes of EDID data When sending the command there are 64 groups for 512 bytes of EDID data 9 3 13 Reset Device Command Send Receive 0xED 0xEB address 0xED 0x04 0x03 0x01 0x02 0x07 checksum 0xEB address 0xED 0x01 0xFA checksum ...

Page 29: ...ture ii Product modification orfailure to follow instructions supplied withtheproduct iii Repair orattemptedrepairby anyone not authorized by Kramer iv Any shipment of theproduct claims must bepresentedtothe carrier v Removal orinstallation of theproduct vi Any other cause which does not relate to aproduct defect vii Cartons equipment enclosures cables or accessories used inconjunction withtheprod...

Page 30: ...PN 2900 300032 Rev 2 ...

Reviews: