background image

Operating Instructions

OIC 12en  Edition 08/2016 

29

Lubricating the ball bearings

Servicing

Lubricating the ball bearings

Tab. 4 Lubricating intervals of ball bearings

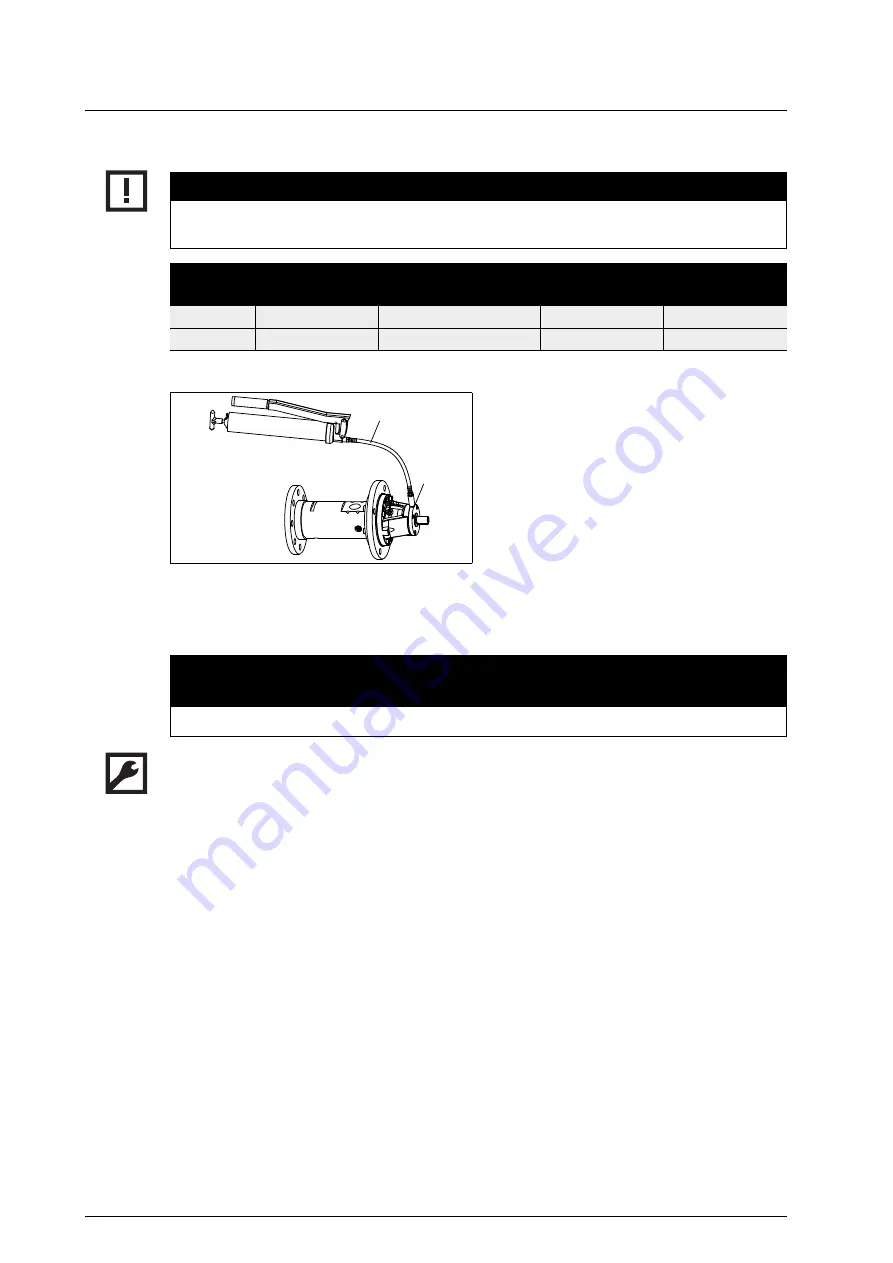
Aids:

Grease gun

► Re-lubricate the ball bearing with the recommended amount of grease via the grease nipple

B

.

Be sure to observe the following instructions:

► Re-lubrication may only be carried out while the pump is running.
► First re-lubrication after an hour running time.

Size

Temperature [°C]

Lubricate interval [h] with 
speed 1450 min

-1

Grease amount 
[cm

3

]

Recommended 
grease

CLC 55

100

7500

6

SKF LGWA 2

CLC 550

100

6000

16

SKF LGWA 2

A

Grease gun

B

Grease nipple of ball bearings

Fig. 6

Lubricating the ball bearings

A

B

CAUTION

Damage to bearing because of lack of lubrication.

► It is imperative that the lubrication intervals be observed.

Summary of Contents for CLC 55

Page 1: ...ay Langley Bridge Eastwood Nottinghamshire NG16 3RY Tel 44 0 1773 302 660 Email sales northridgepumps com Website www northridgepumps com Operating Instructions KRAL Screw Pumps CLC Series High viscos...

Page 2: ...oval and connection Installation 15 Installing the pump 15 Protecting the pump against soiling 15 Connecting the pump to the pipe system 16 Assembling the pump and motor 16 Connecting the motor 17 Rem...

Page 3: ...ad and observe these instructions and the associated documents in particular the safety instructions and war nings Observe additional system specific directives and regulations Specialist personnel fi...

Page 4: ...TEX supplementary instructions for operation in potentially explosive areas Declaration of conformity according to EU Directive 2006 42 EC Declaration of conformity according to EU Directive 2014 34 E...

Page 5: ...safety instructions must be observed No liability is accepted for damage arising through non observance of the operating instruc tions Read the operating instructions carefully and observe them The o...

Page 6: ...2 Size Corresponds to delivery rate in l min at 1450 min 1 3 Shaft seal F PTFE seal with quench 4 Pressure stage overflow valve Z without valve 5 Bearing Heating system Pump housing material X Special...

Page 7: ...e contact the manufacturer to determine the necessary NPSH values Weights Tab 3 Weights Unit CLC 55 CLC 550 Max operating pressure bar 63 63 Max inlet pressure bar 10 10 Max temperature of pumped liqu...

Page 8: ...ating system Scope of delivery 1 Mount the heating cover to the pump housing using the supplied socket screws 2 Mount the piping Commissioning the fluid heating system Required heating up period for t...

Page 9: ...tion 08 2016 9 Structure Function description Function description Structure Fig 1 Structure CLC 55 Fig 2 Structure CLC 55 with completion Fig 3 Structure CLC 550 1 2 3 4 5 6 7 8 9 10 11 12 13 14 15 1...

Page 10: ...and is therefore especially suita ble for pumped liquids that harden when they cool down tend to crystallize or are abrasive Fig 4 Structure CLC 550 with completion 1 Suction cover 2 Pump housing 3 F...

Page 11: ...ts to the three sealing chambers are designed and filled diffe rently Sealing chamber A Application specific for example PTFE grease for lubrication of the balancing cylinder Sealing chamber B PTFE gr...

Page 12: ...test run the internal components of the pump are wetted with test oil which has a preserva tive effect The pipe connections are fitted with protective covers Unless otherwise specified the exter nal...

Page 13: ...ing the external surfaces of the pump Aids Preservative e g Castrol Rustilo DWX 33 Paint or spray the preservative onto all plain and unpainted parts At intervals of about six months check the preserv...

Page 14: ...nk 2 Clean residues of the pumped liquid from the individual parts 3 Separate the sealing elements made of elastomer from the pump and dispose of them in the residual waste 4 Recycle iron parts WARNIN...

Page 15: ...operating limits NPSH values and ambient conditions into account see Technical data page 7 The function safety and service life may not be impaired by humidity temperature influences or explosive atmo...

Page 16: ...re necessary If the screws tighten easily this is a sure sign that the installation is stress free 5 Tighten the connecting screws crosswise with torque see Tab 2 page 38 Assembling the pump and motor...

Page 17: ...ular offset of the coupling using a hairline gauge If the limit values of the above table are exceeded loosen the fastening of the pump or motor and move the pump or motor in order to reduce the angul...

Page 18: ...hile doing so collect the emitted quench liquid in a collecting vessel see Fig 3 page 18 6 Loosen the connecting flange 7 Loosen the fastening of the pump unit on the foundation and dismantle the moto...

Page 19: ...s are not taken into account The following variants are described Variant 1 Sealing chamber A application specific B and C filled in factory with PTFE grease Variant 2 Sealing chamber A application sp...

Page 20: ...C are filled with PTFE grease see Lubricating the radial shaft seal page 30 Variant 2 Filling sealing chamber B with quench liquid via quench tank Aids Quench liquid pH neutral and resin free for exa...

Page 21: ...he sealing chamber A is filled application specifically and vented and sealing chamber C is filled with PTFE grease see Lubricating the radial shaft seal page 30 2 Screw out both screw plugs 2 of the...

Page 22: ...bricating the radial shaft seal page 30 2 Open the screw plug of the upper vent hole by a max of two rotations see Fig 5 page 22 so that air can escape during the filling process 3 Open the suction si...

Page 23: ...h pumped liquid Shut off devices in the suction and pressure line opened Variant 3 Circulation line opened for quench liquid 1 Rotation direction arrow Fig 6 Indication of direction of rotation 1 1 CA...

Page 24: ...opcock read the operating pressure close the pressure gauge stop cock Switching off the pump 1 Switch off the motor 2 Close the pressure and suction side shut off devices Decommissioning the pump Carr...

Page 25: ...g liquid Close the pressure and suction side shut off devices Dismantled Disconnect the motor from the power supply and secure it against being switched back on see Removing the pump page 18 stored Ob...

Page 26: ...tted pumped liquid safely and dispose of it in an environmentally compatible man ner Also observe the general drawings during all the work on the pump see General drawings page 35 Finding Cause Elimin...

Page 27: ...cope of delivery Extractor Fig 1 Fig 2 Fig 3 Fig 4 Fig 5 042 074 2 090 112 Balancing cylinder Flange cover Suction cover Union flange 131 222 3 661 914 1 Pump housing Flat gasket Screw set Socket scre...

Page 28: ...w in such a way that the bearing bushes are flush with the flange cover Slide on the pump housings see Tab 3 page 27 7 Tighten the socket screws 914 2 of the union flange with reduced torque see Tab 3...

Page 29: ...following instructions Re lubrication may only be carried out while the pump is running First re lubrication after an hour running time Size Temperature C Lubricate interval h with speed 1450 min 1 Gr...

Page 30: ...page 30 Variant 2 Quench liquid screw plug 2 Sealing chamber B filling via quench tank see Refilling quench liquid page 31 PTFE grease screw plug 1 and 3 Sealing chamber A and C see Tab 5 page 30 Vari...

Page 31: ...n line if necessary Re lubricate the recommended amount of grease via the grease nipples 1 and 3 see Tab 5 page 30 Refilling quench liquid If necessary top up the quench liquid while observing the min...

Page 32: ...e or shaft seal for leaks Pay particular attention to leakage at valves and connection points If necessary replace parts 4 Suction head too high Reduce difference of level or Reduce pipe length or Inc...

Page 33: ...ng the pump to the pipe system page 16 18 Resonance in the system Provide a flexible bearing arrangement for the pump unit or Make the connections with hoses 19 Speed of flow in suction or pressure li...

Page 34: ...sing and the rotating parts with an oilstone If necessary replace the pump Reduce the differential pressure 30 Viscosity is too low and has overloaded the sleeve bearing Dismantle the pump and clean i...

Page 35: ...ngs Appendix Appendix General drawings Fig 1 CLC 55 Fig 2 Completion CLC 55 914 1 090 222 3 914 2 112 131 222 2 074 2 872 062 821 464 127 057 914 4 914 3 222 1 134 471 472 039 059 745 049 1 739 471 04...

Page 36: ...ions General drawings Appendix Fig 3 CLC 550 Fig 4 Completion CLC 550 914 1 090 222 3 914 2 112 131 222 2 074 2 062 821 127 057 914 4 914 3 222 1 134 471 472 056 059 745 049 1 739 471 040 042 866 1037...

Page 37: ...ng 057 Threaded ring 526 Pump bracket foot 059 Support ring 661 Screw set 061 Thrust washer 739 O ring 062 Spacer 745 Radial shaft seal 074 1 Flange cover 821 Four point contact bearings 074 2 Flange...

Page 38: ...0 Property class 80 Thread Galvanized Stainless steel M 3 0 6 1 5 1 2 1 5 1 1 G 1 8 13 M 4 1 4 2 9 4 1 2 3 3 2 G 1 4 30 M 5 2 7 6 0 8 0 4 8 6 0 3 9 3 5 4 7 G 3 8 60 M 6 4 7 9 5 14 7 6 10 3 6 9 6 8 G 1...

Reviews: