background image

3

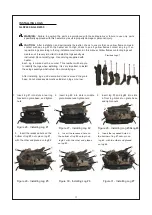
Figure  - Attaching Flexible Gas 

Hose to Heater Gas Regulator

Figure 3-A - External Regulator 
with Vent Pointing Down For NG

Figure 3-B - External Regulator 

with Vent Pointing Down For LP

10.  Attach base assembly to fireplace floor using two masonry screws 

(in hardware package) (see Figure ).

A CSA/AGA design-certified equipment shutoff valve with 

/8-inch NPT tap is an acceptable alternative to test gauge connec-

tion. Purchase the optional CSA/AGA design-certified equipment 

shutoff valve from your dealer. 

The installer must supply an external regulator. The external regula-
tor will reduce incoming gas pressure. You must reduce incoming gas 
pressure to minimum allowable on rating label. If you do not reduce 
incoming gas pressure, heater regulator damage could occur. Install 
external regulator with the vent down as shown in Figure 3. Pointing 

the vent down protects it from freezing rain or sleet.

Installation must include equipment shutoff valve, union, and plugged 
/8-inch NPT tap. Locate NPT tap within reach for test gauge hook 
up. NPT tap must be upstream from heater (see Figure 4). To pre-
vent performance problems, Propane/LP tank of less than 00 lbs. 
capacity is not recommended. 

 IMPORTANT: 

 Install an equipment shutoff valve in an accessible 

location. The equipment shutoff valve is for turning on or shut-
ting off the gas to the appliance. Apply pipe joint sealant lightly 
to male threads. This will prevent excess sealant from going 
into pipe. Excess sealant in pipe could result in clogged heater 
valves.

 CAUTION:  

Use only a new, black iron or steel pipe. Internally-

tinned copper tubing may be used in certain areas. Check your 
local codes. Use pipe of large enough diameter to allow proper 
gas volume to heater. If pipe is too small, undue loss of pressure 
will occur.

 CAUTION:  

Use pipe joint sealant that is resistant to natural 

gas(NG) or liquid petroleum (LP) gas.

Figure 4 - Gas Connection

We recommend that you install a sediment trap in the supply line as shown in Figure 4. Place sediment trap where 

it is within reach for cleaning and where trapped matter is not likely to freeze. A sediment trap traps moisture and 

contaminants. This keeps them from going into heater controls. If sediment trap is not installed or is installed incorrectly, 
heater may not run properly.

 IMPORTANT: 

 Hold pressure regulator with wrench when connecting it to gas piping and/or fittings.

Summary of Contents for GLD1850

Page 1: ...tructions If you cannot reach your gas supplier call the fire department Installation and service must be performed by a qualified installer service agency or the gas supplier This is an unvented gas...

Page 2: ...before starting installation Failure to fol low these instructions may result in a possible fire hazard and will void the warranty ITEM NO GLD2440 GLD2450 Input Rating 32 000BTU Hr 32 000BTU Hr Gas Ty...

Page 3: ...heart or lung disease or anemia those under the influence of alcohol and those at high altitudes Natural and Propane LP Gas Natural or propane LP gas is odorless An odor producing agent is added to n...

Page 4: ...om you must open the vents before operating log set Always operate heater with glass doors fully open 8 This log heater is designed to be smokeless If logs ever appear to be smoking turn off heater an...

Page 5: ...nd fuel burning appliances draw air from the house To operate you must provide adequate fresh air for these appliances This will insure proper venting of vented fuel burning appliances PRODUCING ADEQU...

Page 6: ...adding the space of an adjoining room If the extra space provides an unconfined space remove door to adjoining room or add ventilation grills between rooms See Ventilation Air From Outdoors page 7 Ve...

Page 7: ...ETY PILOT This heater has a pilot with an Oxygen Depletion Sensing ODS safety shutoff system The ODS pilot is a required feature for vent free room heaters The ODS pilot shuts off the heater if there...

Page 8: ...nspect chimney flue for damage WARNING Maintain the minimum clearances If possible provide greater clearances from the floor ceiling and adjoining wall than required Minimum Fireplace Clearance to Com...

Page 9: ...E This heater is intended for use as supplemental heat Use this heater along with your primary heating system Do not install this heater as your primary heat source If you have a central heating sys t...

Page 10: ...requirements IMPORTANT If these minimum clear ances are not met you must operate heater with chimney flue damper open Go to Installing Damper Clamp Accessory for Vented Operation page 11 MANTEL CLEARA...

Page 11: ...e three reasons for operating your heater as a vented model 1 The fireplace does not meet the clearance requirements for vent free operation 2 State or local codes do not permit vent free operation 3...

Page 12: ...ove when you adjust controls Moving heater may cause a gas leak WARNING If installing in a sunken fireplace special care is needed You must raise the fireplace floor to allow access to heater control...

Page 13: ...re 14 To pre vent performance problems Propane LP tank of less than 100 lbs capacity is not recommended IMPORTANT Install an equipment shutoff valve in an accessible location The equipment shutoff val...

Page 14: ...d in the NG position Do not operate heater between locked positions 3 Remove hex plug with wrench provided from natural gas inlet of regulator and install into LP inlet of regulator use thread sealant...

Page 15: ...soap and water to gas joints Bubbles forming indicate a leak 5 Correct all leaks immediately 6 Reconnect heater and equipment shutoff valve to gas supply Check reconnected fittings for leaks Test Pres...

Page 16: ...is very important to install these logs exactly as instructed Do not modify logs After installing logs add decorative cinders around the grate base do not place any decorative cinders on logs or burne...

Page 17: ...ry important to install these logs exactly as instructed Do not modify logs After installing logs add decorative cinders around the grate base do not place any decorative cinders on logs or burner 1 I...

Page 18: ...ors fully open FOR YOUR SAFETY READ BEFORE LIGHTING WARNING If you do not follow these instructions exactly a fire or explosion may result causing property damage personal injury or loss of life When...

Page 19: ...ian or gas supplier TO TURN OFF GAS TO APPLIANCE 1 Turn gas control knob clockwise to OFF position Do not force 2 If applicable Turn off all electric power to the appliance MATCH LIGHTING INSTRUCTIONS...

Page 20: ...g the thermocouple This will cause he thermocouple to cool When the thermocouple cools the heater will shut down If pilot flame pattern is incorrect as shown in Figure 35 Turn heater off see To Turn O...

Page 21: ...e unit to cool for at least thirty minutes 2 Inspect burner pilot and primary air inlet holes on injector holder for dust and dirt see Figure 38 3 Blow air through the ports slots and holes in the bur...

Page 22: ...ntrol knob while pressing ignitor button 3 Continue holding down control knob Repeat igniting operation until air is removed 4 Clean ODS pilot see Care and Maintenance page 21 or replace ODS pilot ass...

Page 23: ...on 1 Residues from manufactory 2 Not enough combustion ventila tion air 1 Problem will stop after a few hours 2 Refer to air for combustion and venti lation requirements 1 Control knob not fully press...

Page 24: ...nections page15 2 Replace control valve 1 Gas leak See Warning statement page 21 2 Control valve defective Gas odor during combustion 1 Foreign matter between control valve and burner 2 Gas leak See W...

Page 25: ...KOZY WORLD PHONE NUMBER 814 643 1775 When contacting your dealer have ready Your name Your address Model and serial numbers of your heater How heater was malfunctioning Type of gas used natural or pro...

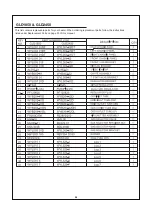
Page 26: ...26 26 This list contains replaceable parts for your heater When ordering replacement parts follow the instructions listed under Replacement Parts on page 25 of this manual GLD1850 GLD2450...

Page 27: ...27 27...

Page 28: ...28 28 This list contains replaceable parts for your heater When ordering replacement parts follow the instructions listed under Replacement Parts on page 25 of this manual GLD2440...

Page 29: ...29 29 Printed in China...

Reviews: