K20W Sound Writer User Guide
Page 8 of 12
Step 5
– Add Sound files and Silence
-
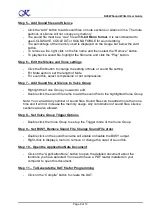
Click the “Add” button to add sound files or mute sections or silence in ms. The mute
sections or silence will not occupy any memory
-
The sound file must be a
“wav” file with
8-bit Mono format
. It is recommended to
use GOLDWAVE, COOLEDIT or SOUND FORGE for sound editing.
-
The percentage of the memory used is displayed on the Usage bar below the Add
button.
-
To remove a file, right click on the file name and then select
the “Remove” button.
-
To playback a sound file, highlight the file name
and click the “Play” button.
Step 6
– Edit the Silence and Voice settings
-
Click the Edit button to change the setting of Mute or sound file setting
-
For Mute section, set the length of Mute
-
For sound file, select compression or not compression
Step 7
– Add Sound file or Silence to Voice Group
-
Highlight the Voice Group you want to edit.
-
Double click the sound file name to add the sound file to the highlighted Voice Group.
Note: You can add any number of sound files. Sound files can be added more than one
time and it will not increase the memory usage. Any combination of sound files, silence
sections are also allowed.
Step 8
– Set Voice Group Trigger Options
-
Double click the Voice Group to set up the Trigger mode of the Voice Group.
Step 9
– Set BUSY, Remove Sound File, Change Sound File order
-
Double click on the sound file name will enable or disable the BUSY output.
-
Right-click to display a menu to remove or change the order of sound file.
Step 10
– Open the Application Note Document
-
Click on the “Application Note” button to open the detailed document about the
functions you have selected. You need to have a PDF reader installed on your
computer to open this document.
Step 11
– To Generate the DAT file for Programming
-
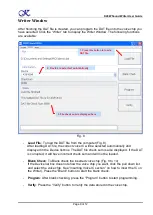
Click on the “Compile” button to create the DAT.

