


En-
4
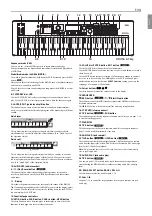
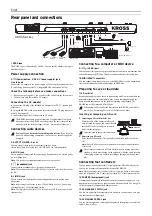
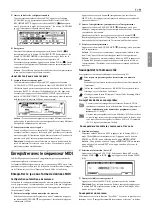
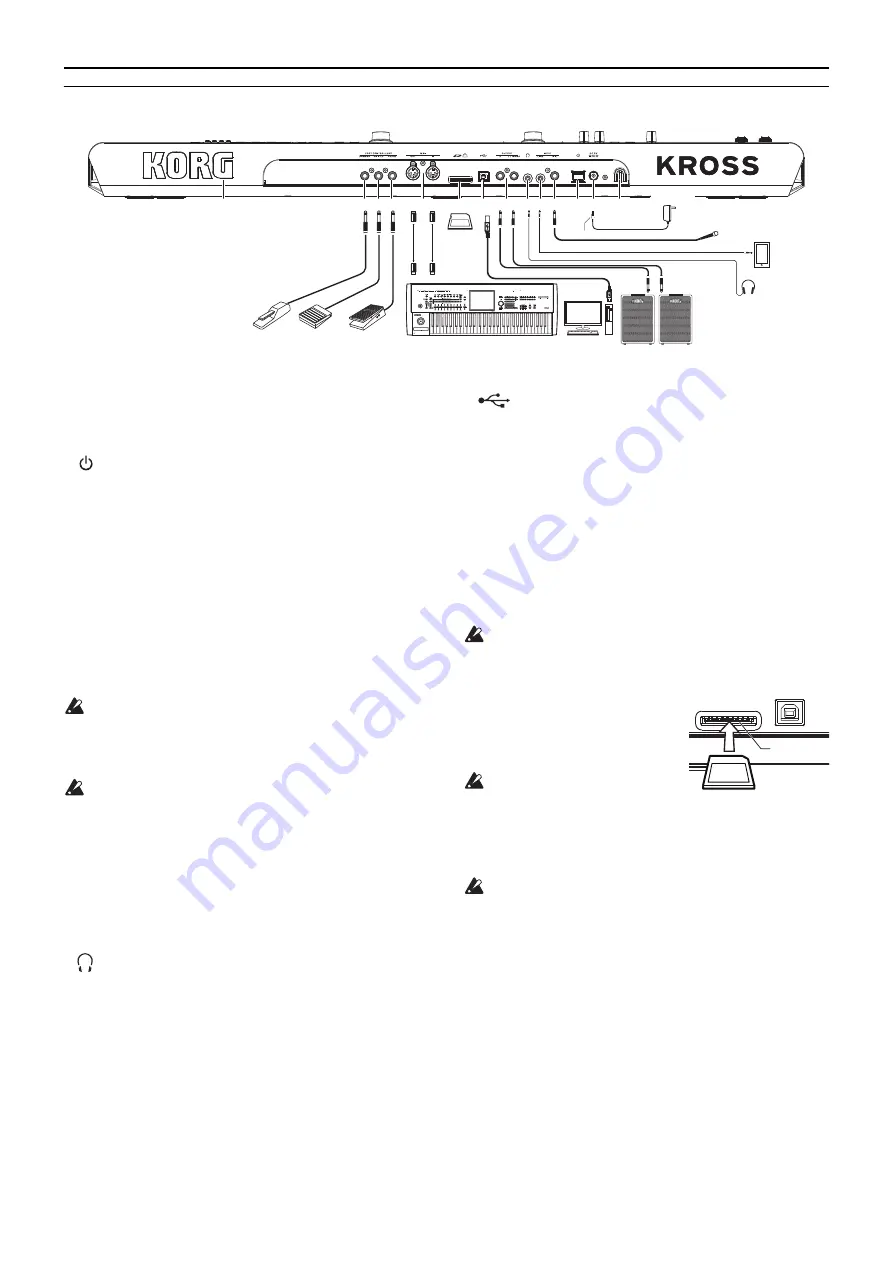
Rear panel and connections
1. KORG logo
The KORG logo is illuminated by an LED. You can specify whether the logo is
illuminated or not .
Power supply connection
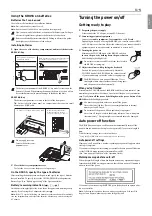
2. (Power) button, 3. DC 9V (power supply) jack,
4. cord hook
Connect the AC adapter to the power supply by following the procedure below.
If you’re using batteries, refer to "Using the KROSS on batteries", below.
Check the following before you make connections
•
Be sure you're using an AC power outlet of the correct voltage for your unit.
•
You must use only the included AC adapter.
Connecting the AC adapter
a.
Connect the DC plug of the included AC adapter to the DC 9V (power) jack
of this unit.
b
. Using the KROSS’s cord hook, fasten the cord so that the DC plug is not acci-
dentally disconnected.
c
. Connect the plug of the AC adapter to an AC outlet.
The KROSS has an auto power-off function. If approximately four hours
have elapsed since the KROSS was last operated, the power turns off auto-
matically (with the factory settings).(See p.5 "Auto power off function")
Connecting audio devices
Power-off your devices before making connections.
If you leave the
power on when making connections, your devices or speakers might be
damaged.
5. OUTPUT L/MONO, R jacks
You can connect these jacks to your monitor amp or mixer.
Adjust the volume level using the VOLUME knob. (
ø6.3mm
phone jack)
6. MIC IN jack
This is a monaural input jack for connecting a dynamic mic or an electric guitar.
(
ø6.3mm
phone jack)
Note:
This jack does not support phantom power or plug-in power.
7.
(headphone) jack
Connect stereo headphones here. (stereo mini-phone jack)
Note:
The headphone jack of the KROSS 88-key is located on the front of the unit at
the left.
8. LINE IN jack
This is a stereo line input jack for connecting an audio player. (stereo mini-
phone jack)
Note:
Input settings can be made in the AUDIO IN dialog box.
(See "Connecting
your input devices" of the Operation Guide)
Note:
The input signals from the MIC IN jack and the LINE IN jack cannot be used
simultaneously.
Connecting to a computer or MIDI device
9. (USB
B)
port
You can connect this port to a computer, and transmit and receive performance data
and sound settings as MIDI data. This port can also send and receive audio data.
10. MIDI IN/OUT connectors
You can connect these connectors to an external MIDI device, and transmit and
receive performance data and sound settings as MIDI data.
Preparing to save or load data
11. SD card slot
Sounds and song data can be saved or loaded using an SD card; in addition, the
pad sampler function can automatically save or load sampling data, and the
audio recorder function can use the card for recording and playback. The
KROSS can use SD cards and SDHC cards.
When using an SD card for the first time on the KROSS, you must for-
mat it. (See "Formatting SD card" of the Operation Guide)
Inserting or removing an SD card
1.
Inserting an SD card into the slot
With the label of the commercially avail-
able SD card facing upward, insert the card
into the SD card slot and press it inward
until it clicks into place.
Insert the card in the correct orientation.
2.
Removing an SD card
Press the card inward until it is partially ejected; then pull it out of the
slot.
Note:
Store the SD card correctly as described in the owner's manual included
with the card.
Never insert or remove an SD card while the unit is starting up or shut-
ting down, while data is being saved or loaded, while the audio recorder
is recording or playing, or while recording or editing with the pad sam-
pler.
Connecting foot controllers
You can connect various options that let you operate the KROSS with your feet.
You can use a connected foot controller to control the KROSS.
Note:
When connecting a foot controller for the first time, you'll need to make adjust-
ments and assignments.
(See "Connecting foot controllers" of the Operation Guide)
12. DAMPER (damper pedal) jack
A damper pedal (separately sold option) sustains the notes as long as you con-
tinue pressing it, even after you take your hand off the keyboard. The Korg DS-
1H (sold separately) supports half-damper action.
13. ASSIGNABLE SWITCH jack
You can use a pedal switch (separately sold option) to switch sounds, or to play/
stop the sequencer or drum track.
14. ASSIGNABLE PEDAL jack
You can use an expression/volume pedal (separately sold option) to control the
volume, tone, or effect.
AC adapter
(Included)
DC plug
to an AC outlet
DAMPER
ASSIGNABLE
PEDAL
ASSIGNABLE
SWITCH
SD card
MIDI keyboard
MIDI IN
MIDI OUT
MIDI cable
USB cable
Computer
Audio player, etc.
Mic
Monitor Amplifier, etc.
INPUT
Headphones
12 13 14
10
11
9
5
7 8 6
2 3
4
1
KROSS 61-key
SD Card Slot
SD Card
Summary of Contents for KROSS Series
Page 1: ...1...
Page 2: ......
Page 4: ...1 1 1 2 2 2 4 5 5 5 6 6 6 6 7 7 7 7 8 MIDI 8 MIDI 8 8 9 9 9 10 10 Ja...
Page 14: ...En 10...
Page 45: ...Fran ais Deutsch Espa ol J 1 2 AC AC100V AC AC AC AC AC AC AC AC AC AC...


