background image


If the new drive doesn’t appear in My Computer, it 
means this USB2.0 External Drive is a whole new 
hard disk drive which doesn’t contain any partition. 
Please refer to the “Partition the USB2.0 External 
Hard Disk” chapter to configure your USB2.0 
Hard Disk. 


4.2 Windows ME / 2000 / XP 
 
Step 1:


If you are plugging the USB External Drive     into 
your computer for the first time, the system will detect 
a USB2.0 Storage Device and install the driver for a 

[USB Mass Storage Device]

 from the system files


automatically.


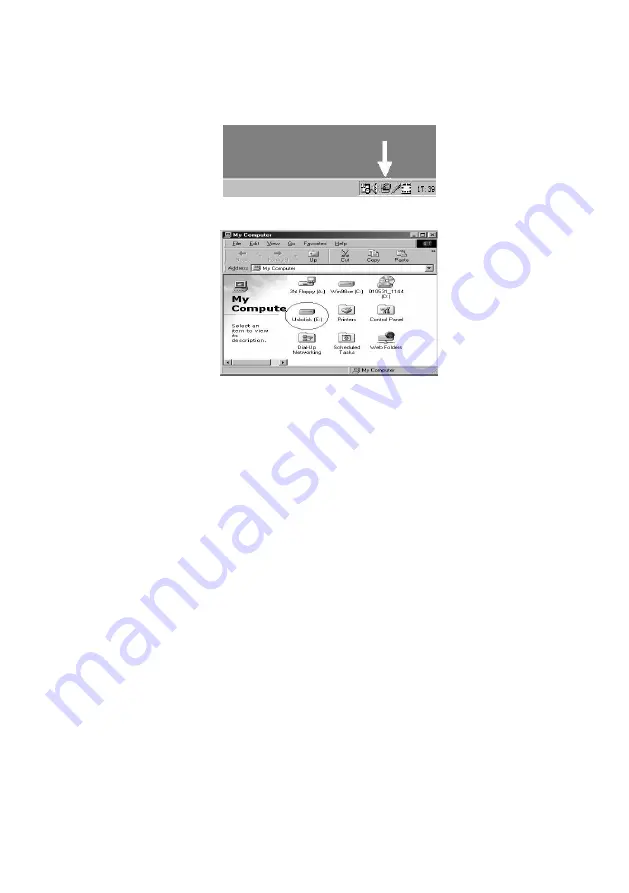
Step 2:


After the system installed the driver for the USB mass 
storage device, double click on 

[My Computer]

. A 

new drive will appear. This is the USB2.0 External 
Drive which has just been installed. 


Summary of Contents for CMP-MOBSTOR120

Page 1: ...CMP MOBSTOR15 CMP MOBSTOR25 CMP MOBSTOR120 USER MANUAL ENGLISH ...

Page 2: ... LAN Share Mode 14 7 4 USB Mode 14 8 Use With NETDISK Mode in Windows 16 8 1 Install LAN Share Device Management 16 8 2 Install NDAS Device Management 17 8 3 LAN Share Administrator 19 8 4 Add Register a New NDAS device 19 8 5 Add Register without Registration Wizard 21 8 6 Found New Hardware Wizard 22 8 7 Using NDAS Device 23 8 8 Sharing NDAS Device 23 9 LAN Share Mode in Mac OS X 25 9 1 Install ...

Page 3: ...wer cable Screws Driver CD User manual CMP MOBSTOR25 3 5 IDE HDD enclosure HDD stand USB 2 0 cable Power adapter Power cable Screws Driver CD User manual CMP MOBSTOR120 3 5 IDE HDD LAN SHARE enclosure HDD stand USB 2 0 cable RJ 45 cable Power adapter Power cable Screws Driver CD User manual ...

Page 4: ...BSTOR120 only 3 Hardware installation Step 1 Boot up your computer into the operating system and make sure the USB USB2 0 port device driver has been installed properly Step 2 Plug the connector of the USB cable into the USB Port of your USB2 0 External Drive Step 3 Plug the connector of the USB cable into the USB port of the computer Step 4 CMP MOBSTOR15 gets its power from the USB port of the co...

Page 5: ... Windows 98SE and make sure the USB port device driver has been installed properly in Windows 98SE 2 Plug the port connector of the USB cable of USB2 0 device into the USB port of computer 3 If this is the first time you plug the USB2 0 Storage device into the USB port of the computer the Add New Hardware Wizard dialog box appears 4 Click on Next check Search for the best driver for your device an...

Page 6: ...e system installs the driver double click on My Computer A new drive letter is added This is the USB Storage Device which has just been installed A green Unplug or Eject hardware icon will appear in the system tray ...

Page 7: ...ard Disk 4 2 Windows ME 2000 XP Step 1 If you are plugging the USB External Drive into your computer for the first time the system will detect a USB2 0 Storage Device and install the driver for a USB Mass Storage Device from the system files automatically Step 2 After the system installed the driver for the USB mass storage device double click on My Computer A new drive will appear This is the USB...

Page 8: ...s supported by the Mass Storage Support 1 3 5 software in Mac OS You do not need to install any drivers 2 Versions of Mac OS Mac OS 8 6 If you are using Mac OS 8 6 the software for Mass Storage Support 1 3 5 is required You can download the USB Mass Storage Support 1 3 5 driver from the Apple Software Updates web site http www apple com support Mac OS9 0 or later You do not need to install any sof...

Page 9: ...SB Port of your USB2 0 External Drive Step 2 Plug the port connector of the USB cable into the USB port of computer Plug the AC power cord to the inlet of your USB2 0 External drive and turn on the power switch on your USB2 0 External Drive Step 3 The USB2 0 External Drive is ready for use immediately 5 2 Disconnect the USB2 0 External Drive from the computer 5 2 1 Windows 98SE Step 1 Double click...

Page 10: ...stopped click on OK When the green Arrow Icon has disappeared pull out the USB cable from the USB port of the computer 5 2 2 Windows ME 2000 XP Step1 Double click on the Unplug or Eject Hardware icon in the system tray The Dialog box as shown below appears ...

Page 11: ...disconnecting your USB2 0 External Drive from computer close all windows and quit all running applications that are stored on the USB2 0 External Drive Then drag the USB2 0 External Drive s icon into Trash to dismount it from the Desktop prior to unplugging the USB2 0 External Drive from the USB port CAUTION Do not unplug the USB2 0 External Drive from the USB port of your computer or HUB while co...

Page 12: ...USB2 0 Hard Disk Drive Step 1 Click Start choose Control panel in Settings and double click System Open Hard disk A screen appears as shown below Step 2 You can see the USB2 0 hard Disk you just installed Highlight the USB Hard Disk and choose Properties then select Settings setting the USB2 0 Hard Disk to Removable as shown below ...

Page 13: ...em a removable HDD is added to My Computer Choose the removable HDD and click the right button of your mouse Select Format to format your USB2 0 Hard Disk Drive You can only set the USB2 0 Hard Disk Drive to one partition in this method ...

Page 14: ...ve Tools Double click Computer Management A window appears as shown below Step 2 Click on Disk Management on the left part of this window All connected disk drives will be listed in the right part Find the USB2 0 Hard Disk that you added On the right side of the window you can see the status of the partitions of this disk drive You can create a new one or delete an existing partition by right clic...

Page 15: ...k Drive click on Create Partition The Create partition wizard will appear Step 4 Follow the instructions of the wizard to partition and format your USB2 0 Hard Disk Drive Now you have built a partition in the USB2 0 Hard Disk Drive and you can write data to it ...

Page 16: ...m the Ethernet port on LAN Share to a switch 100 Base T 2 Wireless users Connect LAN Share to your wireless router or access point with included Ethernet cable 3 Make sure the power connector is firmly attached to the LAN Share and connect the power adapter to a power source 7 4 USB Mode 7 4 1 Windows 2000 XP ME 1 Connect the LAN Share and your computer with the USB Cable 2 Connect the power cable...

Page 17: ...hoose Search for the best driver for your device Click Next 5 Insert the software CD and select D USB Windows98 Driver Click Next 6 Click Next again 7 Click Next then you can use the HDD enclosure 8 The USB icon will be displayed in the system tray 7 4 3 Uninstall the driver Click Start Settings Control Panel Add Remove Programs choose USB Storage Adapter and then press Add Remove Programs ...

Page 18: ...d 2 Install Shield Wizard will appear Click the Next button to continue to next step 3 Accept License Agreement and then click Next to continue installation 4 Click the Install button to install drivers 5 Click Continue Anyway if any windows come up asking if you are sure to install non certified drivers 6 Click the Finish button to complete 7 Click on the Yes button to restart your computer now o...

Page 19: ...e click it and start the installation 2 Install Shield Wizard will appear click Next 3 Select I accept the terms in the license agreement and then click Next 4 Click Install 5 When this window appears insert the Windows 98SE CD and click OK 6 Select Yes I want to restart my computer now then click Finish restart the computer ...

Page 20: ...uter Drive letter and name may vary between Personal Computers 8 Select Search for the best driver for your device Click Next 9 Select Specify a location and click Browse button From the Browse for Folder window search for NDASUSB folder and click OK Once the location is set click Next from the Add New Hardware Wizard window 10 Click Next 11 Driver has been successfully installed click Finished ...

Page 21: ...k Next to continue 4 Enter a name for the NDAS device and click Next 5 Add your NDAS device ID and Write Key Write Key is needed to write to NDAS device Click Next to continue NB Key and ID can be found on the sticker in front of this manual If the Write Key was entered in the previous step the NetDisk is registered as Read Write Mode If the Write Key was not entered in the previous step the NetDi...

Page 22: ...ite Mode Read Only Mode Mounts NDAS device as Read Only Mode Don t Mount NDAS device is left in Connected Unmounted Mode Note Read Write Mode will be disabled if a user did not enter the Write Key during step 5 8 Registration is finished Click Finish ...

Page 23: ...he Register a new NDAS Device window will appear 4 Enter in a NDAS Device Name 5 Type in NDAS Device ID and Write Key Write Key is needed to write to NDAS device Leave the Activate this device after registration box checked to automatically enable the device after registration Note NDAS device ID and Write Key do not contain the letter O Please use the number 0 for all letter O s ...

Page 24: ... should automatically find the appropriate drivers for your NDAS Device Note For Windows 2000 the Upgrade Device Driver Wizard will appear instead 2 If the Windows Logo Testing message comes up click Yes or Continue Anyway to finish the installation 3 Registration is complete Click NDAS Device Management to see the registered NDAS device Read Write Mode Read Only Mode ...

Page 25: ...AS device is connected to your network it can be accessed from any computer on your LAN To share NDAS device the following must be done Windows 2000 XP Environment 1 All computers and NDAS device must be on the same LAN 2 NDAS device must be connected via Ethernet or Wireless Router 3 To share Read and Write access all computers on the network using the NDAS device must have the LAN Share driver v...

Page 26: ...er at a time and is passed from one user to another NOTE In order to use LAN Share in mixed environments LAN Share disks must be formatted in FAT32 If you use the Disk Management utility in Windows XP or 2000 to format your LAN Share then your LAN Share will be re formatted in NTFS NTFS is not a compatible file system format with Mac and Windows 98SE thus your computers on these OS will not recogn...

Page 27: ...installation please click Agree Otherwise click Disagree 5 Select a Destination Click Continue 6 Easy Install Click Upgrade 7 Install Software When software successfully finishes install click Close 8 Restart your computer NOTE Once LAN Share software is installed LAN Share needs to be Added Registered to your computer before you can start using LAN Share 9 2 Add Register LAN Share 1 Double click ...

Page 28: ...in icon NetDiskAdmin window will appear NetDiskAdmin has six functions Add Add Register a LAN Share to your computer Delete Delete a LAN Share from your computer Disable Disable Reading and Writing to LAN Share Enable RW Enable LAN Share into Read Write Mode Enable RO Enable LAN Share into Read Only Mode Quit End LAN Share Admin LAN Share IDs Window Displays all the LAN Shares that are registered ...

Page 29: ...specific LAN Share at a time No other users or applications can write to LAN Share until Read Write Access is transferred Changing Read Only or Read Write Mode If LAN Share Admin window is not already opened double click Macintosh HD icon on your desktop double click Applications folder and double click LAN Share Admin icon Changing to Read Only Mode Select a LAN Share from NDAS IDs window Click E...

Page 30: ...Share each computer on the network must install the corresponding LAN Share Driver On Windows XP 2000 install LAN Share driver v2 4 do not use 3 x x On Windows 98 SE ME install LAN Share Driver 1 x On Mac OSX install LAN Share driver 1 0 x LAN Share must be registered onto each computer Write access is assigned to one user at a time and is passed from one user to another NOTE In order to use LAN S...

Page 31: ...tall LAN Share 1 Start the Uninstaller by double clicking LAN Share Uninstaller 2 Authenticate Enter Admin Name and Password Then click OK 3 Click Uninstall 4 LAN Share has been successfully uninstalled Click Quit ...

Page 32: ...nect the product from mains and other equipment if a problem should occur Do not expose the product to water of moisture WARRANTY No guarantee or liability can be accepted for any changes and modifications of the product or damage caused due to incorrect use of this product GENERAL Designs and specifications are subject to change without a notice ...

Page 33: ...WWW KONIGCOMPUTER COM ...

Reviews: