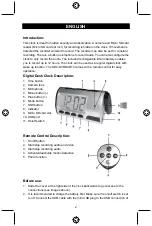
3
the clock and the USB plug at the other end of the cable to a USB connection of
a computer/notebook or the included AC/DC adapter.
3. During charging the indicator lights up red and the green indicator will be slowly
flashing. The battery is fully charged after 3 to 4 hours. After charging the green
indicator will be on. Note: for optimal performance of the battery it’s
recommended to charge the battery for 12 hours the first three times.
4. Insert a Micro SD card before proceeding.
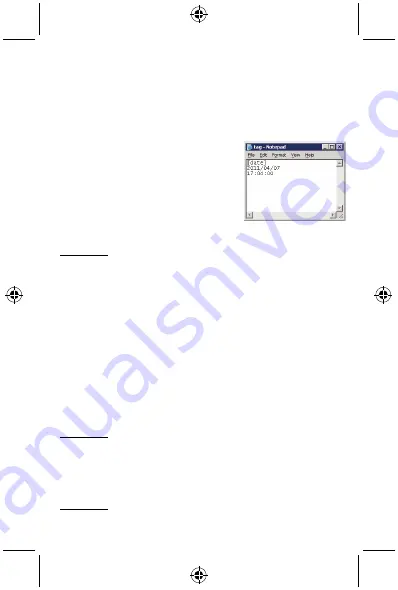
5. Set the date and time for videos and photos. Be
sure the device is still connected to a computer or
notebook. Select in the window “open folder to
view files”. Create a text file in the folder. The text
file must be named
tag
and enter the current date
(YYYYMMDD) and time (HHMMSS). The date in
the record files will be shown as MM/DD/YYYY
HH/MM/SS. Save the file. (Please type the time
setting according to the picture).
Operation:
Video function
1. Switch the clock on with the on/off switch. The indicator lights up red.
Note: if the indicator does not light up, press the on/off button on the remote control
to turn it on.
2. To record with motion detection, press the activate/deactivate motion detection
button on the remote control. The red indicator flashes quickly 3 times and goes
off. If the camera detects motion, the recording starts. To stop recording with
motion detection, press the activate/deactivate motion detection button again.
The red indicator flashes quickly 3 times and stays on.
Note: when recording is started, the device will try to detect motion every two
minutes. When there is no movement detected the recording stops, otherwise the
recording continues.
3. To record constantly, press the start/stop recording audio and video button on
the remote control. The red indicator flashes quickly 3 times and goes off. To
stop recording, press the button again. The red indicator flashes quickly 3 times
and stays on.
Photo function
1. Switch to on with the on/off switch. The indicator lights up red.
Note: if the indicator does not light up, press the on/off button of the remote control
to turn it on.
2. Press the photo function button to make a photo. The red indicator goes off after
a few seconds and then returns red. Press again for more photos.
Audio function
1. Switch to on with the on/off switch. The indicator lights up red.


