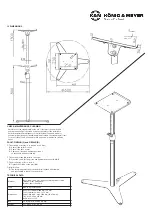
MONITOR TRAY (6-12)
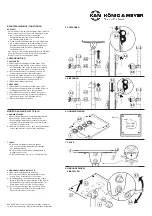
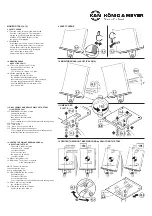
9 SAFETY LEDGE
9.1 The tray
c
may only be moved towards the
9.1
direction of the ledge
c.1
. The ledge must
9.1
always be positioned such that the ledge is
9.1
ALWAYS AT THE BOTTOM, to secure
9.1
the monitor from slipping.
9.2 WARNING:
9.2
If the ledge is at the top and not at the bottom
9.2
of the angled tray, the monitor is not secured.
9.2
Should the monitor slip, the ledge will not
9.2
be able to catch the monitor, which would
9.2
result in damage to the monitor
9.2
and possible injury to individuals.
10 MONITOR ANGLE
10
(=ACUSTICAL AXIS)
10.1 The scale (see Section
7
) shows
10.1
that the angle of the tray
c
can
10.1
be adjusted from:
10.1
12.5°-minus to 0° though 12.5°-plus
10.2 When adjusting the angle
10.2
through the level (0°) position
10.2
the tray must be disassembled and
10.2
reassembled
c
(see Section
11
- 180°-reversal),
10.2
because the safety edge MUST ALWAYS
10.2
be at the BOTTOM to secure the monitor
10.2
(see Section
9.1
).
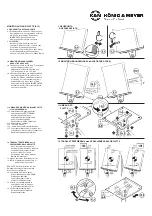
11 DISASSEMBLY AND REASSEMBLY OF THE TRAY
11
(=180°-REVERSAL)
11.1 REMOVE both screws located
11.1
underneath the tray:
11.1
First take off the caps,
11.1
then remove the safety nuts
11.1
and washers.
11.1
To accomplish this use SW10
i
Allen wrench /hexagon key.
11.2 Remove tray
c
...
11.3 ...turn it 180°...
11.4 ...place it back on the joint
b.4
.
11.5 Tighten the safety nuts and wshers.
11.5
To accomplish this, use the Allen wrench /hexagon key
i
.
11.5
In the final step put the caps back on.
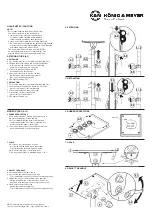
12 CENTER THE WEIGHT BEARING LOAD by
12
ADJUSTING THE TRAY
12.A
The stand is the most stable,
12.A
if the monitor is centered
12.A
over the stand tube.
12.A
If this is not the case
12.A
the tray
c
can be moved
12.A
over the joint
b.4
:
12.A Ideal: centered monitor.
12.B Objective: The monitor is centered
12.B Objective:
to the extent possible.
NOTE: The monitor must be
removed from the tray
c
prior to adjusting the tray.
12.1 Only LOSSEN the two screws
12.1
beneath the tray
c
:
12.1
First take off the caps,
12.1
loosen the safety nuts.
12.1
To accomplish this use SW10
i
Allen wrench /hexagon key.
12.2 Place tray
c
on the joint
b.4
12.2
the slit length is 45 mm.
12.3 Tighten the safety nuts followed
12.3
by placing the caps back on.
9 SAFETY LEDGE
9
10 MONITOR ANGLE (=ACUSTICAL AXIS)
11 UMBAU DER
11
PLATTE
12 CENTER THE WEIGHT BEARING LOAD by ADJUSTING THE TRAY


