background image

Chapter 2   Basic Operations 

2-20


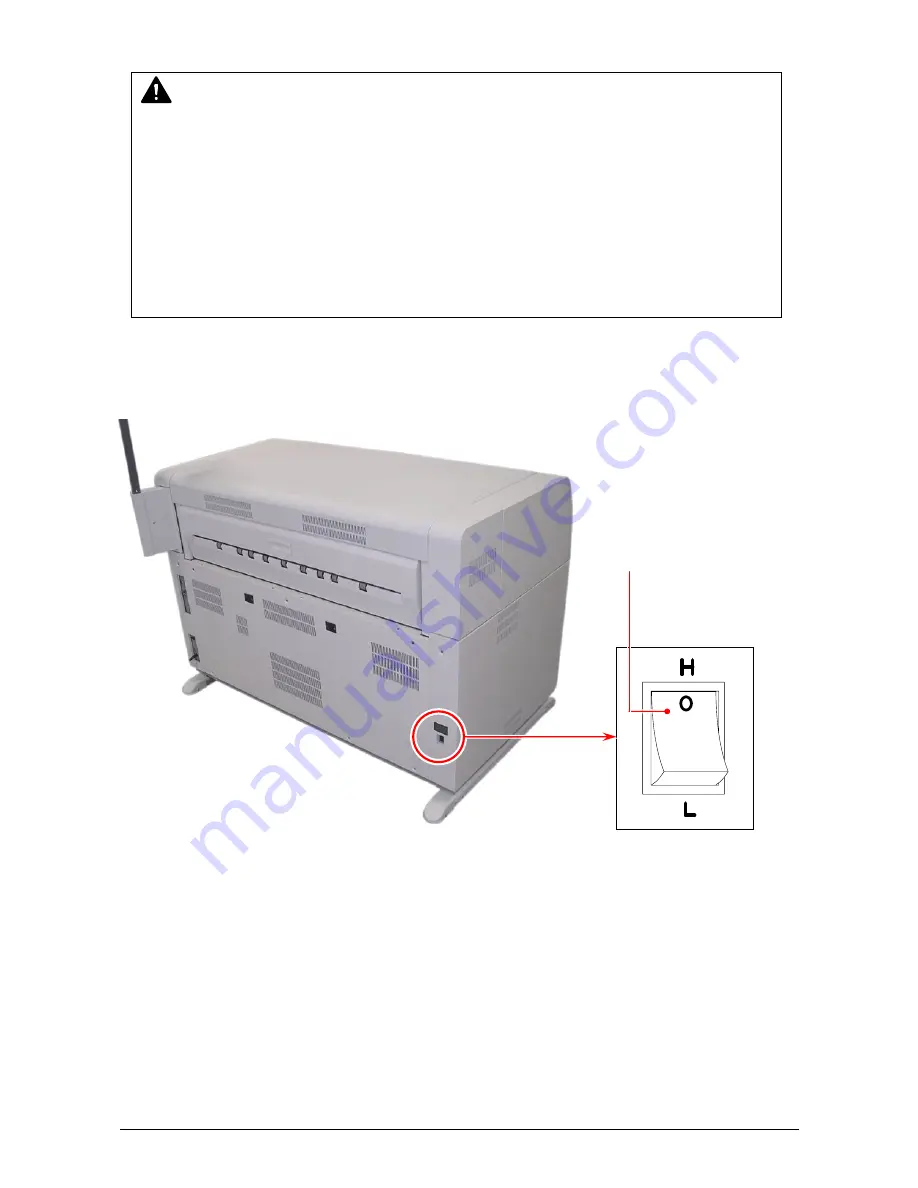
“Dehumidify Heater Switch” is located on the left-rear side of the machine. 
Press “H” to turn on the Dehumidify Heater.  


NOTE 

 
(1) There are several dehumidifying settings which can be set by service personnel.  

When these settings are determined, the dehumidifier functions.  
With any setting, the printer must be plugged in and the switch noted above must be in 
the “H” position. 

Call your service personnel if you would like to change the switch setting. 
Note that the user can not change the setting. 

 
(2) To achieve the best image quality, we recommend that you use media that is unpacked 

from the manufacture right before installing it into the printer. 
If media is unpacked long before installation, poor image quality may occur. 

Dehumidify Heater Switch 

Press “H” side. 

Summary of Contents for KIP 7700

Page 1: ...Version A1 KIP 7700 User Manual...

Page 2: ...void the user s authority to operate the equipment 2 When this machine is installed in Canada IC Company No UPN No 7391A K120 Operation is subject to the following two conditions 1 this device may no...

Page 3: ...dicates that this product conforms to GB 18455 2001 11364 2006 of National Standard of the People s Republic of China and does not apply to countries outside of People s Republic of China The symbol s...

Page 4: ...anual and have the following meaning WARNING This WARNING mark means that there is a possibility of death or serious injury if you ignore or do not follow the said instruction CAUTION This CAUTION mar...

Page 5: ...If the Power Cord is damaged it may cause a fire or you may receive an electric shock REPLACE THE CORD IF DAMAGED 1 Do not put a flower vase a flowerpot or any water filled item on the product Spilt...

Page 6: ...printer in a humidified room or a dusty room Also do not install the printer on an unstable floor as injuries may occur 1 Unplug the printer before you move it The power cord may be damaged and it may...

Page 7: ...iate plug does not fit the wall outlet in the installation the customer shall install an appropriate outlet Connector Type Configuration Standard Rating Usually found in IEC60320 C19 20A 250V UL 16A 2...

Page 8: ...ion 1 13 Chapter 2 Basic Operations Page 2 1 Turning on KIP 7700 2 2 2 2 Turning off KIP 7700 2 4 2 3 Replacing Roll Media 2 5 2 4 Replacing Toner Cartridge 2 13 2 5 Placing Cut Sheet Media 2 17 2 6 C...

Page 9: ...8 3 2 2 Upper Frame Unit Top Cover Open 3 18 3 2 3 Exit Cover Open 3 19 3 3 Other Errors 3 20 3 3 1 Roll Replacement 3 20 3 3 2 Toner Empty 3 20 3 4 Call Service Errors 3 21...

Page 10: ...plication 1 3 1 3 Features 1 4 1 4 Specifications 1 5 1 5 Appearance 1 7 1 5 1 Front 1 7 1 5 2 Rear 1 8 1 6 Optional Configurations 1 9 1 7 Specifications for Printing Media 1 10 1 7 1 Available Print...

Page 11: ...umidifiers or refrigerators 1 The installation site must not have open flames dust or ammonia gases 2 The equipment must not be exposed to the air vents from air conditioners It may affect the image q...

Page 12: ...ding that some specific company copies such originals as many as it requires for its own business 2 We recommend you not to copy freely such originals as government issued passport public or private i...

Page 13: ...1 inches 294mm for roll media The print image is more stabilized than before since we adopt a minute toner for mono component development The combination of KIP Contact Development System and mono com...

Page 14: ...2 minutes 23C 74F 60 RH and the rated voltage for Bond First print time 21 seconds A0 from Roll 1 Fusing method Roll Fuser Development method Dry type with non magnetic mono component toner Exposure...

Page 15: ...the condition of 0 to 35 Centigrade 32 95 F and 10 to 85 RH NOTE for Tracing Paper Vellum Due to the characteristics of the Tracing Paper Vellum it is easy to be affected to the temperature or humidi...

Page 16: ...ea too strong 2 Top Cover Open here to clear the mis fed paper 3 Manual Table Open here to insert a cut sheet or to pull the Upper Frame Unit 4 Roll Decks Each Roll Deck drawer holds 2 rolls of print...

Page 17: ...Use the following type of power cord UL Listed 1 Rating 250VAC 20A 2 Plug type NEMA6 20 3 Socket type IEC60320 C19 4 Cord SJT 3xAWG12 L 4 5m 5 UL Listed 4 Breaker It is possible to shut off supplying...

Page 18: ...rinter with optional outer devices Please contact your dealer for further information of integrating KIP 7700 to your network and other devices KIP Scanner KIP 7700 KIP 7700 Other printers Scanner Con...

Page 19: ...914mm Length 8 5 210mm 6m NOTE It is possible to print longer than 6 meters as an option You can choose either 24m or unlimited as a maximum print length Call your service personnel if you would like...

Page 20: ...Chapter 1 Before Use 1 11 1 7 2 Media not to be used Do not use the following kinds of printing paper Doing so may damage the printer Excessively curled Folded Creased Torn Punched...

Page 21: ...surface of the paper 2 Print image may become defective if the print paper has an excess curl 3 It will cause paper mis fed poor print image or creasing if you use a paper that does not satisfy the sp...

Page 22: ...veryday use and keep it in a plastic bag Void of image occurs when you print with plain paper and vellum If you will not make print soon remove the media from the machine and keep it in a plastic bag...

Page 23: ...e of image solid black image especially may occur if you print with a humidified film When film is installed under the high humidity environment higher than 60 RH we also recommend that you turn on th...

Page 24: ...ning on KIP 7700 2 2 2 2 Turning off KIP 7700 2 4 2 3 Replacing Roll Media 2 5 2 4 Replacing Toner Cartridge 2 13 2 5 Placing Cut Sheet Media 2 17 2 6 Canceling Sleep Mode 2 18 2 7 Dehumidifying Roll...

Page 25: ...ING 1 Do not handle the Power Plug with wet hands or you may receive an electrical shock 2 Ground the printer for safety 3 Do not plug the printer into a multi wiring connector in which other devices...

Page 26: ...I will flash during warming up The UI screen may vary depending on your system configuration Shown with available options 4 When Ready Indicator stops flashing the KIP 7700 is ready for operation NOTE...

Page 27: ...r the embedded controller is still operating in approximately 2 minutes after Power Switch operation for the controller s shutdown Do not unplug the KIP 7700 before the controller s shutdown Doing so...

Page 28: ...Please refer to your KIP IPS Touch Screen Operator s Guide for the UI screen 2 It is recommended that a tracing paper vellum roll is loaded to Roll Deck 3 or 4 for 4 Roll type Roll Deck 1 for 2 Roll t...

Page 29: ...a or an empty roll core 2 2 Raise the green lever 4 on Flange 2 Remove both Flanges 4 from the roll core 3 3 Hold the shown part of the right Slide Guide 5 Move it to match your roll media s width The...

Page 30: ...stalled NOTE 1 Fully insert Flange into the roll media core so that the inside rim of Flange evenly touches the side face of the roll media Correct Fully inserted Wrong not touching roll side 2 Flange...

Page 31: ...ons 2 8 5 Push both the levers 4 down in either way Position them flat against Flange to secure the roll media 6 Lift the roll media by holding both Flanges Lower Flanges onto Slide Guides 5 Continued...

Page 32: ...ong Edge comes from top 2 The outside rim 7 of Flange should meet the black triangle 8 marked on Slide Guide Otherwise the roll media may fall in Roll Deck or result in an incorrect media feeding Corr...

Page 33: ...er 2 Basic Operations 2 10 7 Insert the leading edge under Guide Plate 9 until it touches the feeding roller 10 9 9 10 10 Front Deck Roll 1 3 Rear Deck Roll 2 4 Roll 1 Roll 3 Roll 2 Roll 4 9 9 10 10 1...

Page 34: ...tch the leading edge 9 Push Roll Deck 1 to firmly close it Roll 1 Roll 3 Roll 2 Roll 4 11 11 Front Deck Roll 1 3 Rear Deck Roll 2 4 NOTE 1 Be sure to close Roll Deck fully until it locks at the correc...

Page 35: ...asic Operations 2 12 10 When you close Roll Deck Define Roll screen will appear on the UI screen Choose the correct width and type and press Initial Cut button with scissors icon for the corresponding...

Page 36: ...ner Cartridge for other models is installed the KIP 7700 does not operate with indicating Toner Empty sign or Toner Cartridge not set correctly 2 Once the Toner Cartridge becomes empty with the toner...

Page 37: ...rotations will be enough to close the opening but rotate Toner Cartridge until it stops completely 5 Keep pressing the green lever Lift up Toner Cartridge and remove it NOTE Slide the Joint until it c...

Page 38: ...il it clicks Insert the far left pin on Toner Cartridge into the slot firmly Please direct the opening on Toner Cartridge downward at this time NOTE Please confirm that the green lever firmly locks th...

Page 39: ...o the arrow direction at least 180 degrees The new Toner Cartridge is closed firmly so as not to lose the toner during the transportation 10 Push in Upper Frame Unit firmly Close the Manual Table NOTE...

Page 40: ...machine automatically carries and sets the sheet at the proper position NOTE 1 As a curly cut sheet will cause a mis feed straighten the sheet as far as possible before printing And set the sheet in...

Page 41: ...Cold Sleep Mode will start after a 60 minute of inactivity to stop the power supply for Fuser Unit and some other components Sleep Mode is canceled and the machine gets ready when the machine receive...

Page 42: ...to prevent the above kinds of print defect You may be able to fix the above kinds of problem Normal Print Normal Print If the media is humidified If the media is humidified Creasing Voids NOTE Re appe...

Page 43: ...ions With any setting the printer must be plugged in and the switch noted above must be in the H position Call your service personnel if you would like to change the switch setting Note that the user...

Page 44: ...ind the printer High Capacity Print Tray Stack Capacity Plain Paper 100 sheets Tracing Paper Vellum 10 sheets standard size only a single print set in the same size Film 1 sheets For larger print size...

Page 45: ...e the device s documents if you use one That might include additional information for usage notice of the printer Lever Lever NOTE 1 Do not leave ejected prints with been displaced Doing so may preven...

Page 46: ...tion J 05 3 5 3 1 3 Paper Feeder Section J 10 J 11 J 12 3 6 3 1 4 Fuser Section J 13 J 14 3 9 3 1 5 Outer Device J 21 J 22 3 16 3 2 Open Cover Errors 3 17 3 2 1 Roll Deck Open 3 17 3 2 2 Upper Frame U...

Page 47: ...shock or damage to components 3 Gently remove a jammed paper When it does not reach Fuser Unit toner on it may spill off If toner gets into eyes or your mouth immediately rinse them with water and co...

Page 48: ...k J 02 Roll 2 Upper Roll Deck J 03 Roll 3 Lower Roll Deck J 04 Roll 4 Lower Roll Deck Clear the Paper Mis feed using the following procedure 1 Open the Roll Deck in issue And then rewind the roll onto...

Page 49: ...lose the Roll Deck NOTE The outside rim of Flange should meet the black triangle marked on Slide Guide Otherwise the roll media may fall in Roll Deck or result in an incorrect media feeding Correct Wr...

Page 50: ...s in the Manual Feeder the UI shows J 05 J 05 Manual Feeder Clear the Paper Mis feed using the following procedure 1 Pull out the mis fed paper from the Manual Feeder and if the leading edge of the pa...

Page 51: ...per Mis feed occurs in the Paper Feed Section the UI shows J 10 J 11 J 12 J 10 Front region J 11 Middle region J 12 Middle Rear region J 10 J 11 J 12 Clear the Paper Mis feed using the following proce...

Page 52: ...ror Correction 3 7 2 Pull out the Upper Frame Unit to your side front with holding both handles 3 Pull up both knobs and then push the Top Cover to rear side Handle Top Cover Knob Knob Top Cover Upper...

Page 53: ...Chapter 3 Error Correction 3 8 4 Remove the mis fed paper 5 Close Top Cover 6 Close Upper Frame Unit and Manual Table Print Manual Table Top Cover Upper Frame Unit...

Page 54: ...Clear the Paper Mis feed using the following procedure 1 It is necessary for a printer with High Capacity Print Tray option to move it aside to release position First remove stacked prints from the tr...

Page 55: ...ot hold a thinner wire to carry the entire tray 2 You cannot open Exit Cover until you move the tray from lock position to release position 3 Do not place any heavy object on the tray with mounted at...

Page 56: ...it close Exit Cover High Capacity Print Tray requires relocation See step 12 on page 3 14 If it is not possible go to the next step 6 Open the Manual Table WARNING There are extremely hot parts inside...

Page 57: ...ror Correction 3 12 7 Pull out the Upper Frame Unit to your side front with holding both handles 8 Pull up both knobs and then push the Top Cover to rear side Handle Upper Frame Unit Top Cover Knob Kn...

Page 58: ...9 Remove the mis fed paper 10 Close Top Cover 11 Close Upper Frame Unit and Manual Table For the printer with High Capacity Print Tray go to step 12 on the next page for its relocation Print Manual T...

Page 59: ...n the top face of the printer s rear beam NOTE 1 Do not hold a thinner wire to carry the entire tray 2 Ejected prints will be stacked incorrectly on Print Tray until you move it from release position...

Page 60: ...lide upward Slightly push the tray down to catch its bottom hooking part on the top of the Support Rod 14 Fully press the Lock Lever down to lock the tray NOTE To fit the Lock Lever in position fully...

Page 61: ...en a Paper Mis feed occurs in the Outer Device the UI shows J 21 J 22 J 21 J 22 Outer Device Auto Stacker Folder etc J 21 J 22 Clear the mis feed using the following procedure 1 As for the way to clea...

Page 62: ...ion Correct firmly closed Wrong not closed completely 3 2 Open Cover Errors When any deck cover is open not closed firmly the UI Screen will display Door Open or any other prompt screen Close the conc...

Page 63: ...rame Unit or Top Cover is open the UI screen shows Door Open Check if the Upper Frame Unit and the Top Cover are closed firmly Correct Both Top Cover Upper Frame Unit closed firmly Wrong Top Cover ope...

Page 64: ...Chapter 3 Error Correction 3 19 3 2 3 Exit Cover Open If Exit Cover is open the UI screen shows Door Open Check if Exit Cover is closed firmly Exit Cover...

Page 65: ...ed for the current print job the UI Screen will display Roll Replacement sign as well Please load the required roll media to any Roll Deck For the roll replacement procedure refer to 2 3 Replacing Rol...

Page 66: ...3 Main Motor Error E 04 Developer Error E 06 Counter Error E 07 Cutter Error E 14 Fuser Motor Error E 16 Wire Cleaning Error E 21 Fuser Thermostat Error E 27 Toner Density Detect Error E 40 Outer Devi...

Page 67: ...6 8585 Japan Please note that some articles illustrations and photographs might be partially different from the actual machine because of the modification of machine and so on 2009 Katsuragawa Electri...

Reviews: