190
ARRANGEMENT FOR THE INSTALLATION OF THE DEMOLITION HAMMER (BREAKER)
6.2.3.2
REMOVING THE HAMMER
6.2.4 MAINTENANCE
8 - Stop the machine again and lubricate the joints (See “4.5 LUBRICATION”) and the hammer (See the specific
use and maintenance manual).
9 - Before starting work, check the seals.
DANGER
•
Always wear thick gloves and safety goggles during this check.
•
To check the system for leaks, use a piece of cardboard or a wooden board.
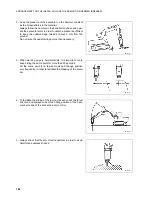
To remove the hammer, proceed as follows:
1 - Stop the engine and move the hydraulic controls in all directions, in order to completely release the residual
pressures present in the circuits of the machine.
2 - Press the hammer control pedal to release the residual pressure present in the hammer delivery pipe.
3 - Slowly loosen the hydraulic oil filling cap to release the residual pressure from the tank.
4 - Disconnect the hammer feeding and draining pipes.
5 - Fit the sealing plugs of the rapid couplings.
6 - Disconnect the hammer from the mechanical constraints, as described in “3.13.4 CHANGING THE BUCKET”.
The hydraulic system does not require any maintenance operation and inspection other than those prescribed for
the machine.
For the maintenance operations required for the hammer, see the specific operation manual.
Summary of Contents for PC20R-8
Page 2: ......
Page 12: ...10...
Page 20: ...18...
Page 21: ...SAFETY AND ACCIDENT PREVENTION...
Page 23: ...SAFETY NOISE AND VIBRATION PLATES 21 MACHINE WITH CANOPY RWA00010 RWA00030 RWA00020 RYA11890...
Page 54: ...52...
Page 55: ...THE MACHINE AND ITS OPERATIONS...
Page 118: ...116...
Page 119: ...MAINTENANCE...
Page 172: ...170...
Page 173: ...TECHNICAL SPECIFICATIONS...
Page 182: ...180...
Page 183: ...AUTHORISED OPTIONAL EQUIPMENT...


