background image

 113978-2-

CA

 (-)

3

 Kohler Co., Kohler WI

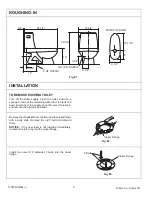
TO INSTALL SUPPLY SHUT-OFF VALVE

Install the supply shut-off valve so it is 7-1/4” above the
finished floor line, and 5-1/8” to the left of the closet flange
centerline.

The centerline of the supply shut-off valve outlet should
extend 3-3/8” from the finished wall. Install the supply
shut-off valve with the outlet vertical.

Fig. #4

Supply Shut-Off
Valve

7-1/4”

12”

5-1/8”

Closet Flange
Centerline

TO INSTALL TOILET

Set the toilet upside down on some padding. Firmly press
the toilet gasket onto the toilet outlet.

NOTE: If you are using a toilet gasket with an integral
plastic sleeve, make sure the gasket is positioned with the
sleeve facing away from the toilet.

If you temporarily plugged the the closet flange with a rag,
remove the rag at this time.

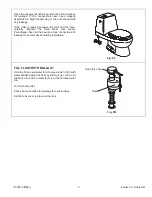
Carefully align and lower the toilet over the closet flange
and T-bolts. Apply full body weight to the toilet rim to set
the seal.

CAUTION: Risk of external leakage: Do not lift or
rock the toilet after placement – a new toilet gasket
must be installed if you break the watertight seal.

Fig. #5

Toilet Outlet

Toilet Gasket

Closet Flange

T-Bolt

Assemble the bolt cap bases, washers, and nuts on the
exposed T-bolts. Hand tighten the nuts, then tighten them
an additional 1/2-turn.

CAUTION: Risk of personal injury or product
damage: 
Overtightening may cause breakage or
chipping of the vitreous china.

If the T-bolts extend more than 1/4” over the top of the
nuts, cut off the excess and file the end. Wipe away any
residue. Install the bolt caps.

Fig. #6

Nut

Washer

Bolt Cap Base

Bolt Cap

T-Bolt

Summary of Contents for WELLINGTON LITE K-3446

Page 1: ...at post holes on 5 1 2 centers Water depth from rim is 6 7 8 2 passageway Ensure that the new toilet has the correct roughing in dimension The K 3446 has a 12 roughing in dimension See Fig 1 Be very careful while working with vitreous china products Vitreous china can break or chip if the bolts and nuts are overtightened or if carelessly handled Carefully inspect the new fixture for any sign of da...

Page 2: ... to remove the remaining water from the tank and bowl Disconnect the supply shut off valve if present and remove the old tank and bowl Remove the old gasket from the floor and the closet flange with a putty knife Remove the old T bolts and discard them NOTICE If the new toilet is not installed immediately temporarily stuff a rag into the closet flange Fig 2 Closet Flange Install two new 5 16 diame...

Page 3: ...om the toilet If you temporarily plugged the the closet flange with a rag remove the rag at this time Carefully align and lower the toilet over the closet flange and T bolts Apply full body weight to the toilet rim to set the seal CAUTION Risk of external leakage Do not lift or rock the toilet after placement a new toilet gasket must be installed if you break the watertight seal Fig 5 Toilet Outle...

Page 4: ...tallation of the supply shut off valve refer to the installation instructions packed with the valve Carefully bend the tubing to fit Cut the end of the tubing 1 4 longer than the distance be tween the supply shut off valve and the supply shank Re move any burrs from the inside of the tubing Slip the coupling nut compression nut and ferrule onto the tubing Insert the tubing into the supply shut off...

Page 5: ...he three brass nuts evenly Periodically check all the bowl and tank connections for leakage for several days following installation Fig 9 FILL FLOAT WITH BALLAST Hold the float underwater for a few seconds to fill it with water ballast Adjust the float by sliding it up or down on the float rod until the water level is at the marked water line Test flush the toilet Check all connections for leakage...

Page 6: ...d turn water on and off a few times Clean float valve seal surface located under float valve cap Replace float valve cap assembly by engaging lugs and rotating 1 8 turn clockwise Turn water on Install filter in supply line to prevent recurring problems B Replace seal 3 Incorrect water level height A Valve float cup does not contain enough water to provide required ballast A During fill cycle hold ...

Page 7: ...istributor and the KOHLER TECHNICAL SPECIALIST THIRD If you are unable to obtain warranty service through either your contractor or Kohler Co distributor please write us directly at Kohler Co Attn Customer Service Department Kohler WI 53044 U S A FOURTH Include all pertinent information regarding your claim including a complete description of the product model numbers colors finishes and the date ...

Page 8: ... 113978 2 CA 8 Kohler Co Kohler WI ...

Reviews: