background image

8.12

Section 8
Electrical System and Components

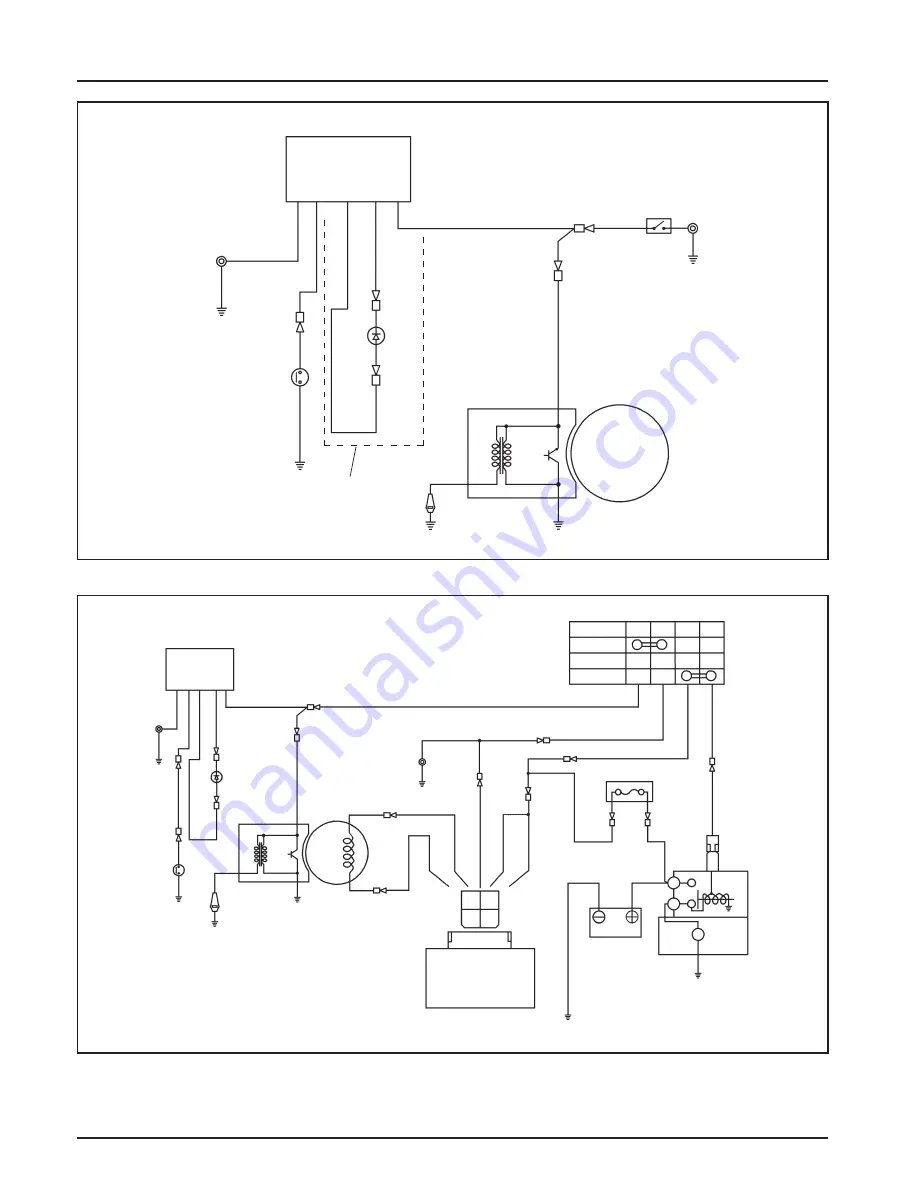
Figure 8-12.

Figure 8-13.

Oil
Warning
Unit

Spark
Plug

Stator

Ignition Module

Stop Switch

Oil Sentry™
Light

Ground

Ground

Ground

Ground

Ground

Ground

Ground

Ground

Ground

Ground

Ground

Ground

Oil
Warning
Unit

Stator

Ignition
Module

B

L

BW

BW

Y

Y

R

BW

R

BW

B

Oil
Sentry™
Gauge

B

L

B

Wire Lead

B

Oil
Sentry™
Gauge

Y

Y

BW

BW

Oil
Sentry™
Light

BW

R

R

BW

Engine
Ground

Engine
Ground

G

G

G

G

G

G

B

R

R

B

B

BW

R RW

RW

RW

Fuse (10 A)

R

R

R

R

Battery

Starting Motor

Rectifier

G

G

R

B

BW

B

R

RW

Wire Color

Off

On

Start

Spark
Plug

Main Switch

B

R

R

R

R

M

Not on All
Models

B

B

B

B

Electronic Ignition System Oil
Sentry™ System, with Indicator Light
(Some Models), Recoil Start.

Electronic Ignition System, 3 Amp
Charging System, Rectified Only. Oil
Sentry™ System. Electric Start
(Solenoid Shift Starter).

Summary of Contents for Command PRO CS

Page 1: ...6 59 0 18 25 217 5 1 6 7 200 1 352 6 3...

Page 2: ......

Page 3: ...shooting Section 4 Air Cleaner and Air Intake System Section 5 Fuel System and Governor Section 6 Lubrication System Section 7 Retractable Starter Section 8 Electrical System and Components Section 9...

Page 4: ......

Page 5: ...6HFWLRQ 6DIHW DQG HQHUDO QIRUPDWLRQ 6HFWLRQ 6DIHW DQG HQHUDO QIRUPDWLRQ RU RXU 6DIHW 6DIHW 3UHFDXWLRQV 51 1 87 21 127 5RWDWLQJ 3DUWV RW 3DUWV 51 1 51 1 FFLGHQWDO 6WDUWV 51 1...

Page 6: ...6HFWLRQ 6DIHW DQG HQHUDO QIRUPDWLRQ ODPPDEOH 6ROYHQWV HWKDO KDXVW DVHV SORVLYH XHO 51 1 51 1 87 21 SORVLYH DV 51 1 6SULQJ 8QGHU 7HQVLRQ 51 1 51 1 OHFWULFDO 6KRFN...

Page 7: ...1R RPPDQG QJLQH 6ODQWHG OLQGHU RUVHSRZHU 3 3 3 3 3 6XI HVLJQDWHV 7 5HWUDFWDEOH 6WDUW 6 OHFWULF 6WDUW 7DSHUHG UDQNVKDIW 3 7KUHDGHG UDQNVKDIW 5 HDU 5HGXFWLRQ RU LJXUH SODQDWLRQ RI QJLQH GHQWL FDWLRQ 1XP...

Page 8: ...W DQG HQHUDO QIRUPDWLRQ 2LO 5HFRPPHQGDWLRQV 2LO 7 SH LJXUH 9LVFRVLW UDGHV 7DEOH LJXUH 2LO RQWDLQHU RJR XHO 5HFRPPHQGDWLRQV 51 1 SORVLYH XHO HQHUDO 5HFRPPHQGDWLRQV XHO 7 SH DVROLQH OFRKRO EOHQGV DVROLQ...

Page 9: ...6DIHW DQG HQHUDO QIRUPDWLRQ 0DLQWHQDQFH QVWUXFWLRQV 51 1 FFLGHQWDO 6WDUWV 0DLQWHQDQFH 6FKHGXOH UHTXHQF 0DLQWHQDQFH 5HTXLUHG 5HIHU WR DLO RU HIRUH 6WDUWLQJ QJLQH YHU RXUV YHU RXUV YHU RXUV QQXDOO RU Y...

Page 10: ...6HFWLRQ 6DIHW DQG HQHUDO QIRUPDWLRQ 0XI HU 6FUHHQ DQG 6SDUN UUHVWRU 6 6 6 LJXUH 0XI HU 6FUHHQ DQG 6SDUN UUHVWRU LJXUH 0XI HU 6FUHHQ 0XI HU 6FUHHQ DQG 6SDUN UUHVWRU 0XI HU 6FUHHQ 6 6...

Page 11: ...6HFWLRQ 6DIHW DQG HQHUDO QIRUPDWLRQ 6WRUDJH...

Page 12: ...LRQ 6DIHW DQG HQHUDO QIRUPDWLRQ LJXUH 7 SLFDO QJLQH LPHQVLRQV 6 DQG 6 LPHQVLRQV LQ PLOOLPHWHUV QFK HTXLYDOHQWV VKRZQ LQ TW PP GHHS 6WUDLJKW 372 6SDUN 3OXJ 2LO LOO 2LO UDLQ 3OXJ 0RXQWLQJ DFH GLD TW VOR...

Page 13: ...IRUPDWLRQ LJXUH 7 SLFDO QJLQH LPHQVLRQV 6 VSHF 6 DQG 6 LPHQVLRQV LQ PLOOLPHWHUV QFK HTXLYDOHQWV VKRZQ LQ GLD GLD GLD GLD 6WUDLJKW 372 6SDUN 3OXJ 2LO LOO 2LO UDLQ 3OXJ 0RXQWLQJ DFH TW PP GHHS TW PP GHH...

Page 14: ...6HFWLRQ 6DIHW DQG HQHUDO QIRUPDWLRQ LJXUH 7 SLFDO QJLQH LPHQVLRQV 6 VSHF PP GHHS TW PP GHHS TW PP GHHS TW VORWWHG KROH TW KROH TW LPHQVLRQV LQ PLOOLPHWHUV QFK HTXLYDOHQWV VKRZQ LQ...

Page 15: ...6HFWLRQ 6DIHW DQG HQHUDO QIRUPDWLRQ HQHUDO 6SHFL FDWLRQV...

Page 16: ...6HFWLRQ 6DIHW DQG HQHUDO QIRUPDWLRQ HQHUDO 6SHFL FDWLRQV FRQW LU OHDQHU DPVKDIW DUEXUHWRU RQQHFWLQJ 5RG...

Page 17: ...6HFWLRQ 6DIHW DQG HQHUDO QIRUPDWLRQ RQQHFWLQJ 5RG FRQW UDQNFDVH UDQNVKDIW...

Page 18: ...6HFWLRQ 6DIHW DQG HQHUDO QIRUPDWLRQ UDQNVKDIW FRQW OLQGHU RUH OLQGHU HDG OHFWULF 6WDUWHU...

Page 19: ...6HFWLRQ 6DIHW DQG HQHUDO QIRUPDWLRQ OHFWULF 6WDUWHU FRQW O ZKHHO XHO 7DQN JQLWLRQ 0XI HU 2LO 6HQWU 3LVWRQ 3LVWRQ 5LQJV DQG 3LVWRQ 3LQ...

Page 20: ...6HFWLRQ 6DIHW DQG HQHUDO QIRUPDWLRQ 3LVWRQ 3LVWRQ 5LQJV DQG 3LVWRQ 3LQ FRQW...

Page 21: ...6HFWLRQ 6DIHW DQG HQHUDO QIRUPDWLRQ 5HGXFWLRQ 6 VWHP 5HWUDFWDEOH 6WDUWHU 5RFNHU UP 7KURWWOH RQWURO 9DOYH RYHU 9DOYHV DQG 9DOYH LIWHUV...

Page 22: ...6HFWLRQ 6DIHW DQG HQHUDO QIRUPDWLRQ 7RUTXH RQYHUVLRQV 2LO UDLQ 3OXJV 7LJKWHQLQJ 7RUTXH 1 P LQ OE 6L H 0 0 QWR OXPLQXP 0RGHO 9DOYHV DQG 9DOYH LIWHUV 1RWHV...

Page 23: ...e h c r o F 5 0 4 2 8 R L K s l o o T E S r e t s e T n w o d k a e L r e d n i l y C n r o w e r a s e v l a v r o s g n i r n o t s i p r e d n i l y c f i d n a n o i t n e t e r n o i t s u b m o...

Page 24: ...A S e l u d o M e c n a v d A k r a p S K R A P S T R A M S h t i w s e n i g n e n o M A S D d n a M A S A M A S e h t t s e t o T S 0 4 1 6 7 5 2 r e l h o K t f i h S d i o n e l o S l o o T g n i...

Page 25: ...e l E t f i h S d i o n e l o S S 2 0 7 5 3 2 5 r e l h o K t n a l a e S e n o c i l i S V T R e t i t c o L r e s n e p s i d l o s o r e a z o 4 n i y d o B y v a e H 0 0 9 5 e s u r o f d e v o r...

Page 26: ...ening tightening or removing with a puller Figure 2 1 Flywheel Holding Tool Rocker Arm Crankshaft Tool A spanner wrench to lift the rocker arms or turn the crankshaft may be made out of an old junk co...

Page 27: ...throttle controls 6 Faulty spark plug 7 Low compression 8 Faulty ACR mechanism 9 Weak spark ignition Engine Will Not Crank 1 PTO drive is engaged 2 Battery if equipped is discharged 3 Safety interloc...

Page 28: ...heck the oil level Note if the oil level is within the operating range on the dipstick or if it is low or overfilled Check the condition of the oil Drain the oil into a container the oil should flow f...

Page 29: ...ine over using recoil or electric starter and check results Standard Compression Pressure 400 600 kPa 57 85 psi with ACR mechanism in operation Cylinder Leakdown Test A cylinder leakdown test can be a...

Page 30: ...ir escaping from exhaust system Defective exhaust valve Air escaping from carburetor Defective intake valve Gauge reading in low green zone Piston rings and cylinder in good condition Gauge reading in...

Page 31: ...4 1 through 4 4 The third design does not use a paper element just the foam See Figure 4 14 Servicing information for the third design is on page 4 5 The heavy duty air cleaner assemblies also contain...

Page 32: ...races of detergent are eliminated Squeeze out excess water do not wring Allow the precleaner to air dry 4 Saturate the precleaner with new engine oil Squeeze out all excess oil 5 Install the precleane...

Page 33: ...with precleaner Remove the precleaner from the paper element Service the precleaner Heavy Duty Cyclonic Air Cleaner Unhook the latches and remove the housing assembly from the mounting base Remove the...

Page 34: ...nto the cover housing Insert the small end first into the housing so the larger end with the foam seal is out visible Secure with the wing nut if used Secure the cover housing with the latches See Fig...

Page 35: ...e with loose or damaged air cleaner components could allow unfiltered air into the engine causing premature wear and failure Every 50 hours of operation wash and reoil the foam air cleaner element mor...

Page 36: ...without the air cleaner element excessive piston and or cylinder wear may result Air Intake Cooling System To ensure proper cooling make sure the grass screen cooling fins and other external surfaces...

Page 37: ...6 VWHP DQG RYHUQRU 6HFWLRQ XHO 6 VWHP DQG RYHUQRU HVFULSWLRQ 51 1 SORVLYH XHO XHO 6 VWHP RPSRQHQWV 2SHUDWLRQ XHO 5HFRPPHQGDWLRQV HQHUDO 5HFRPPHQGDWLRQV XHO 7 SH DVROLQH OFRKRO EOHQGV DVROLQH WKHU EOHQ...

Page 38: ...6HFWLRQ XHO 6 VWHP DQG RYHUQRU DUEXUHWRU HQHUDO 7HVW RQFOXVLRQ 7URXEOHVKRRWLQJ XHO 6 VWHP 5HODWHG DXVHV XHO LQH XHO 6 VWHP 7HVWV...

Page 39: ...6HFWLRQ XHO 6 VWHP DQG RYHUQRU 7URXEOHVKRRWLQJ DUEXUHWRU 5HODWHG DXVHV 7URXEOHVKRRWLQJ KHFNOLVW RQGLWLRQ 3RVVLEOH DXVH 3UREDEOH 5HPHG...

Page 40: ...6HFWLRQ XHO 6 VWHP DQG RYHUQRU LJK OWLWXGH 2SHUDWLRQ GMXVWPHQWV HQHUDO GMXVWLQJ RZ GOH XHO DQG 6SHHG LJXUH DUEXUHWRU GMXVWPHQWV GOH 6SHHG 6FUHZ GOH XHO 1HHGOH ZLWK LPLWHU DS...

Page 41: ...6HFWLRQ XHO 6 VWHP DQG RYHUQRU LJXUH 6 DQG 6 DUEXUHWRU SORGHG 9LHZ LJXUH 6 DUEXUHWRU SORGHG 9LHZ...

Page 42: ...6HFWLRQ XHO 6 VWHP DQG RYHUQRU DUEXUHWRU 6HUYLFH ORDW LW RQWDLQV LJXUH ORDW HLJKW 3RVLWLRQ LJXUH 0HDVXULQJ ORDW HLJKW 87 21 HVFULSWLRQ 4W...

Page 43: ...6HFWLRQ XHO 6 VWHP DQG RYHUQRU LJXUH QOHW 1HHGOH DQG 6HDW HDU DPDJH HWDLOV URRYHG HDU XVW RYHUQRU 2SHUDWLRQ 6SHHG QFUHDVLQJ 6SHHG HFUHDVLQJ LJXUH FWLRQ RI RYHUQRU HDU...

Page 44: ...JXUH RYHUQRU 6 VWHP QLWLDO GMXVWPHQW RYHUQRU GMXVWPHQW RYHUQRU HYHU 0RXQWLQJ ROW RYHUQRU 6KDIW RYHUQRU HYHU RYHUQRU 6KDIW 0RXQWLQJ ROW LJXUH 6 6 RYHUQRU GMXVWPHQW LJXUH 6 VSHF 6 DQG 6 RYHUQRU GMXVWPHQ...

Page 45: ...YHU 7KURWWOH 6WRS 6FUHZ 7KURWWOH HYHU LJK GOH 6SHHG GMXVWPHQW LJXUH 6 6 7KURWWOH HYHU 7KURWWOH 6WRS 6FUHZ HWDLOV LJXUH 6 VSHF 6 DQG 6 7KURWWOH HYHU 7KURWWOH 6WRS 6FUHZ HWDLOV 7KURWWOH 6WRS 6FUHZ 7KURW...

Page 46: ...6HFWLRQ XHO 6 VWHP DQG RYHUQRU RZ GOH 6SHHG GMXVWPHQW GMXVWLQJ 6FUHZ GMXVWLQJ 6FUHZ LJXUH 6 6 RZ GOH 6SHHG GMXVWLQJ 6FUHZ LJXUH 6 RZ GOH 6SHHG GMXVWLQJ 6FUHZ...

Page 47: ...6HFWLRQ XEULFDWLRQ 6 VWHP 6HFWLRQ XEULFDWLRQ 6 VWHP HQHUDO 2LO 5HFRPPHQGDWLRQV 2LO 7 SH LJXUH 2LO RQWDLQHU RJR KHFN 2LO HYHO SAE 10W 30 A P I SERVIC E S J...

Page 48: ...6HFWLRQ XEULFDWLRQ 6 VWHP LJXUH XWDZD 6KRZLQJ 3URSHU 2LO HYHO 2LO 6HQWU LJXUH 2LO 6HQWU 2SHUDWLRQ KDQJH 2LO 3URSHU 2LO HYHO RZ 2LO HYHO ULQJ HYHO 8S 7R 3RLQW RI 2YHU RZ...

Page 49: ...6HFWLRQ XEULFDWLRQ 6 VWHP LJXUH 6 6 5LJKW 2LO LOO HYHO 3OXJ RFDWLRQ LJXUH 6 6 HIW 2LO LOO HYHO 3OXJ RFDWLRQ LJXUH 6 5LJKW 2LO LOO HYHO 3OXJ RFDWLRQ LJXUH 6 HIW 2LO LOO HYHO 3OXJ RFDWLRQ...

Page 50: ...6HFWLRQ XEULFDWLRQ 6 VWHP...

Page 51: ...Exploded View To Remove Starter 1 Remove the hex flange screws three on CS4 and CS6 four on CS8 5 12 securing the starter assembly to the blower housing 2 Remove the starter assembly To Install Start...

Page 52: ...e Pawls and Tighten Mounting Screws Rope Replacement The rope can be replaced without complete starter disassembly 1 Remove the starter from the engine blower housing 2 Pull the rope out approximately...

Page 53: ...not remove the center screw from starter until the spring tension is released Removing the center screw before releasing spring tension or improper starter disassembly can cause the sudden and potent...

Page 54: ...cement 2 Unscrew the center screw and lift off the drive plate The screw will be captured within plate by the clip on backside 3 Carefully note the positions of the pawls and pawl springs CS8 5 12 onl...

Page 55: ...unting screws to 5 5 N m 47 7 in lb See Figure 7 3 3 Carefully install pulley into recoil housing engaging the spring hook with starter housing tab See Figure 7 10 NOTE Rotating pulley counterclockwis...

Page 56: ...7 6 Section 7 Retractable Starter...

Page 57: ...2 20 6 mm 13 16 in 3 15 9 mm 5 8 in Spark Plug Service Every 100 hours of operation remove the spark plug check its condition and reset the gap or replace it with a new plug as necessary 1 Before rem...

Page 58: ...engine operating under normal conditions will have light tan or gray colored deposits If the center electrode is not worn a plug in this condition could be set to the proper gap and reused Carbon Foul...

Page 59: ...e module When the primary voltage is precisely at its peak the module induces a high voltage in its secondary windings This high voltage creates a spark at the tip of the spark plug This spark ignites...

Page 60: ...bare spot on the crankcase ground Turn the ignition switch on crank the engine and observe the red LED indicator lamp a If the indicator lamp was not flashing trace the black manual start models or b...

Page 61: ...meter Test the ignition key switch as follows a On manual start engines trace the two black leads from the on off switch and separate them from any connections Connect the ohmmeter leads to the switc...

Page 62: ...No Page No CS6T CS6T CS6T CS6TR CS6TP CS6TG S6T CS6TR CS6ST CS6TG CS6TG CS6T CS6ST CS6T CS6T CS6T CS6TG CS6TG CS6TR 911501 911502 911503 911504 911505 911506 911507 911508 911509 911510 911511 911512...

Page 63: ...Model No Spec No Figure No CS12T CS12T CS12TG CS12TP CS12TR CS12TR CS12STG CS12ST CS12S CS12ST CS12TG CS12STG CS12TG CS12STG CS12STG CS12STG CS12STG CS12STG CS12T Hydro 12 75 CS12S CS12STG CS12TG CS12...

Page 64: ...Green w Red Stripe Green w Yellow Stripe Blue w White Stripe Blue w Red Stripe Green w Black Stripe Black w Gray Shielding Ignition Module Spark Plug Ground Ground Stop Switch Wire Lead B Ignition Mod...

Page 65: ...round Stator Ignition Module Fuse 15 A Battery Rectifier Regulator Starter Solenoid B Y L BW BW Y Y B Wire Lead Oil Sentry Gauge Spark Plug BW B B B B B B R R R R R B W W W W R R B W W W W R R R R BW...

Page 66: ...und Ground Spark Plug Y Y Oil Sentry Light BW BW R BW BW R Ignition Module Stator W W W W Engine Ground B B B B R R R R R B W W W W WL R WL B Rectifier Regulator WL Charge Lamp Ground WL Battery R R R...

Page 67: ...n Start Oil Warning Unit Oil Warning Unit B L BW B Wire Lead Ground Oil Sentry Gauge B Ground Ground Ground Spark Plug Ground Ignition Module Y Y BW R R BW BW Oil Sentry Light Ground B YR YR YR R R R...

Page 68: ...ry Gauge B L B Wire Lead B Oil Sentry Gauge Y Y BW BW Oil Sentry Light BW R R BW Engine Ground Engine Ground G G G G G G B R R B B BW R RW RW RW Fuse 10 A R R R R Battery Starting Motor Rectifier G G...

Page 69: ...BW B R RW Y LR Main Switch Off On Start W GR Y Y GR B L W L W GB GB GR BW B Ground Ground Ground Ground Ground W W B R R R RB Y LR Figure 8 14 Figure 8 15 Rectifier W W R R B W W B R R R B W W W W St...

Page 70: ...e 8 16 Figure 8 17 10 Amp Charging System with Rectifier Regulator and Oil Sentry System Solenoid Shift Electric Starter 18 Amp Charging System with Rectifier Regulator and Oil Sentry System Solenoid...

Page 71: ...em Rectified Only and Oil Sentry System Solenoid Shift Electric Starter Optional Solenoid Valve Some Models 18 Amp Charging System with Rectifier Regulator and Oil Sentry System Solenoid Shift Electri...

Page 72: ...s Figure 8 20 Figure 8 21 No Charging System Operational Off Battery Oil Sentry System Solenoid Shift Electric Starter Recoil Start No Oil Sentry System Stop Switch Only Ignition Module Spark Plug Gro...

Page 73: ...p Charging System Recoil Start Only Oil Sentry System Rectifier Regulator W W R R B W W B R R R B W W W W Stator Ground Ground Ground Ignition Module Spark Plug Oil Sentry Gauge B L BW BW Y Y Oil Sent...

Page 74: ...voltage There are two different rectifier regulators which are used an 18 amp and a 7 10 amp assembly Although externally similar the internal circuits differ and the two should not be interchanged 1...

Page 75: ...e mounting screw Grounding is achieved through the wiring harness In certain other applications the rectifier may be integrated within the basic engine wiring harness The rectifier converts AC voltage...

Page 76: ...C white leads Connect an AC voltmeter across the stator leads female terminals With engine running at 3600 RPM measure the AC output from the stator 2 If voltage is 20 0 volts or more stator is OK Rec...

Page 77: ...e all jewelry when servicing batteries Before disconnecting the negative ground cable make sure all switches are OFF If ON a spark will occur at the ground cable terminal which could cause an explosio...

Page 78: ...ngines in this series will use either an inertia drive or a solenoid shift starter Each style has its own respective starter solenoid incorporated into the mounting configuration The inertia drive sta...

Page 79: ...o the positive brush lead attached to the lower stud terminal of solenoid Connect the other end to the positive terminal of the battery Connect one end of the negative jumper cable to the negative ter...

Page 80: ...ion Test 2 Solenoid Pull In Coil Contact Continuity Test Use an ohmmeter set to the audible or Rx2K scale and connect the two ohmmeter leads to the two large post terminals Perform the preceding test...

Page 81: ...e pinion out of mesh with the ring gear and into the retracted position When power is removed from the starter the armature stops rotating and the drive pinion is held in the retracted position by the...

Page 82: ...fide lubricant to the splines 7 Install the drive pinion spring and spring holder collar onto the armature shaft Figure 8 37 Installing Drive Components 8 Install a new retaining ring into the groove...

Page 83: ...moving End Cap with Brush Plate 6 Pull the armature out of the starter frame Brush Inspection Replacement 1 Remove the lower jam nut metal washer insulating washer and O Ring from the positive stud Ca...

Page 84: ...utator segments The depth should be 2 mm 0 079 in If less cut scrape the mica to the proper measurement using a hacksaw blade or similar tool ground to fit between the segments See Figure 8 46 NOTE Th...

Page 85: ...nd cap from the inside out Install the O Ring fiber washer metal washer and inner hex jam nut Tighten nut to secure but do not overtighten or damage to the inside plastic support can occur Figure 8 48...

Page 86: ...ning with a wrench while tightening the top nut to prevent damaging the internal components See Figure 8 55 Reinstall the protective boot over the connection If the solenoid was removed from the start...

Page 87: ...n out onto the drive shaft and into mesh with the flywheel ring gear When the pinion reaches the end of the drive shaft it rotates the flywheel and cranks the engine When the engine starts and the sta...

Page 88: ...rame from around the armature and drive end cap See Figure 8 59 Figure 8 59 Disassembled Starter 8 Pull outward on the pivot portion of the drive lever and remove the drive lever and armature from the...

Page 89: ...See Section 2 to lever and shaft Starter Reassembly 1 Install the drive pinion onto the armature shaft 2 Slide the stop collar onto the armature shaft below the retaining ring groove Make sure the rec...

Page 90: ...tor in Place 9 Stand the armature drive end cap assembly on end so the commutator end is up Place brush armature installation tool over the end of armature shaft until it rests against the commutator...

Page 91: ...d engaging the plunger end with the yoke of the drive lever Check by pulling solenoid towards the rear Mount the solenoid to the starter using the two hex flange nuts Tighten securely See Figure 8 69...

Page 92: ...8 36 Section 8 Electrical System and Components...

Page 93: ...e There are many commercially available cleaners that will quickly remove grease oil and grime from engine parts When such a cleaner is used follow the manufacturer s instructions and safety precautio...

Page 94: ...e Figures 9 5 9 6 and 9 7 Figure 9 5 CS4 CS6 Air Cleaner Base Figure 9 2 Fuel Shut Off Valve Drain Oil From Crankcase 1 Remove one of the oil drain plugs and one of the oil fill caps Figure 9 3 Oil Dr...

Page 95: ...y If the fuel shut off valve is mounted directly to tank close the valve See Figure 9 2 2 Loosen the clamp and disconnect the fuel line from the outlet of shut off valve fuel tank mounted valves on CS...

Page 96: ...engines Figure 9 12 Disconnecting Choke Link and Dampening Spring from CS8 5 CS12 Carburetor 2 Loosen the hex flange screw securing the governor lever to the governor shaft Mark which hole location th...

Page 97: ...tuds Figure 9 16 Removing Carburetor Gaskets and Spacer If you want to remove the carburetor without disturbing the governor lever mounting proceed as follows 1 Gently hold the governor lever in the f...

Page 98: ...removing the starter cover panel mounting screws will allow easier access to the screw in the upper right hand position Figure 9 21 Cover Panel Mounting Screws Figure 9 22 CS8 5 spec 92xxxx CS10 and C...

Page 99: ...and CS12 Right Tank Mounting Bracket Details Electric Start Engines Only 3 Remove the two screws securing the control panel and mounting bracket for the electrical components See Figure 9 28 Figure 9...

Page 100: ...dels with Solenoid Shift Starters 5 Remove the starter motor wiring harness and control panel housing from the engine Components may be further disassembled if required See Figures 9 31 9 32 and 9 33...

Page 101: ...e breather assembly is inside the valve cover Figure 9 38 Valve Cover Gasket and Air Shroud Removed Figure 9 34 CS4 CS6 Left Side Tank Mounting Bracket Details Figure 9 35 CS8 5 spec 92xxxx CS10 and C...

Page 102: ...ds so they will be reinstalled in the same location Figure 9 40 Remove Cylinder Head Mounting Screws Figure 9 41 Cylinder Head and Gasket Removed Disassemble Cylinder Head 1 Remove the spark plug 2 Sl...

Page 103: ...lding tool see Section 2 may also be used to hold the flywheel when loosening or tightening the flywheel retaining nut Always use a puller to remove the flywheel from the crankshaft Do not strike the...

Page 104: ...Type Puller to Remove Flywheel on CS4 CS6 3 Remove the flywheel key from keyway Remove Ignition Module 1 Remove the two hex flange screws securing the ignition module to the crankcase See Figure 9 51...

Page 105: ...ankcase Place a flat pan or towel under the housing to catch any remaining oil See Figures 9 54 and 9 55 2 Remove the four hex flange shoulder screws securing the stator to the crankcase Remove the st...

Page 106: ...ar assembly See Figure 9 62 Figure 9 58 Removing Screw from Crankshaft on CS4 CS6 Figure 9 59 Removing Screw from Crankshaft on CS8 5 CS12 5 Remove the reduction components a On CS4 and CS6 leave the...

Page 107: ...ion Assemblies CS4 and CS6 1 Remove any drive coupling and the key from the reduction output shaft Clean the shaft and keyway of any burrs damage 2 Remove the four reduction cover mounting screws Use...

Page 108: ...using bearings An arbor press should be used for removal of the others 6 1 Reduction Assemblies CS8 5 CS10 and CS12 1 Remove any drive coupling and the key from the reduction assembly output shaft Cle...

Page 109: ...red use an internal bearing puller to remove the housing bearings An arbor press should be used for removal of the others Remove Closure Plate 1 Remove the hex flange screws securing the closure plate...

Page 110: ...he cutout in the casting and remove the oil sentry gauge Note the routing of the wire 5 Remove the governor gear flyweight assembly by carefully applying upward pressure with two small screwdrivers be...

Page 111: ...tempting to remove the piston 2 Carefully remove the connecting rod and piston assembly from the cylinder bore See Figure 9 85 Figure 9 85 Removing Piston Figure 9 82 Removing Balance Shaft Remove Cam...

Page 112: ...pin and plain washer from the governor cross shaft See Figure 9 87 Remove Flywheel End Main Bearing and Oil Seal 1 Remove the front oil seal from the crankcase See Figure 9 89 Figure 9 89 Oil Seal Rem...

Page 113: ...additional information Measurement Guide TP 2159 B and Engine Inspection Data Record TP 2435 are also available use these to record inspection results Automatic Compression Release ACR These engines...

Page 114: ...ith ACR start much faster in cold weather than engines without ACR 6 Engines with ACR can be started with spark plugs that are worn or fouled Engines without ACR are more difficult to start with those...

Page 115: ...asket fragments Gasket surfaces must also be free of deep scratches or nicks Check the cylinder bore for wear scoring or vertical scratches In severe cases unburned fuel can cause scuffing and scoring...

Page 116: ...should intersect at approximately 20 off the horizontal Too flat an angle could cause the rings to skip and wear excessively too steep an angle will result in high oil consumption See Figure 10 7 Fig...

Page 117: ...the piston pin 3 Piston to bore clearance is the difference between the bore diameter and the piston diameter step 2 minus step 1 Flywheel Inspection Inspect the flywheel for cracks and the flywheel...

Page 118: ...4 in 0 7 mm 0 03 in 1 7 mm 0 067 in Intake 21 0 mm 0 83 in 24 0 mm 0 94 in 5 5 mm 0 22 in 64 5 mm 2 54 in 65 9 mm 2 59 in 0 7 mm 0 0276 in 1 7 mm 0 067 in 90 0 01 mm 0 0004 in 5 5 mm 0 22 in 0 04 0 06...

Page 119: ...rolled test conditions Bad Condition The valve depicted here should be replaced Note the warped head margin damaged and too narrow These conditions could be attributed to excessive hours or a combinat...

Page 120: ...m Corrosion Moisture in the fuel or condensation are the most common causes of valve stem corrosion Condensation occurs from improper preservation during storage and when engine is repeatedly stopped...

Page 121: ...stem or the guide is responsible for the excessive clearance The valve guides are not replaceable Valve Seat Inserts The valve seats are not replaceable If the seats become badly pitted worn or disto...

Page 122: ...nder wall under this condition Oil control is also lost when ring gaps are not staggered during installation When cylinder temperatures get too high lacquer and varnish collect on the piston causing t...

Page 123: ...STD pistons and for 0 25 mm 0 010 in and 0 50 mm 0 020 in oversized pistons Always use new piston rings when installing pistons Never reuse old rings The cylinder bore must be deglazed before service...

Page 124: ...st 2 Middle Compression Ring Locate and identify the compression ring with the R marking Using a piston ring expander install this ring in the middle groove with the R up towards the top of the piston...

Page 125: ...wo small screwdrivers and carefully applying upward pressure from beneath the gear and against the bosses in the closure plate Do not pry against or nick damage the gasket surface of the closure plate...

Page 126: ...d inspect all components for wear and damage Remove the housing gasket and dowel pins then clean the gasket surfaces with a cleaning solvent or aerosol type gasket remover Do not nick or scrape the se...

Page 127: ...10 Figure 10 25 Inspect for Binding 5 Check to see that the closure plate oil passages to the reduction assembly are open and not restricted See Figures 10 26 and 10 27 Figure 10 26 CS4 CS6 Oil Passa...

Page 128: ...10 16 Section 10 Internal Components...

Page 129: ...s 10 Install stator and wire shield 11 Install flywheel 12 Install ignition module 13 Assemble and install cylinder head 14 Install push rods rocker arms studs and rocker shaft 15 Install valve cover...

Page 130: ...the lower flat section faces to the right 3 o clock position and insert the hitch pin so the end of the clip comes in contact with the raised section of the housing boss limiting the inward movement...

Page 131: ...bearing and seal Install Connecting Rod with Piston and Rings 1 If the piston and or connecting rod has been changed or removed make sure the following is correct before installing Figure 11 6 CS4 CS...

Page 132: ...pin and piston rings with engine oil Compress the rings using a piston ring compressor 4 Lubricate the crankshaft journal and connecting rod bearing surfaces with engine oil 5 Make sure stamping on p...

Page 133: ...ligning Balance Shaft and Crankgear Timing Marks Install Governor Assembly The governor gear assembly is located inside the closure plate If servicing was performed or the governor was removed reassem...

Page 134: ...0 1 mm 0 0039 in 0 2 mm 0 007 in 0 3 mm 0 011 in and 0 4 mm 0 015 in for CS8 5 12 When proper end play has been established install all screws and torque in the sequence shown in Figure 11 22 or 11 2...

Page 135: ...nto the cover to a depth of 2 mm 0 08 in See Figure 11 26 Apply a light coating of lightweight lithium grease to lip of seal 1 8 4 6 2 7 3 5 Figure 11 24 CS4 CS6 Installing Bearing Torque Screws to 30...

Page 136: ...the keyway of the crankshaft Install the crankshaft gear onto the engine crankshaft Secure with the flat washer and hex flange screw See Figure 11 32 Torque the screw to CS8 5 spec 92xxxx CS10 CS12 60...

Page 137: ...tall the dowel pins into their respective locations in the closure plate and install a new gasket dry onto the dowel pins See Figures 11 34 and 11 35 Figure 11 35 CS8 5 12 Installing Dowel Pins and Ga...

Page 138: ...ring Washer Bolt Washer Shaft 2 Idle Sprocket Chain Washer Straight Key C Oil seal installation depth 2 mm 0 08 in 30 N m 265 in lb 65 N m 48 ft lb No Description 1 2 3 4 5 6 7 8 9 Chain Case Cover Ga...

Page 139: ...ation Depth 3 Pre lube all bearing surfaces with engine oil 4 Install a new gasket between the reduction housing and closure plate 5 Install the reduction housing to the closure plate as shown and sec...

Page 140: ...hole on side Capacity 0 15 liter 5 02 fl oz 9 Install the level plug and fill plug into their respective locations The fill plug contains a vent hole and must be installed on top See Figure 11 46 Torq...

Page 141: ...gear on crankshaft Figure 11 49 Installing Counter Gear Assembly 5 Lubricate the bearing surfaces with oil and install the output shaft gear assembly into the cover See Figure 11 50 Figure 11 50 Inst...

Page 142: ...all the four M6 shoulder screws and torque the screws in sequence shown as applicable to 5 8 N m 44 70 in lb Figure 11 54 Installing Stator Mounting Screws Figure 11 55 Stator Screws Torque Sequence 2...

Page 143: ...ng the flywheel make sure the crankshaft taper and flywheel hub are clean dry and completely free of lubricants The presence of lubricants can cause the flywheel to be over stressed and damaged when t...

Page 144: ...installed 2 Install the ignition module loosely to the bosses with the two hex flange screws Move the module as far away from the flywheel as possible then tighten the screws just enough to hold it in...

Page 145: ...ylinder Head Screws Torquing Sequence Figure 11 66 Tightening Cylinder Head Screws NOTE The engine utilizes a valve stem seal on the intake valve Always use a new seal when valves are installed in the...

Page 146: ...CS10 CS12 Install the rocker arms and adjuster assemblies into their original locations Seat the push rods into the cupped end of the rocker arms Oil the rocker arm shaft and install it through the cy...

Page 147: ...he compression stroke b Insert a flat feeler gauge between the rocker arm and the valve stem The recommended valve to rocker arm clearance for both intake and exhaust is 0 1 mm 0 004 in Figure 11 74 C...

Page 148: ...acket off the two right side valve cover locations or to the cylinder head boss locations based upon the model involved using the two longer screws Torque all the screws to 10 12 N m 88 106 in lb See...

Page 149: ...5 spec 92xxxx CS10 CS12 Mounting Left Fuel Tank Support 2 Assemble the right fuel tank support and attached electrical components to the crankcase bosses Mount the throttle control bracket off the fl...

Page 150: ...ase using the two hex flange head screws Torque the screws to 10 12 N m 88 106 in lb 3 Check that the ground leads are secured at the bracket locations as shown in Figures 11 83 through 11 85 CS8 5 12...

Page 151: ...age Connected to Governor Arm Figure 11 89 CS4 CS6 Spring Hole Position Model Hole Position CS4 All models 2 1 2 Figure Number 11 89 CS6 All models except listed specs CS6 Specs 911510 11 89 11 89 1 2...

Page 152: ...CS12T CS12S 941601 941602 941603 941604 941605 941606 941607 941608 941609 941610 941611 941612 941613 941615 941616 941617 941618 941619 941620 941621 11 90 11 90 11 90 11 90 11 90 11 90 11 90 11 90...

Page 153: ...30 N m 265 in lb See Figure 11 95 Figure 11 92 CS8 5 spec 92xxxx CS10 CS12 Installing Electric Starter 2 Connect the electrical leads for the Oil Sentry ignition module keyswitch solenoid and starter...

Page 154: ...flange screws On CS4 and CS6 engines secure the ground lead with the silver screw in the upper right hand location See Figures 11 96 11 97 and 11 98 Torque the screws to 7 N m 62 in lb Figure 11 98 C...

Page 155: ...the hole s of the throttle lever See Figures 11 101 and 11 102 Figure 11 101 CS4 CS6 Assembling Linkage Figure 11 102 CS8 5 12 Assembling Linkage 3 CS8 5 12 Connect Z end of choke link and dampening s...

Page 156: ...Torque hex flange nuts to CS4 CS6 5 8 N m 44 71 in lb CS8 5 12 10 12 N m 88 106 in lb Torque hex flange screw s to 5 8 N m 44 71 in lb Seal Seal Figure 11 104 CS4 CS6 Installing Air Cleaner Base Figur...

Page 157: ...gure 11 109 CS8 5 12 Adjusting Governor Install Fuel Tank CS4 CS6 CS8 5 spec 92xxxx CS10 CS12 1 If the fuel shut off valve was removed or serviced separately install and secure with the flange nut so...

Page 158: ...buretor inlet Secure with the clamps Install Outer Air Cleaner Cover 1 Install the outer air cleaner cover onto the stud over the element Secure with the knob Figure 11 113 CS8 5 spec 95xxxx Shut Off...

Page 159: ...3 Fill the crankcase with the correct oil Refer to the oil recommendations and procedures in the General Information and Lubrication System sections 4 Reconnect the rectifier regulator if so equipped...

Page 160: ...Section 11 Reassembly 11 32 Figure 11 118 CS4 CS6 High Speed Stop Screw Figure 11 119 CS8 5 spec 92xxxx CS10 CS12 High Speed Stop Screw Figure 11 120 CS8 5 spec 95xxxx High Speed Stop Screw...

Page 161: ......

Page 162: ...7 2 1 8 6 250 12 5HY 668 5 9 6 1 1 9 6 21 2 5 2 2 5 6 216 1 25 6 6 1 6 59 1 250 7 21 1 8 6 1 1 RKOHU QJLQHV FRP...

Reviews: