background image

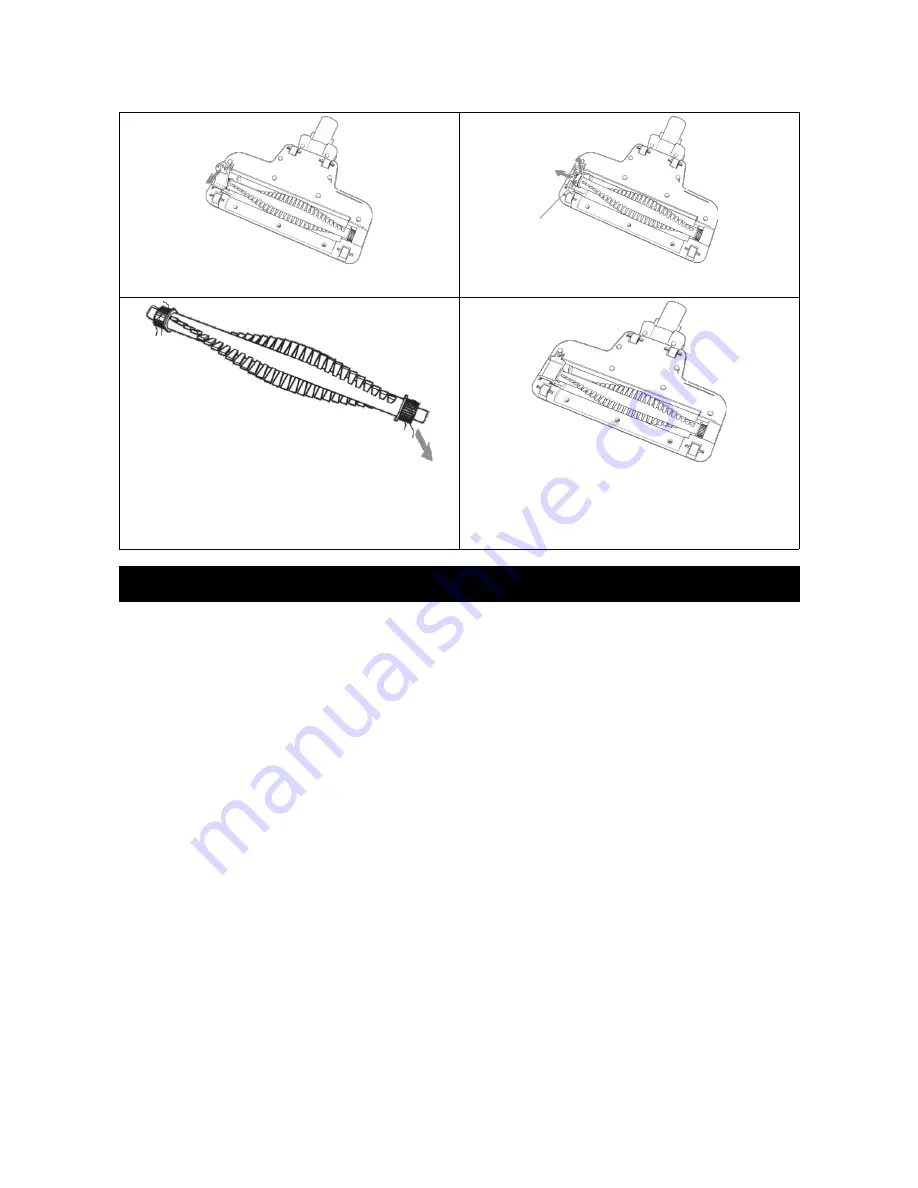
Method when the rotating brush cannot be manually rotated

1.

Unscrew the left hand side, then lift and 
dislodge the brush cover.

2.

Lift the left side of the rotating brush up, 
then remove the belt pulley from the belt.

3. Take out the rotating brush and then 

remove the blockage.

4. Reinstall the rotating brush again. 

Check that the brush cover is securely 
fixed and that the brush rotates 
properly again.

Removing the Batteries

To protect the environment, never put this product in household rubbish at the end of its useful 
life. This appliance contains Li-ion batteries that must be taken out of the appliance for 
recycling. 

Do the following to remove the batteries: 

1.

Detached all accessories connected with vacuum cleaner.

2. Remove all the screws in the vacuum cleaner unit.
3. Remove one side of the housing.
4. Remove all screws in the battery box.
5. Cut all the wires connected to the battery.
6. Deposit the batteries in the special battery collection containers provided by your local 

authorities.

If you have any issues, questions or concerns regarding the use of this product, please contact 

the Kogan customer support team.

10

Belt

Remove waste

Summary of Contents for KAVACSTK18VA

Page 1: ......

Page 2: ...rging the Battery 4 Important Note for Charging 5 Indication Lights 5 Basic Installation 5 Vacuum Cleaner 5 Blower 6 Operation Instructions 6 Accessories 7 Crevice set accessories 7 Hose set accessories 7 Cleaning and Maintenance 8 Filter and Filter Covers 8 Dust Bin 9 Floor Brush 9 Removing the Batteries 10 1 ...

Page 3: ...ot use wet hands when handling the vacuum Do not tug on the adaptor s cable in order to unplug it Do not expose the vacuum cleaner to outdoor weather conditions moisture or heat Do not leave the appliance close to heat sources such as ovens heaters and radiators nor allow the cord to come into contact with hot surfaces DO NOT IMMERSE THE MOTOR HOUSING CABLE OR TRANSFORMER IN WATER OR ANY OTHER LIQ...

Page 4: ...revice condenser D Nozzle lock P Crevice E Blower nozzle Q Brush F Charge indicator R Extendible crevice G ON OFF button S Floor nozzle H Dust bin T Carpet Fabric brush I Dust bin release lever U Long hose J Filter cover V Additional holder K Battery pack W Floor brush L Charger base 3 ...

Page 5: ... charge condition It should be charged for 6 hours prior to initial use Note Recharge your appliance after storing for a long time Charge the appliance when the Charging indicator F is flashing red during operation Only charge the vacuum cleaner with the charger M and charging base L supplied 1 Insert the small plug into the charging base L and you can let the charging base L stand on a table or f...

Page 6: ...g warning Low Battery Red with flashing Auto cut off During Charging Charging Red Fully Charged Blue Basic Installation This is a multi function appliance supplied with full set of accessories With different accessories it will become a Vacuum cleaner a Blower or a Power brush cleaner Vacuum Cleaner Insert the long hose U and floor brush W into the main unit to become a stick vacuum cleaner Fig 5 ...

Page 7: ...ree Pull the rotate release button C and rotate the nozzle Fig 8 Fig 8 3 Combine these two features the nozzle can point to almost any direction In front of it it is very useful when the vacuum cleaner is used on the floor or on the table 4 To detach the nozzle press the Nozzle lock D and pull it out Blower Insert the Crevice P into the main unit Blower nozzle E to become a Blower The Blower nozzl...

Page 8: ...on the unit the roller brush in the power brush will rotate Note This product is for dry pick up only Fig 10 Accessories This Vacuum cleaner comes equipped with a full set of accessories each designed for different cleaning jobs Crevice set accessories This set of accessories includes Crevice P Brush Q Crevice condenser O Simply insert the Crevice P into the inlet of the nozzle The Brush Q and Cre...

Page 9: ...ter Covers Clean the filter cover J and both filters V W after each use 1 Open the filter cover J by turning anti clockwise Fig 14 2 Empty the contents out of the dust container 3 Remove the outer filter a by turning in anti clockwise Fig 15 Pull the inner HEA filter b out Fig 16 4 Clean both filters with a soft brush If it is very dirty it can be washed in soapy water make sure to rinse it well a...

Page 10: ...e centres Fig 14 Fig 15 Fig 16 Dust Bin Clean the dust bin H after each use 1 Remove the dust bin H by pressing the dust bin release button I on both side and pull the dust bin out Fig 17 2 Empty the contents out of the dust bin by pressing the dust bin cover c down Fig 18 3 To replace the dust bin place it back onto the appliance and lock into place Fig 17 Fig 18 Floor Brush Carry out maintenance...

Page 11: ...duct in household rubbish at the end of its useful life This appliance contains Li ion batteries that must be taken out of the appliance for recycling Do the following to remove the batteries 1 Detached all accessories connected with vacuum cleaner 2 Remove all the screws in the vacuum cleaner unit 3 Remove one side of the housing 4 Remove all screws in the battery box 5 Cut all the wires connecte...

Reviews: