background image

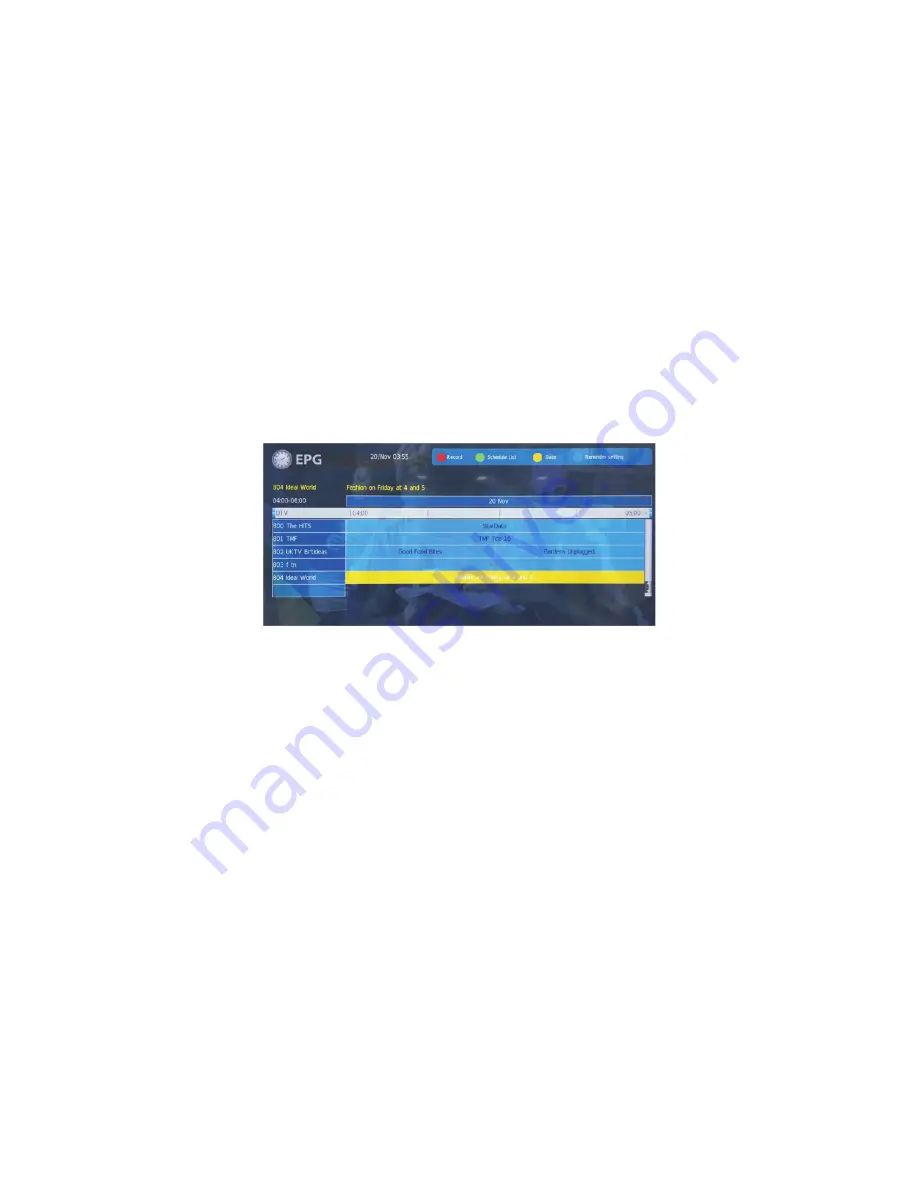
EPG MENU (Electronic Program Guide)

The EPG menu is used to look at what is being broadcast by DTV stations. After you turn the TV 

on and select DTV as your input, your TV will commence receiving EPG data progressively over a

period of time as you move from channel to channel. Press EPG button to access EPG menu.  

You will receive detailed program information on the channel you are currently watching, as well 

as programs in the near future.  Press   to move to the top of the EPG screen to the programme 

guide tab, then press   to select either Time or Channel listings. There will be a short delay while 

the EPG changes modes.

In Time mode, move the highlighted tab down to the date line using the cursor keys, then press 

the     keys to select the desired reception date. Use   to move through the available programs 

◀▶

for the selected date and time.

In Channel mode, use the cursor keys to select your desired DTV channel, then scroll through the

available programs into the near future. If the DTV channel shows "No Information", it means that

the EPG has not loaded the data for that channel. You can speed up this process (for this 

channel only) by using the     keys to select the channel in the EPG list, then press OK on the 

▲▼

Remote Control.  The TV will change to the newly selected channel and start loading the EPG 

data. Once the selected program is chosen, you can select to tag it for Reminder activity using 

the Blue button on the remote control, then view the planned activity in the Schedule list.

RECORD

Press the red button to book at DTV program for future recording and add it to the schedule list. 

Once the record settings are in place, the TV will make the recording, even if it is in standby 

power mode.  Move the cursor to the bottom of the Recorder screen to first select from Auto, 

Once, Everyday or Weekly recording options.  Then, apart from the Auto options, you can adjust 

the start and stop times to account for changes in the TV station's schedules, as many programs 

are not transmitted at the exact times stated in the EPG, as most programs often run a few 

minutes late. To avoid missing the end of a program, you can modify the finish time manually (eg

a finish time of 14:30 can be manually "bumped" to 14:40 to ensure that the entire program gets 

recorded).

INFO

Use         to select a program, then press the Green Button or INFO on the remote control to 

◀▶▲▼

display the programs highlighted information (if available).

SCHEDULE

Press the yellow button to list all of the stored reminders in the schedule list.  Press     to choose

▲▼

within the list, then press the red button to delete a selected item in the schedule list, then press 

EPG to return to the EPG menu.

REMIND

Press the Blue button to book a DTV program for future viewing.  Only future programs can be 

booked.  You can select the reminder to run Once, Every Day or Weekly.  Press     to move 

▲▼

within the Reminder setting area, then use     to change the required settings.

◀▶

19

Summary of Contents for KALED32***YD

Page 1: ......

Page 2: ...1 Getting Started 12 First Powering on the TV 12 Menu Settings 13 Using the Main Menus 13 Channel Menu 13 Auto Tuning 13 DTV Manual tuning 14 ATV Manual tuning 14 Program Edit 14 Signal Information 14 Software Update OAD 14 Software Update USB 14 Picture Menu 15 Sound Menu 15 Time Menu 16 Options Menu 16 PVR File System 17 Select Disc 17 Check PVR File System 17 Format 17 PVR File System Type 17 S...

Page 3: ...t the Kogan customer support team Never attempt to make repairs yourself Never push objects of any kind into the set through the cabinet slots as they may touch dangerous voltage points or short circuit parts that could result in a fire or electric shock Never spill any liquids onto the set Use special caution in households where children are present The television is not suitable for children und...

Page 4: ...d or limited by covering the ventilation slots with items such as newspapers tablecloths curtains etc At least 10cm of space should be left around the apparatus for sufficient ventilation The television should be situated away from heat sources such as radiators heaters stoves or other products that product heat Place the television in a position where the screen is not exposed to direct sunlight ...

Page 5: ...d location allow some time for any dew or condensation inside the television to evaporate fully before you turn the unit on To prevent injury the television must be securely attached to the floor wall in accordance to the supplied installation instructions Cleaning Unplug the television from the power supply before cleaning Do not use any liquid cleaners or harsh chemicals Use a soft damp cloth 4 ...

Page 6: ...ction of this manuals please continue reviewing this Installation chapter to ensure that your TV is correctly connected to your TV antenna and related AV equipment eg DVD or Blu ray player amplifier sound bar etc Base Stand Assembly Instruction Prepare to place the TV with the display side down onto a flat surface Due to the size and weight of this TV the use of 2 people is recommended when moving...

Page 7: ...p objects can come into contact with the screen surface Do not exert pressure on the front of the unit at any time as this may damage the LED screen 2 Remove the four long screws from the lower part of the television where the desk stands are attached to the TVs body and remove the stands store the stands and screws in a safe location for future use 3 Use the four M6 screws provided with your TV t...

Page 8: ...n the event that the remote is not available there are various alternative controls for basic functions located on the bottom of the TV when viewed from the front of the TV 1 Source Displays the input source menu 2 MENU Displays the main MENU 3 V V Adjusts the sound level In MENU mode press V or V to adjust the item that you have selected 4 CH CH In TV mode press CH or CH to change the channel up ...

Page 9: ...nected devices into the mains socket before switching the TV on SIDE AV Connections When viewed from the side of the TV the following connections are visible from left to right HDMI 1 input HDMI 2 input HDMI 3 input Headphone output 3 5mm stereo socket YPbPr input USB socket for HDTV recording playback RF TV Antenna input Don t connect both a HDMI and an AV cable to the same device eg Blu ray play...

Page 10: ...plifier equipment In most cases external accessories such as Blu ray players or gaming consoles that were previously connected directly to the TV would now be connected to the amplifier via HDMI and a separate HDMI cable would then be connected between the TV and the AV amplifier This system then allows the Surround AV amplifier to process the surround channels and correctly align the video and au...

Page 11: ...RCA cable between the AUDIO output R L sockets on this TV and the appropriate line level inputs eg AUX input on your amplifier Note Take care when powering up your TV Amp combination as they may be a click or pop sounds on the audio output of the TV during its powering up down phase that can be amplified by your sound system It is highly recommended that the TV is first powered up then once the sc...

Page 12: ...atteries Below are steps to assist you with replacing batteries 1 Open the back cover of the battery compartment 2 Install the batteries into the battery tray There are polarity markings on the compartment Please ensure the polarities are correct 3 Close the battery cover 11 ...

Page 13: ...ill become active and can be commanded using the remote control First Powering on the TV When you first power up your TV or reset the TV to its factory settings it will automatically enter the TV auto tuning mode This where the TV searches for available TV stations and stores the station details it finds Make sure the TV antenna is connected before proceeding with this operation By default the TV ...

Page 14: ...ny time you mis select a menu or setting press the Exit button located on the bottom right hand side of the cursor arrow buttons to exist the Menu setting To access the Input Source menu where you can select ATV or DTV reception plus access signals from your connected audio video devices eg AV composite video or HDMI press the Input Source button located at the top right hand side of the cursor se...

Page 15: ...ete Auto Tune Skip Press to choose the program press the blue teletext button on the Remote Control to skip this program from future up down manual channel selections The strikethrough symbol will appear to the right side of the program name If you highlight the skipped program and press the blue button again you will cancel the skip and the strikethrough symbol will disappear Favourite Press to c...

Page 16: ...commended for home viewing 5 The Noise Reduction option is for areas that still have analogue transmissions In Australia this should be set to the OFF position Sound Menu The third item of the MENU is the SOUND MENU You can adjust sound effects such as treble bass balance etc Press to move press OK to adjust NOTE 1 There are five Sound modes that can be selected Standard Music Movie Sports and Use...

Page 17: ...m a wide selection At the initial setup of the TV the default language is English and it is recommended that this setting is not changed unless you are fluent in any new language chosen 2 The Audio Languages and Subtitle Languages options relate to DTV reception only Some TV channels transmit their audio and subtitles in more than one language and if this is known in advance you can select this al...

Page 18: ...Press the OK button to return to the PVR File System sub menu Check PVR File System Press the OK button to start checking the file system of your USB storage or Hard Disk and check the recording speed capability of the connected device Once SUCCESS is shown after checking you will then be able to begin recording or use the Time Shift Function If FAIL is shown after checking you will need to format...

Page 19: ...nels to be blocked from access until your PIN password is entered Each time one of these blocked channels is selected the PIN must be entered before the channel can be viewed Parental Guidance In this sub menu you can select from a range of Program Classification eg G PG M etc that will prevent viewing of DTV channels that are broadcasting material with a classification equal to or above the level...

Page 20: ... select to tag it for Reminder activity using the Blue button on the remote control then view the planned activity in the Schedule list RECORD Press the red button to book at DTV program for future recording and add it to the schedule list Once the record settings are in place the TV will make the recording even if it is in standby power mode Move the cursor to the bottom of the Recorder screen to...

Page 21: ...sk selection menu Press the cursor buttons to select the correct disk then press OK to display the media files and folder list or press EXIT to return to the media type selection menu Once you have selected the required media type and drive details you can view the various files and folders on screen Select the media by pressing or then press OK and the preview frame will pop up if the file is pla...

Page 22: ...re Mute Volume check if mute is activated or if the audio systems are not correct No Picture Mute Power cord not inserted Contrast brightness too low Press Power Stand by No Colour Normal Audio Colour control Noise Normal weak Retune channels No Colour Noise TV System Mosiac broken Distorted Antenna loose Weak DTV signal Please turn on the main power at the bottom mid right hand side of the TV bef...

Page 23: ...ation Demodulator COFDM OFDM MOD 2K 8K FFT SFN and MFN Packed Carriers 2K 8K Guard Interval 1 8 1 16 1 32 Terminals HDMI Inputs 3 Audio Input RCA sockets 1 L R Composite Video Input RCA 1 Audio Output RCA sockets 1 L R Headphone Output 3 5mm socket 1 L R USB media play software update input 1 Coaxial digital audio output 1 Optical output 1 Other Input voltage 100V 240V 50 60Hz Power consumption 17...

Reviews: