Kogan KACCTV4CHA User Manual Download Page 14

6 Mask Setting

Mask setting function can make some regions of the image invisible.  These regions in preview images and 
playback images are filled with black pixels.  The method to set masks is similar with motion detection 
settings.  You can right click the mouse in the area where the masking is to cancel this function.
You can stop setting when you right click the mouse in an area where you have no mask setting.  There are 
four regions that can be set in one channel.

7 Playback

*File Search
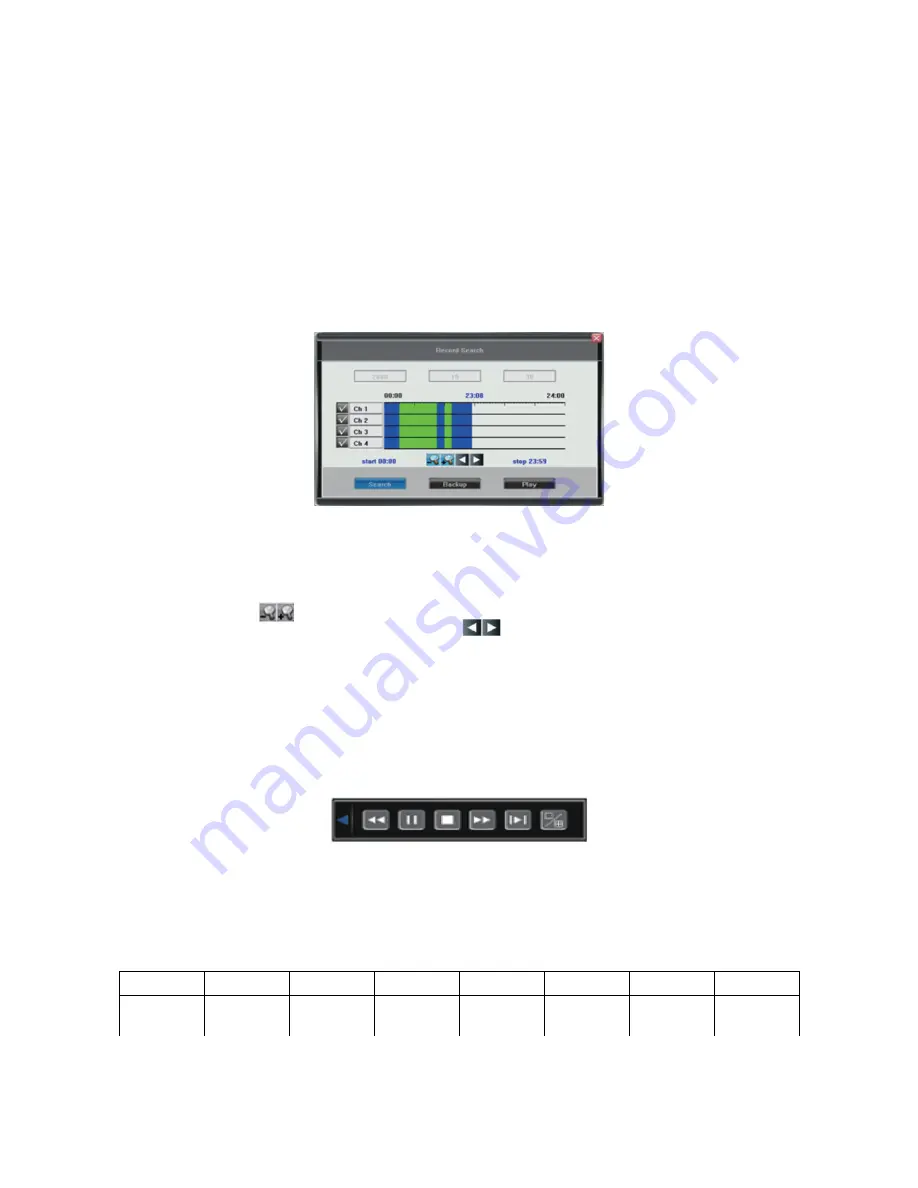
Specify the date/time and channel number by selecting <Tool Bar>→<Record Search>.  Click [Search] in the
pop-up screen to start searching.  The search results will be listed on the screen in different colours so as to 
distinguish different record types.  Please see Fig IV-2 Record Schedule for details of the colour descriptions.

Fig IV-2 File Search

User can use the mouse or use the panel to specify the time.
Panel Operation: move the highlight icon to the relevant selection box using the [◄], [►] buttons.
Move the highlight icon to date/time selection box, then modify it using the [▲], [▼] buttons.
Move highlight icon to channel selection box, press [OK] to select it, or cancel the selection.
Move highlight icon to          , then press the [OK] button to zoom in/zoom out the timeline (time ruler).  If the 
timeline is offscreen, please move the highlight icon to            and press [OK] to display the part of screen 
that is not in shot.
After setting the time, channel number and timeline, move the highlight icon to [Search] using the [◄], [►] 
buttons and press [OK] to start searching.
After searching has completed, press [Fn] button to pop-up the timeline for the selected start point.  Press 
[◄], [►] buttons to move the timeline and press [Fn] to confirm selection.   Press [Fn] again to pop-up the 
second timeline for selection stop.  Press [◄], [►] to move the timeline, and press [Fn] to confirm selection.
After all settings have been set, move the highlight icon to [Play] using the [◄], [►] buttons and press [OK] 
to start playing.   Move the highlight icon to [Backup] using the [◄], [►] buttons and press [OK] to backup.

*Playback Control

: Fast Rewind.  The available rewind speeds are 8X and 16X.
: Pause.  Will pause the current playback, or resume it when paused.
: Stop playing.
: Forward speed.  The available forward speeds are 1/4X, 1/2X, 1X, 2X, 4X, 8X and 16X.
: Frame.  Advances the playback by 1 single frame.
: Click to switch from single split view to 4/9 splits view mode, or vice versa.

The status of the current playback will be displayed in the upper right corner of the screen.

Indication

►►

 16X

►►

 8X

 1X

►►

 1/2X

►►

 1/4X

◄◄

 8X

◄◄

 16X

Speed

16x Fast 
Forward

8x Fast 
Forward

Normal 
Playback

1/2x 
Forward

1/4x 
Forward

8x Fast 
Rewind

16x Fast 
Rewind

NOTE: When playing back only one channel, the image will display in full-screen.

13

Summary of Contents for KACCTV4CHA

Page 1: ......

Page 2: ...n 4 Chapter Three Usage 6 1 Brief Introduction 6 2 Menu Operations 7 Chapter Four Operations 8 1 Turn on 8 2 Preview 8 3 Record 10 4 Camera Control 11 5 Motion Detection Settings 12 6 Mask Setting 13 7 Playback 13 8 Backup 14 9 Alarm Settings 14 10 Network Operation 15 11 Maintenance 18 10 Advanced Settings 20 Chapter Five Appendix 22 1 Specifications 22 2 Methods of Calculating HDD Capacity 24 3 ...

Page 3: ...ted Recording Manual record and schedule record supported The schedule report types include timing motion detection alarm motion detection alarm SATA hard disk supported Backup and clip record files through USB drive portable USB HDD and USB CD DVD RW supported Preview and Playback Simultaneous output of VGA and TV Up to 4 channels playback in fast play mode slow play mode rewind and single frame ...

Page 4: ...Operation Table 2 Rear Panel Description NO Interface Description 1 Video In 4 8 channel video input BNC 1Vp_p 75Ω 2 TV Out 1 channel TV output BNC 1Vp p 75Ω 3 Audio Out 1 channel audio output BNC 2Vp p 600Ω 4 Audio In 4 channels audio input RCA 2Vp p 600Ω 5 VGA Output 1 DIN 15 6 Network Interface 1 RJ45 10 100M self adaptive USB Interface 2 USB 2 0 7 RS485 1 Half Duplex 8 Power DC 12V 4 Remote Co...

Page 5: ...h the hard disk to the shock absorption washers by aligning the installation holes to the case Hold and fix them by 4 x M3 12 head screws plus plain washers Connect the HDD data cable and HDD power cable to the respond interfaces of the main board Replace the DVR top cover then screw it closed NOTE If installing your own HDD please be sure to purchase a DVR rated HDD instead of a computer rated HD...

Page 6: ...ns of the signal cable are designed for access of PTZ and alarming devices Please follow these steps to connect 1 Pull out the angle pins that are inserted in the alarm input and output interfaces 2 Unscrew the screws with a micro Philips screwdriver insert the signal cable into the interface under the spring then tighten the screws 3 Plug the connected pins into the green angle pin socket PTZ Inp...

Page 7: ...Chapter Three Usage 1 Brief Introduction 6 ...

Page 8: ... highlight icon to the sub menu required by using the and button or roll the mouse to select directly Only one item can be selected here Edition Box When in edition box user can type in numbers directly by pressing the number buttons Press DEL to delete the character before the cursor and press OK or ESC button to exit Sub screen button Press it to pop up the sub screen When in sub screen select C...

Page 9: ...TTINGS Language Please enter Tool Bar System System Setting Language to set the language VGA Resolution Please enter Tool Bar System System Setting VGA Resolution to set the VGA resolution and refresh rate It supports 800x600 60Hz 1024x768 60Hz 1280x1024 60Hz 1440x900 60Hz currently Please select relevant values according to the parameters of your setup Time Format Please enter Tool Bar System Sys...

Page 10: ...e displayed on the left upper corner and the channel time will be displayed on the right corner of the screen Channel Status Display Area The channel statuses include motion detection triggered recording common recording motion recording alarm triggered recording external alarm input alarm output Indication of motion detection common recording alarm recording will be displayed on the right upper o...

Page 11: ... NOTE Switch display menu between VGA and TV by selecting ESC 1 ESC sequence must be pressed within 3 seconds on the remote control or front panel 3 Record Record type contains manual record and schedule record The priority of manual record is higher than schedule If the record schedule is conflicted with the manual recording the manual recording will be recognised and processed until the manual r...

Page 12: ...he Fn button again to exit Alternately user can drag the mouse to set NOTE When motion detection recording is selected the motion detection sensitivity and area should be set ahead of time Please refer to 4 4 2 Motion Detection settings for details When alarm recording is selected the alarm triggering settings should be set ahead Please refer to 4 7 2 Event Handling for details 4 Camera Control PT...

Page 13: ...ass through multiple presets Set sequence 1 Select preset number you want to call Click on set button 2 Repeat to add other presets until finished Click button to end setting Click on to clear the sequence 10 Track Track is a continuous route of camera Set track 1 Click on to start setting 2 Move camera as the track and pattern you want it to run 3 Click on again to finish setting Click on to run ...

Page 14: ...ine time ruler If the timeline is offscreen please move the highlight icon to and press OK to display the part of screen that is not in shot After setting the time channel number and timeline move the highlight icon to Search using the buttons and press OK to start searching After searching has completed press Fn button to pop up the timeline for the selected start point Press buttons to move the ...

Page 15: ...ent handling includes record alarm output PTZ sound output alarm zoom out E mail report to center FTP upload file The channel alarm input can zoom display interval 1 10s optional If the display interval time is set to go off the zoom display will be invalid After using the zoom out image Alarm zoom out report to center IE client preview will zoom out simultaneously NOTE If the user wants to set al...

Page 16: ... Enter the mail server address in the screen support domain method login account password recipient and sender email address Press the Test button next to the sender email address to send a test email Mobile Port Port is the channel for mobile phone data transmission All media and signalling data will be transmitted via this port FTP Server Select FTP upload then click to set the FTP server IP use...

Page 17: ...rm Alarm Notification When the network connection is broken or abnormal the alarm notification of No heartbeat of device please check the network will be displayed in the right top corner of the main screen After the recovery of the network the preview will be displayed automatically When remote notification alarms occur the alarm notification with the alarm input number will be displayed such as ...

Page 18: ...rm User can set IO alarm and event handling here All of these settings can be done by selecting Tool Bar System Alarm Setting User Management Including user authority and password setting Relevant interface information can be found at Tool Bar System System Setting Advanced Setting User authority and password can be changed by the Admin account Device Upgrade Click Browse to select the software pa...

Page 19: ...directory of the file selected Click Download to start downloading 6 Bidirectional Talk Click in the Tool Bar to enable the bidirectional talk between Client Web and DVS side A microphone should be connected to the device through the line in interface Click again to stop talking 7 Log Click the device logs will appear There are four options to choose from All According to Time According to Type Ac...

Page 20: ...ut Please enter Tool Bar System Save Setting Log Out then the preview screen will appear together with the log in box Please type in the password for further operations 6 Restore to Factory Defaults Please enter Tool Bar System Save Settings Restore Defaults where the system will ask for confirmation Click Confirm to proceed with the restoring process Note Please refer to Appendix VI for default v...

Page 21: ...u preview screen or search screen for a certain time the control device will automatically lock the screen User needs to re login to unlock the screen PTZ video playback and back up screens will never lock Select Channel Lock to enter the channel lock setting screen Click the channel as desired then select OK The user cannot see the locked channel after they log out Only the admin account can set ...

Page 22: ...etection Settings for instructions on setting detection areas and sensitivity Video Lost Handling After the selected video channel has been lost the incident can be handled by Alarm Out Buzzer or Upload Channel Name Setting After the selected video channel has been lost the incident can be handled by Alarm Out Buzzer or Upload User can input the channel name through the keyboard only accepting let...

Page 23: ... 100M self adaptive Alarm Input 4 channel NO NC Alarm Output 1 channel NO NC relay 30VDC 1A 125VAC 1A SATA Interface 1 SATA port 1 SATA HDD up to 1TB supported Video Audio Video Video Compression H 264 Baseline Video Standards PAL NTSC SECAM Video Compression Resolution PAL 352x288 CIF NTSC 352x240 CIF PAL 704x288 Half D1 2CIF NTSC 704x240 Half D1 2CIF PAL 704x576 D1 4CIF NTSC 704x480 D1 4CIF Fram...

Page 24: ...ent and TCP UDP protocol supported Web client and Client Application Software are provided for remote configuration video browse local recording local and remote playback and remote PTZ control Network transmitting supports independent coding The time delay of LAN is less than 300ms Log Operation The log of operations are alarms will be saved automatically User can directly play the record files t...

Page 25: ...The capacity of the hard disk needed in alarm recording classified here as Sa is Sa Sc x a 2 Calculate the compression bit rate for recording T hours Timing Recording Step 1 Support the capacity of the hard disk is S and the total numbers of channels is n The capacity of the hard disk needed per channel known as Di is Di S n Step 2 Support the total recording time is T The capacity of the hard dis...

Page 26: ...etting Off 30 secs 1 min 5 min Off Channel lock setting Click into submenu screen Recourse Distribution Mode Click into submenu screen Video Settings Record Schedule Click into submenu screen 24 Hours Video Quality Best High Mid Low Best Record Frame Rate PAL Full 12 6 3 1 User Defined NTSC Full 15 7 3 1 User Defined SECAM Full 12 6 3 1 User Defined Full Record Source Video Video Audio Video Audio...

Page 27: ...050 Media Port Click into submenu screen 6050 PPPoE Setting ON OFF Click into submenu screen Off PPPoE Address Click into submenu screen 0 0 0 0 DNS Address Click into submenu screen 0 0 0 0 Dynamic Domain Name ON OFF Off Auto Register ON OFF Off File Sharing Click to select or deselect Off Email Setting Click into submenu screen Mobile Port Click into submenu screen 7050 UpnP Setting Off on Click...

Page 28: ...plified Chinese Traditional Chinese Client side of Symbian60 3rd Operation System English Traditional Chinese client side of WinMobile5 0 6 0 6 1 Operation System iPhone mobile is supported Note We will use WinMobile6 0 as the example to show how to install and run the procedure Download Mobile phone client side Enter into mobile phone system and type the IP address into the IE address column in t...

Page 29: ...hannel in the pull down Channel menu or you can click Disconnect to stop the preview Operations Fig 5 11 Button operations on mobile phone all of these buttons are operated by PTZ From left to right they are Turn Left Turn Right Move up Move down Zoom out Zoom in Focus away Focus close Enlarge Iris Narrow Iris is for picture capture Note Thank you for using our product The installation above is wi...

Reviews: