background image


46

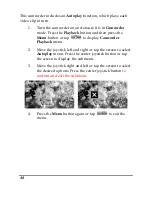
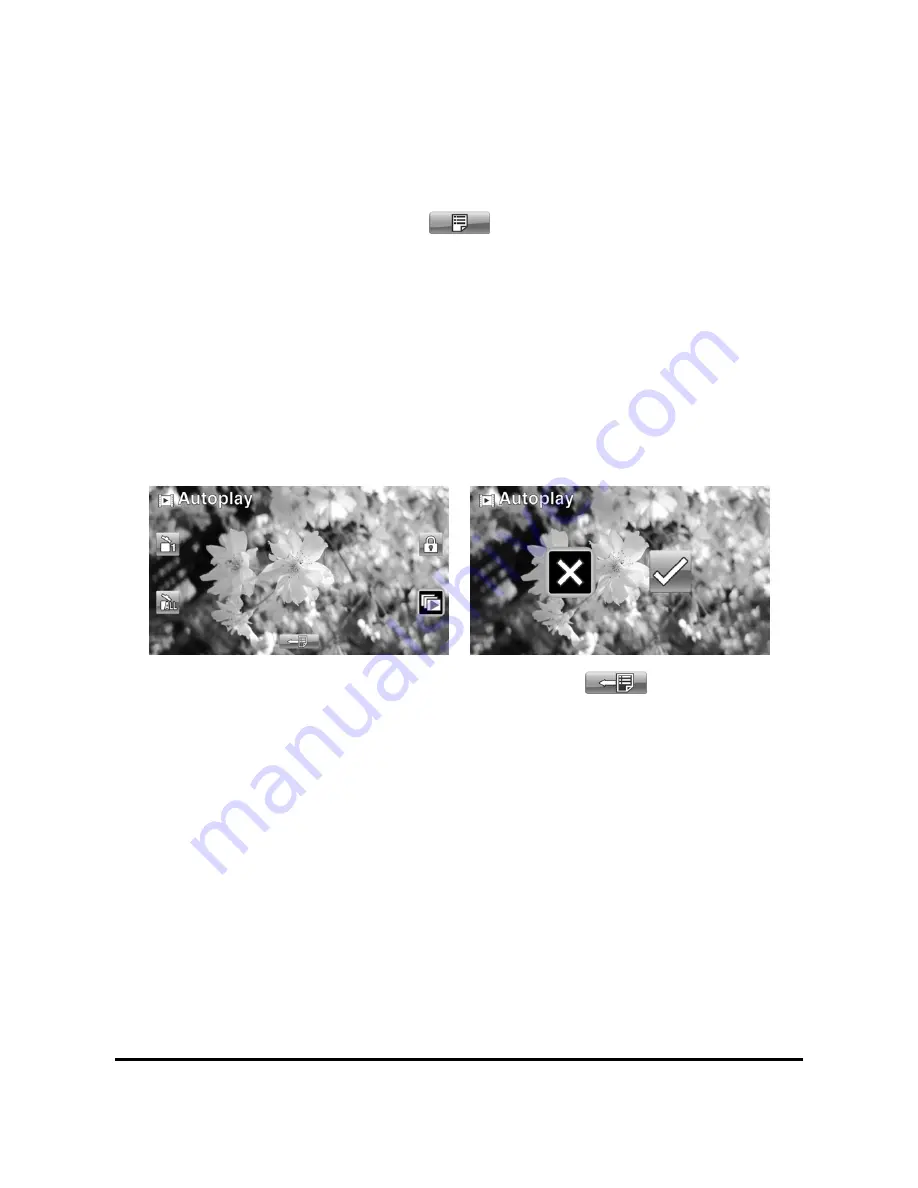
This camcorder includes an 

Autoplay

 function, which plays each 

video clip in turn. 

1.


Turn the camcorder on and ensure it is in 

Camcorder


mode. Press the 

Playback 

button and then press the 

Menu

 button or tap 

 to display 

Camcorder 

Playback

 menu. 

2.


Move the joystick left and right or tap the screen to select 

Autoplay 

menu. Press the center joystick button or tap 

the screen to display the submenu. 

3.


Move the joystick right and left or tap the screen to select 
the desired options. Press the center joystick button

 to 

confirm and exit the submenu


4.


Press the 

Menu

 button again or tap 

  to exit the 

menu. 

Summary of Contents for Full HD 1080P Deluxe

Page 1: ...i User Manual Full HD 1080P Deluxe Touchscreen Video Camcorder Camera...
Page 2: ...nt and Top view 3 1 4 2 Bottom view 3 1 4 3 Left view 3 1 4 4 Back view 4 1 4 5 Control Panel 5 1 4 6 Adjusting the LCD display 6 1 4 7 About the LEDs 11 2 Getting started 12 2 1 Inserting an SD card...

Page 3: ...23 2 11 Connecting to a HDTV 24 3 Using the camcorder 25 3 1 Camcorder mode 25 3 1 1 Camcorder mode 25 3 1 2 Using AF Lock 27 3 1 3 Using Manual Focus 28 3 1 4 Using the zoom function 29 3 1 5 Using...

Page 4: ...de icons 33 3 4 Camera Playback mode 35 3 4 1 Camera Playback mode icons 35 3 5 Thumbnail mode 36 4 Using the menus 37 4 1 Camcorder menu 37 4 1 1 Video resolution 37 4 1 2 Video quality 38 4 1 3 Whit...

Page 5: ...a playback menu 53 4 4 1 Delete 53 4 4 2 Protect 55 4 4 3 Autoplay 56 4 5 System menu 57 4 5 1 Setting the beep 57 4 5 2 Auto power off 57 4 5 3 TV standard 58 4 5 4 Format 59 4 5 5 Default 60 4 5 6 L...

Page 6: ...and our company reserves the right to change the contents or technical rules without notice in advance Also the manufacturer reserves the right to change the technical specification in advance without...

Page 7: ...internal components Do not use harsh chemicals cleaning solvents or strong detergents to clean the product Wipe the product with a slightly damp soft cloth Do not fire the flash while it is too close...

Page 8: ...hospital as soon as possible Operation conditions This camcorder is designed for use in temperatures ranging from 0 C to 40 C 32 F to 104 F Do not use or keep the camcorder in the following areas In...

Page 9: ...eas trip do test the camcorder beforehand to ensure that it functions properly Any additional loss caused by the malfunction of this product such as costs of photography or any loss of benefit generat...

Page 10: ...ve Graphic Card DirectX 9 is must DirectX 10 is recommendation Interface Standard USB 1 1 Port or Higher Hard Disk At least 2GB of Available Disk Space 1 2 Features The camcorder offers a variety of f...

Page 11: ...package If any item is missing or appears damaged contact your dealer immediately AV cable CD ROM Application software Pouch User manual Li ion battery NP 120 Battery charger DC in adapter optional H...

Page 12: ...ollowing illustrations to familiarize yourself with the buttons and controls of this camcorder 1 4 1 Front and Top view Shutter button LED light Microphone Flash Lens Speaker Zoom Volume button 1 4 2...

Page 13: ...4 Hand strap 1 4 4 Back view Mode dial DC in AV USB Output HD Output Joystick REC STOP button Power Camera status LED LCD display Playback button Battery cover Battery cover latch...

Page 14: ...5 1 4 5 Control Panel SD card cover latch Display button Power button LED light Flash button Menu button...

Page 15: ...6 1 4 6 Adjusting the LCD display Flip and twist the LCD screen as shown while capturing a still image or recording a video clip...

Page 16: ...z In Camcorder and Camera mode 1 Move up down to adjust the exposure settings 2 Press the joystick to enable AF Lock The AF Lock icon appears on the screen 3 Move right to enable the MF function The...

Page 17: ...Press right and left to view the stored video clips and press the center joystick button to play stop the video clips 2 In Playing mode move right to fast forward a video clip and move left to rewind...

Page 18: ...ess to enter playback mode Display button Press once to turn off all OSD icons and press again to display all OSD icons off Zoom button z In Camcorder and Camera modes press right left to zoom in and...

Page 19: ...10 Flash button z In Camera modes press the button to switch between the flash modes Battery cover latch z Slide the latch to open the battery card cover when you insert remove the battery...

Page 20: ...e describes the camcorder LEDs LED Color Definition Power Rec Camcorder Status Green Power on Green Red Blinking Recording Red Camcorder busy Self timer Red Blinking Self timer is activated Red Blinki...

Page 21: ...uring preliminary settings See later chapters for advanced functions 2 1 Inserting an SD card An SD card can be installed in the camcorder to provide additional storage space for still images video cl...

Page 22: ...tteries recommended by the manufacturer or your dealer 1 Slide the battery cover latch as shown the battery cover opens automatically 2 Insert the battery as shown 3 Close the battery cover z Note Ins...

Page 23: ...e wall outlet as shown 2 The red LED will light up for proper charging 3 After full charge the LED turns to green 4 It takes about 290 minutes to achieve full charge Actual charging time depends on cu...

Page 24: ...n the camcorder and move the mode dial to SET Move the joystick left and right or tap the screen to highlight Date Time Press the center joystick button to confirm 2 Move the joystick left and right o...

Page 25: ...e menu 2 Move the joystick left and right or tap the screen to select the following languages English Japanese French Italian Spanish Portuguese Dutch Simplified Chinese Traditional Chinese Korean Tur...

Page 26: ...or tap the screen to highlight Beep Press the center joystick button to enter the Beep menu 2 Move the joystick left and right to select Beep Off or Beep On options Press the center joystick button o...

Page 27: ...the video 3 Press the REC STOP button to start recording 4 Press the REC STOP button again to stop recording 5 The video clip is automatically saved with a unique file name Camcorder mode Notes 1 The...

Page 28: ...ary depending on the different video resolution settings See the following table Video resolution Preview Taking pictures and focusing WQVGA 16 9 ratio 16 9 ratio WVGA 720P 1080P 4 Before and during s...

Page 29: ...r tap to fast forward 2x 4x 8x and 16x 4 Press the REC STOP button or tap to pause the video playback Press the REC STOP button again or tap to resume the video playback 5 When viewing the video clip...

Page 30: ...Taking viewing pictures 2 8 1 Taking a still picture 1 Turn on the camcorder and move the Mode Dial to Camera mode 2 Use the LCD screen to frame the picture 3 Press the Shutter button to capture the i...

Page 31: ...t to zoom in the picture There are four direction keys appears on the LCD screen You may use the joystick to pan across the picture 4 Move the joystick up fully or tap to view the thumbnails of all st...

Page 32: ...to learn how to transfer files to a PC show the video clips or photos on a TV Connect the camcorder to a computer with the USB cable provided 2 10 Connecting to a standard TV Connect the camcorder to...

Page 33: ...ng to a HDTV offers the high resolution for displaying the video clips or photos Connect the camcorder to a HD TV as shown with the HDMI cable provided HD in HD out HDMI cable Notes When connected to...

Page 34: ...store them on an SD card 3 1 1 Camcorder mode Use the following picture to familiarize yourself with the Camcorder mode icons and symbols 15 Camcorder mode 8 7 2 4 6 3 5 14 13 12 11 10 9 1 Camcorder...

Page 35: ...or Manual Focus MF indicator 7 LED light indicator 8 Color effect indicator 9 Menu indicator Tap to enter the video menu 10 Battery indicator 11 EV compensation indicator 12 White balance indicator 13...

Page 36: ...27 3 1 2 Using AF Lock The Auto Focus AF Lock function is used to lock focus on a desired image 1 Press the joystick button to enable AF Lock The Lock icon appears on screen...

Page 37: ...ck right to enable MF function The icon appears on screen 2 Aim the camera on your desired subject 3 Move the zoom buttons left or right to manually adjust focus Note To zoom in or out the image tap t...

Page 38: ...force flash module to illuminate subjects in dark environments when press the shutter button You may switch the auto and force flash module by toggling the Flash button The or displays on your camcor...

Page 39: ...owing picture to familiarize yourself with the Camera mode icons and symbols 18 Camera mode 1 11 9 8 7 10 2 4 3 5 15 14 13 12 16 17 6 See the table below for a description of each icon and symbol 1 Re...

Page 40: ...nter the camera menu 13 Battery indicator 14 EV compensation indicator 15 White balance indicator 16 Video resolution indicator 17 Camera mode indicator 18 Zoom indicator 3 2 2 Using AF Lock See secti...

Page 41: ...ion 3 1 66 Using the LED light 3 2 7 Using the Flash module auto and force See section 3 1 77 Using the Flash module auto and force 3 2 8 Using the Stabilizer function See section 3 1 88 Using the Sta...

Page 42: ...yourself with the Camcorder Playback mode icons and symbols 1 Camcorder playback mode 8 2 3 5 4 6 9 7 Camc order playback mode See the table below for a description of each icon and symbol 1 Displays...

Page 43: ...34 5 Pause icon Tap to pause the video 6 Rewind icon Tap to rewind the video 7 File protect indicator 8 Camcorder playback mode icon 9 Displays the file number of the video clip...

Page 44: ...self with the Camera Playback mode icons and symbols 5 2 4 1 3 6 7 See the table below for a description of each icon and symbol 1 Next icon Tap to go to the next image 2 Thumbnail icon Tap to display...

Page 45: ...o clip displays on the screen Move the joystick up or tap to view six thumbnail images video clips on the LCD screen 3 Move the joystick left and right or tap the screen highlight an image or a video...

Page 46: ...The larger screen size requires more memory storage space 1 Turn the camcorder on and ensure it is in Camcorder mode 2 Press the Menu button or tap to enter the Camcorder menu 3 Move the joystick lef...

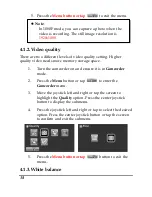
Page 47: ...r menu 3 Move the joystick left and right or tap the screen to highlight the Quality option Press the center joystick button to display the submenu 4 Press the joystick left and right or tap to select...

Page 48: ...ht the White Balance menu Press the center joystick button to display the submenu 4 Move the joystick left and right or tap the screen to select Auto Sunny Cloudy Tungsten or Fluorescent Press the cen...

Page 49: ...t menu Press the center joystick button to display the submenu 4 Move the joystick left and right or tap the screen to select Natural B W or Sepia Press the center joystick button or tap the screen to...

Page 50: ...the Camcorder menu 3 Move the joystick left and right or tap the screen to highlight the Stabilizer menu Press the center joystick button to display the submenu 4 Move the joystick left and right or...

Page 51: ...center joystick button to display the submenu 4 Move the joystick left and right or tap to select Off 1080P WQVGA or 720P WQVGA Press the center joystick button or tap the screen to confirm and exit...

Page 52: ...the Playback button and then press the Menu button or tap to display the Camcorder Playback menu 2 Move the joystick left and right or tap the screen to select Delete One or Delete All options If you...

Page 53: ...ress the center joystick button or tap the screen to confirm All files stored in memory will be deleted 3 Press the Menu button or tap to exit the menu z Note Once deleted files cannot be recovered so...

Page 54: ...select Protect menu Press the center joystick button or tap the screen to display the submenu 3 Then playback screen appears again Move the joystick or tap to locate the file you want to protect Press...

Page 55: ...on or tap to display Camcorder Playback menu 2 Move the joystick left and right or tap the screen to select Autoplay menu Press the center joystick button or tap the screen to display the submenu 3 Mo...

Page 56: ...er on and ensure it is in Camera mode 2 Press the Menu button or tap to enter the Camera menu 3 Move the joystick left and right or tap the screen to highlight the Resolution menu Press the center joy...

Page 57: ...o highlight the Quality option Press the center joystick button to display the submenu 4 Press the joystick left and right or tap the screen to select the desired option Press the center joystick butt...

Page 58: ...again or tap to exit the menu 4 3 4 Color effect The camcorder can capture standard color images black and white images or sepia tone to give an old fashioned look 1 Turn the camcorder on and ensure i...

Page 59: ...button or tap to enter the Camera menu 3 Move the joystick left and right or tap the screen to highlight the Selftimer menu Press the center joystick button to display the submenu 4 Move the joystick...

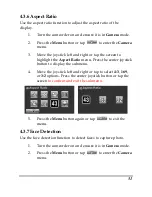
Page 60: ...ct Ratio menu Press the center joystick button to display the submenu 4 Move the joystick left and right or tap to select 4 3 16 9 or 3 2 options Press the center joystick button or tap the screen to...

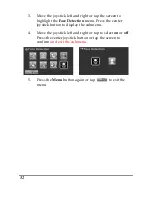
Page 61: ...ace Detection menu Press the center joystick button to display the submenu 4 Move the joystick left and right or tap to select on or off Press the center joystick button or tap the screen to confirm a...

Page 62: ...d then press the Menu button or tap to display the Camera Playback menu 2 Move the joystick left and right or tap the screen to select Delete One or Delete All options If you select Delete One the pla...

Page 63: ...ress the center joystick button or tap the screen to confirm All files stored in memory will be deleted 3 Press the Menu button or tap to exit the menu z Note Once deleted files cannot be recovered so...

Page 64: ...to select Protect menu Press the center joystick button or tap the screen to display the submenu 3 Then playback screen appears again Move the joystick or tap to locate the file you want to protect P...

Page 65: ...Menu button or tap to display Camera Playback menu 2 Move the joystick left and right or tap the screen to select Autoplay menu Press the center joystick button or tap the screen to display the submen...

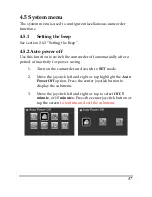
Page 66: ...r off automatically after a period of inactivity for power saving 1 Turn on the camcorder and switch to SET mode 2 Move the joystick left and right or tap highlight the Auto Power Off option Press the...

Page 67: ...witch to SET mode 2 Move the joystick left and right or tap to highlight the TV standard option Press the center joystick button to display the submenu 3 Move the joystick left and right or tap to sel...

Page 68: ...the camcorder and switch to SET mode 2 Move the joystick left and right or tap to highlight the Format option Press the center joystick button to display the submenu 3 Move the joystick left and righ...

Page 69: ...witch to SET mode 2 Move the joystick left and right highlight the Default option Press the center joystick button to display the submenu 3 Move the joystick left and right to select X or and press th...

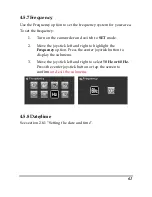
Page 70: ...to SET mode 2 Move the joystick left and right to highlight the Frequency option Press the center joystick button to display the submenu 3 Move the joystick left and right to select 50 Hz or 60 Hz Pr...

Page 71: ...Storage media Internal Built in 128MB Flash Memory External SD Card Up to SDHC 16GB Class6 Sensor sensitivity Auto Color effects Natural B W Sepia Lens 12X Optical zoom lens Wide F1 85 f 6 3mm Tele F...

Page 72: ...mat H 264 AVI Resolution WQVGA240fps WVGA30fps 60fps 720P30fps 60fps 1080P30fps DualVideo 1080P30fps 720P30fps Zoom Movie 12X Optical Zoom 10X Digital Zoom Camera 12X Optical zoom 10X Digital zoom Pla...

Page 73: ...interface MSDC USB 2 0 high speed TV out format NTSC PAL HDMI Shutter Still 1 2 1 2000 Video 1 30 1 2000 Auto power off Off 5 min 10 min Power supply Li Ion battery NP 120 battery DC in via USB Dimen...

Page 74: ...ge the battery See 2 3 Charging the battery The camcorder suddenly turns off The auto power off function was enabled The camcorder is running out of battery power Turn the power on again Please charge...

Page 75: ...using self timer The camcorder is running out of battery power Please charge the battery see 2 3 Charging the battery The image is out of focus The subject is beyond focus range Please take a picture...

Page 76: ...w Unlock the memory card Format the memory card See 4 5 4 Format Before formatting the card ensure you back up the files You can set the video or photo to lower quality See 4 1 2 Video quality All but...

Page 77: ......

Reviews: