background image

 45

www.kodak.com/go/support

6

Sharing pictures and 
videos

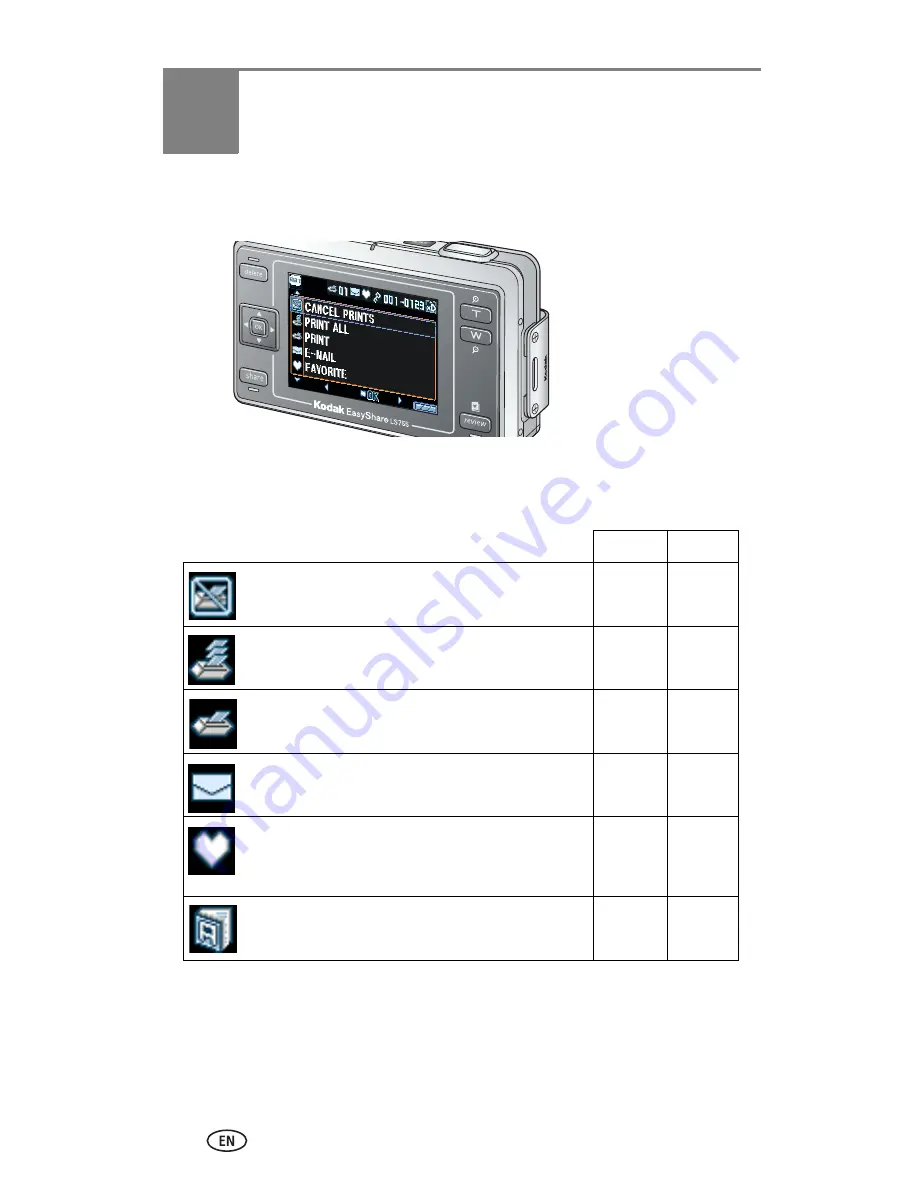
When you press the Share button to “tag” your pictures and videos, they can 
be shared by the following methods when transferred to your computer.

When they are transferred to your computer, you can share them by:

NOTE:  Tags remain until removed. If a tagged picture/video is copied, the tag is not copied. In a 

burst series, only the last picture is tagged during Quickview.

Pictures

Videos

CANCEL PRINTS 


PRINT ALL 


PRINT 


E-MAIL 

FAVORITE 
for easy organization on your computer and for 
sharing on your camera

ALBUM 

Summary of Contents for LS755 - Easyshare Zoom Digital Camera

Page 1: ...Kodak EasyShare LS755 zoom digital camera User s Guide www kodak com For interactive tutorials www kodak com go howto For help with your camera www kodak com go ls755support...

Page 2: ...Eastman Kodak Company Rochester New York 14650 Eastman Kodak Company 2004 All screen images are simulated Kodak and EasyShare are trademarks of Eastman Kodak Company P N 4J1473...

Page 3: ...ver open 1 Shutter button 6 Microphone 2 On Off button 7 Lens Lens cover 3 Camera modes indicator 8 Flash unit 4 Mode button 9 Self timer light 5 Speaker 1 2 4 5 6 7 8 9 3 To open the slot cover slide...

Page 4: ...button 9 Share button 3 On Off button Power light 10 OK button 4 Shutter button 11 5 way controller 5 Zoom button T Telephoto 12 Delete button 6 Zoom button W Wide Angle 13 Ready light 7 Review button...

Page 5: ...Reviewing pictures and videos just taken Quickview 14 Using optical zoom 15 Using digital zoom 15 Using the flash 16 Manually setting the white balance 18 Changing picture taking settings 19 Customizi...

Page 6: ...tures as favorites 47 Optional settings 48 Removing all favorites from your camera 49 Printing and emailing favorites 49 Picture and video album settings 49 7 Transferring and printing pictures 51 Tra...

Page 7: ...ak com go support v 10 Appendix 62 Camera specifications 62 Tips safety maintenance 65 Maximum number of pictures 65 Power saving features 66 Upgrading your software and firmware 66 Regulatory complia...

Page 8: ...g the software first Install the software from the Kodak EasyShare software CD before connecting the camera or optional printer dock or Photo Frame Dock to the computer Otherwise the software may load...

Page 9: ...tery out Important battery information Battery safety and handling Do not allow batteries to touch metal objects including coins Make sure that the battery contacts do not touch metal clips or keys du...

Page 10: ...p them warm Do not discard cold batteries that do not work when they return to room temperature they may be usable Charging the battery 1 Plug the small end of the AC adapter into the DC IN jack on th...

Page 11: ...been reset message appears the first time you turn on the camera or if the battery is removed for an extended period of time 1 SET DATE TIME is highlighted Press the OK button Select Cancel to set the...

Page 12: ...ive camera and picture settings and information about image storage Different information is displayed in capture and in review mode Picture taking screen Pressing the OK button switches on and off th...

Page 13: ...bject is too bright If it is to the left it is too dark Review screen Pressing the OK button cycles through the Icon Display ON mode the Picture Information mode and the Icon Display OFF mode Self Tim...

Page 14: ...tely exhausted Charge or replace the battery E mail icon Print icon Number of prints Review mode Picture protection Picture Video number Image storage Histogram Remaining battery life Scroll arrow Alb...

Page 15: ...r remove a card when the ready light is blinking Doing so may damage your card camera or pictures Using the xD Picture Card 1 Turn off the camera and open the slot cover 2 Orient the card as shown on...

Page 16: ...still take pictures When the ready light is red wait until it blinks green NOTE The default picture taking mode is Auto See page 10 for other picture and video modes Taking a video 1 Press the Mode bu...

Page 17: ...is mode For Auto General picture taking Automatically setsexposure focus and flash Scene Point and shoot simplicity for taking pictures under various conditions see page 11 Custom Use when fine tuning...

Page 18: ...f night landscapes While focusing on the person s a slow shutter speed is used to beautifully depict the night background Place the camera on a flat and steady surface to avoid hand movements Night La...

Page 19: ...ne place TV Screen Taking pictures of TV screens Slow shutter speed prevents horizontal lines from appearing in the taken picture Place the camera on a flat and steady surface to avoid hand movements...

Page 20: ...is not focusing on the desired subject the AF frame turns red Recompose the scene and repeat the previous Step 2 Press the Shutter button completely down to take the picture NOTE The AF frame does not...

Page 21: ...ess to highlight Video mode then press the OK button to play the video Press the Zoom button to adjust the sound volume Share Press the Share button to tag a picture video for e mail or as a favorite...

Page 22: ...get additional magnification beyond optical zoom Combined zoom settings are from 3X to 15X 1 Press the Zoom button T Telephoto to the optical zoom limit 2 Release the button then press it again The ca...

Page 23: ...example Off Never Use to deactivate the flash even in a dark environment Hold the camera steady Red eye Once so the subject s eyes become accustomed to the flash then fires again when the picture is t...

Page 24: ...o Auto Off Fill Auto red eye reduction Scene Modes Portrait Fill Auto Off Auto red eye reduction Sport Off Fill Landscape Off Night Portrait Slow Sync Red eye Off Night Landscape Off Fill Snow Auto Au...

Page 25: ...e press the Menu button 2 Press to highlight White balance then press the OK button 3 Press to highlight Manual then press the OK button The white balance screen is displayed 4 Take a picture of a bla...

Page 26: ...u button to exit Press to return to the previous screen and press the Menu button to exit Setting Icon Options Self Timer Create a 10 second delay before the picture or video is taken ON or OFF defaul...

Page 27: ...setting remains until you change it 5 0MP default 2592 x 1944 pixels Ideal for printing on A3 or smaller size sheet of paper NOTE When the orientation sensor converts a picture in 5 0MP the dimensions...

Page 28: ...AYLIGHT for taking pictures under bright sunlight OPEN SHADE available only in Custom mode for taking pictures in shadows FLUORESCENT prevents the picture from being greenish under fluorescent lightin...

Page 29: ...efault ISO 64 ISO 100 ISO 200 standard picture quality Choose a high ISO setting for dark scenes when you want to eliminate hand movement or take pictures without the flash Raising the ISO level incre...

Page 30: ...ly for the whole picture with an emphasis placed on the center of the camera screen CENTER SPOT only evaluates the lighting conditions of the center section of the camera screen Unavailable in Video A...

Page 31: ...e modes Exposure Compensation Choose how much light enters the camera This setting remains until you change modes or turn off the camera For Custom mode 0 0 default 0 3 0 7 1 0 1 3 1 7 2 0 For Auto mo...

Page 32: ...those album names See page 49 Video Quality Choose number of pixels for recording This setting remains until you change it VGA default video is recorded in a 640 x 480 pixel window QVGA video is reco...

Page 33: ...ideo See page 30 for details on how to set and use the Time Lapse Capture mode Setting Icon Options Quickview Set whether or not to display Quickview after taking a picture or video ON default After y...

Page 34: ...taking mode Orientation Sensor Orient pictures so they are displayed with the correct side up NOTE It may take up to 5 seconds for the camera to convert a picture ON default OFF The orientation sensor...

Page 35: ...Japan most common format PAL used in Europe and China Photo Frame Setting Set the Photo Frame function that can be used when the camera is set in the Kodak Photo Frame Dock See page 41 Format Formatt...

Page 36: ...of the camera blinks slowly for 8 seconds then quickly for 2 seconds before the picture is taken The Self Timer turns off after you take the picture or if you change modes Putting yourself in the vid...

Page 37: ...en When Auto is selected the full remaining capacity of a card will be used for one video Note however that recording will stop when 10 000 frames are taken When User Define is selected you can set th...

Page 38: ...32 album names to the album name list the next time you connect the camera to the computer See Kodak EasyShare software Help for details Second on your camera 1 In any mode press the Menu button 2 Pre...

Page 39: ...s mode you can display and manage shared pictures saved in the Favorites section of the camera s internal memory For more details see page 47 To save battery power during review use an optional printe...

Page 40: ...next row of thumbnails To display the selected picture press the OK button 3 Press the Review button to exit Playing a video 1 Press the Review button 2 Press to locate a video In Multi up view highl...

Page 41: ...pause screen 4 To save the video press to highlight New or Overwrite then press the OK button 5 To make a still picture press to highlight OK then press the OK button Deleting pictures and videos 1 P...

Page 42: ...the Zoom button Press the OK button to redisplay the picture at the 1X original size To see different parts of the picture press or To exit Magnify press the OK button 3 To exit the Review mode press...

Page 43: ...cluding protected pictures and videos Formatting internal memory also erases e mail addresses album names and favorites To restore them see Kodak EasyShare software Help Running a slide show Use the S...

Page 44: ...ideshow menu press to highlight LOOP then press the OK button 2 Press to highlight ON then press the OK button The slide show repeats until you press the OK button or until battery power is exhausted...

Page 45: ...then press the Menu button 2 Press to highlight Copy then press the OK button 3 Press to highlight an option PICTURE VIDEO Copies the current picture or video EXIT Returns to the Review menu ALL Copie...

Page 46: ...light the size you want to make the picture then press the OK button Choose from 4 5MP 3 2 4MP 3MP 1MP VGA or 240X320 You can only choose a size smaller than the current size For details on each size...

Page 47: ...sition 3 Press the OK button 4 Press to highlight New or Overwrite then press the OK button A confirmation screen appears To rotate the picture again select Redo and start over from step 2 5 Press to...

Page 48: ...to highlight Camera setup 2 Press to highlight Photo Frame settings then press the OK button 3 Press to highlight the option you want to change then press the OK button Interval The picture changes a...

Page 49: ...rom the camera s internal memory Favorites mode in internal memory or from an xD Picture Card Running Time Set how long you want Photo Frame Dock to run Once the set time has passed Photo Frame Dock a...

Page 50: ...sh computers Windows 98 98SE ME 2000 or XP Internet Explorer 5 01 or higher 233 MHz processor or greater 64 MB RAM 128 MB for Windows 2000 XP 200 MB hard disk space available CD ROM drive Available US...

Page 51: ...he on screen instructions to install the software Windows OS based computer select Typical to automatically install the most commonly used applications Select Custom to choose the applications you wis...

Page 52: ...red to your computer When they are transferred to your computer you can share them by NOTE Tags remain until removed If a tagged picture video is copied the tag is not copied In a burst series only th...

Page 53: ...kview To remove the print tagging for all pictures in the storage location press to highlight CANCEL PRINTS then press the OK button CANCEL PRINTS is not available in Quickview Printing tagged picture...

Page 54: ...utton 4 To remove all e mail selections highlight CLEAR ALL 5 Press to highlight EXIT then press the OK button The e mail icon appears in the status area 6 Press the Share button to exit the menu Thir...

Page 55: ...n 3 Press the Share button to exit 3 Transfer pictures to your computer 1 If it s not already installed install Kodak EasyShare software V 4 0 or later on your computer See page 43 2 Connect the camer...

Page 56: ...memory 4 Connect the camera to the computer using the USB cable see page 1 or an optional printer dock or Photo Frame Dock EasyShare software removes the favorites on your camera Printing and emailing...

Page 57: ...ighlighted press the OK button If you want to add a picture to multiple albums repeat step 4 for each album The album name is displayed next to each picture A plus sign after the album name means the...

Page 58: ...nto the labeled USB port on the camera 4 Turn on the camera 5 Kodak EasyShare software opens on your computer Transfer pictures and videos according to the instructions displayed The green ready light...

Page 59: ...able and plug the other end of the AC adapter into the outlet See page 2 for details Printing pictures 1 Turn on the printer 2 Turn on the camera then press the Mode button to highlight Auto The PictB...

Page 60: ...ly and friends Order high quality prints Printing from an optional xD Picture Card Automatically print pictures when you insert your card into a printer with an xD Picture Card slot See your printer s...

Page 61: ...sing the adapter However charging does take place Use the custom dock insert if you are docking your LS755 camera on any other EasyShare dock Do not use the adapter NOTE The EasyShare LS755 camera is...

Page 62: ...reen does not turn on Turn the camera off then on again In Review a blue or black screen is displayed instead of a picture Transfer the picture or all pictures to the computer page 51 Format the inter...

Page 63: ...the camera page 34 switch image storage locations page 25 or insert a card with available memory page 8 Contact your local service provider or visit www kodak com go support If Try one or more of the...

Page 64: ...light Turn flash off page 16 Move so that the distance between you and the subject is within the effective flash range see page 16 To automatically set exposure and focus press the Shutter button half...

Page 65: ...off Auto exposure or auto focus are not locked Release the Shutter button and recompose the picture Ready light glows steady red Camera s internal memory or card is full Transfer pictures to the compu...

Page 66: ...t www kodak com go ls755support Status Cause Power light glows steady Camera is on ready to take a picture or video Power light does not turn on and the camera does not work Camera is not turned on Pr...

Page 67: ...mera www kodak com go howto Get information on EasyShare software www kodak com go easysharesw or click the Help button in the EasyShare software Get help with the Windows operating system and working...

Page 68: ...oftware Exact error message you received Australia 1800 147 701 Netherlands 020 346 9372 Austria 0179 567 357 New Zealand 0800 440 786 Belgium 02 713 14 45 Norway 23 16 21 33 Brazil 0800 150000 Philip...

Page 69: ...xels Display Color display 2 5 in hybrid LCD 862 x 240 207K dots Preview Frame rate 30 fps Field of view 100 Lens Taking lens 3X optical zoom lens 36 108 mm 35 mm film camera equivalent f 2 8 4 8 Focu...

Page 70: ...Tele Flash modes Auto Fill Red eye Off Slow sync Capture Capture modes Auto 17 scene modes Portrait Sport Landscape Night Portrait Night Landscape Snow Beach Text Flower Museum Nagashidori Panning Sho...

Page 71: ...de Angle and full Telephoto maximum flash is used for every other picture and the camera is turned off and on once after every 10 pictures Communication with computer USB 2 0 PTP via USB cable PTP usi...

Page 72: ...for more information For rechargeable battery disposal information visit the Rechargeable Battery Recycling Corporation Web site at www rbrc com For digital camera disposal or recycling information co...

Page 73: ...yShare software CD and the camera firmware the software that runs on the camera See www kodak com go ls755downloads Video quality Internal memory xD Picture Card 16MB 32MB 64MB 128MB 256MB VGA with so...

Page 74: ...following measures 1 reorient or relocate the receiving antenna 2 increase the separation between the equipment and the receiver 3 connect the equipment to an outlet on a circuit different from that...

Page 75: ...chnology Equipment VCCI If this is used near a radio or television receiver in a domestic environment it may cause radio interference Install and use the equipment according to the instruction manual...

Page 76: ...ation on camera ii review ii 32 share 45 zoom 15 C cable audio video 1 37 USB 1 51 camera screen reviewing pictures 32 reviewing videos 32 specifications 62 Canadian compliance 67 candle light mode 12...

Page 77: ...lizer 25 image storage 25 information about pictures videos 40 camera firmware version 28 installing battery 2 internal memory change from card 25 format 28 storage capacity 65 ISO speed setting 22 K...

Page 78: ...tagging 31 taking modes 10 playing slide show 36 portrait mode 11 power auto off 66 light ii on off 4 power light status 59 printer dock 51 printing from a card 53 optimizing printer 60 order online 5...

Page 79: ...requirements computer 43 T tagging favorites 47 for albums 31 for email 46 for print 46 technical specifications camera 62 telephone support 61 telephoto zoom 15 television slide show 37 text mode 11...

Page 80: ...www kodak com go support viewing picture after taking 32 magnified 35 W white balance 21 wide angle zoom 15 Windows OS based computers installing software 44 system requirements 43 Z zoom button ii u...

Reviews: