background image

41/KODAK M-SERIES PROJECTORS

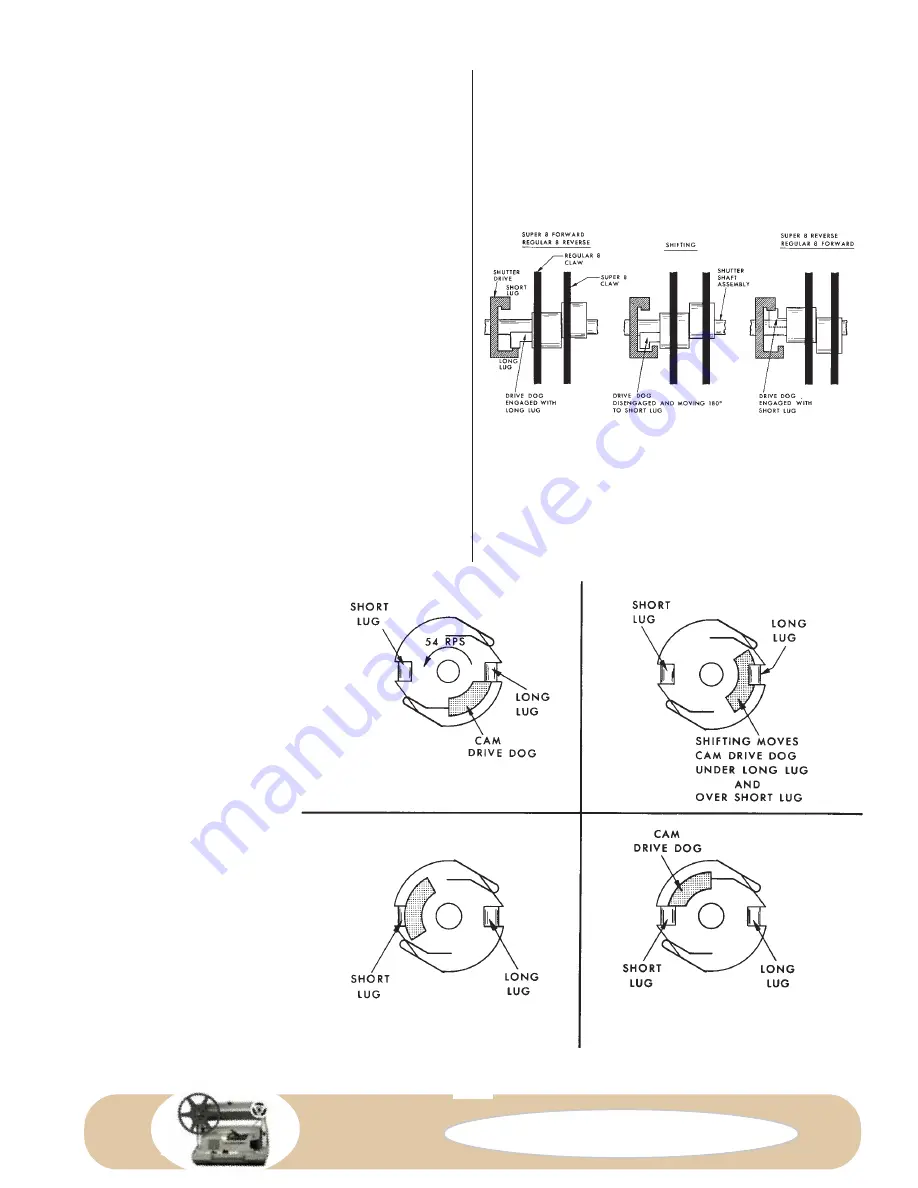
Direction of Shifting Operation

Because the motor turns the shutter-drive shaft in the same
direction at a constant 54rps at all times, shifting from
forward to reverse involves changing the phasing between
the up-and-down cam (on the shutter-drive shaft) and the
in-and-out cam (driven by the shutter). Remember that the
shutter and the shutter-drive shaft can rotate and slide
relative to each other.

In the super-8 

Forward 

running position, the cam dog

drives the long shutter lug (Fig. K12 and Fig. K15) and the
pulldown claw enters the film perforations at the start of
the down stroke.

Shifting direction: the directional shift lever pushes
against the shutter-drive shaft and moves it and the drive
dog to the left, Fig. K13, closer to the shutter and pinion
assembly.

The cam-drive dog is now disengaged (Fig. K13 and Fig.
K16) from the shutter assembly and is free to rotate
relative to it.

The cam-drive dog rotates 180° until it reaches the short
shutter lug, Fig. K14 and Fig. K18. This is the super 8

Reverse 

running position. The pulldown claw enters the

film perforations at the start of the upstroke.

To change direction again, the directional shift lever
releases the shutter shaft, and a
spring moves the shutter-drive
shaft and drive dog back to the
right; the cam-drive dog is free to
rotate 180°until it again engages
the long lug and this again is the
super-8 

Forward

 running position.

In the regular-8 

Reverse

 running

position, the cam dog drives the
long shutter lug, Fig. K12 and Fig.
K15, and the pulldown claw enters
the film perforations at the start of
the upstroke, Fig. K11.

Shifting direction: the directional
shift lever pushes against the
shutter-drive shaft and drive dog
and moves it to the left.

The cam-drive dog is now disen-
gaged, Fig. K13 and Fig. K17,
from the shutter assembly and is
free to rotate relative to it.

The cam-drive dog rotates 180°
until it reaches the short shutter
lug, Fig. K14 and Fig. K18. This
is the regular-8 

Forward 

running

position. The pulldown claw
enters the film perforations at the
start of the downstroke.

FIG. K12                 FIG. K13                FIG. K14

To change direction again, the directional shift lever
releases the shutter-drive shaft and drive dog, and a spring
moves the shutter-drive shaft back to its original position;
the cam-drive dog is free to rotate 180°until it again
engages the long lug and this again is the regular-8

Reverse

 running position.

FIG. K15

FIG. K16

FIG. K17

FIG. K18

Compliments of: 

www.KodakParts.com

Summary of Contents for Instamatic M Series

Page 1: ...Instamatic M80 M80 M80 M80 M80 Projector Includes the variations in other M series projectors Plus Normal Repairs on the Kodak Moviedeck Projectors A Publication of Fargo Enterprises Inc Compliments o...

Page 2: ...ADJUSTMENTS 32 FINAL STEPS OF REASSEMBLY 36 TROUBLESHOOTING SUMMARY 36 LUBRICATION SUMMARY 37 WIRING PICTORIALS 37 2001 by Fargo Enterprises Inc All rights reserved This publication is for informatio...

Page 3: ...r the supply spindle increasing the diameter for super 8 reels The projector has two lamp brightnesses and three running speeds 54 fps 6fps and NORMAL 18fps The M80 uses the 120V projection lamp M85 A...

Page 4: ...as you remove them In some cases we have used slight variations in the reassembly sequence for the purposes of testing or to make reassembly a little easier But you can still simply reverse your disas...

Page 5: ...er Lube grease 3oz tube 21033 shutter oil NYOIL There are two types of screws you encounter in the projector one type has a standard Phillips head and the other type has a hex head a head with six fla...

Page 6: ...cord connects to the switch Fig D6 Note the position of the power cord lead The power cord lead connects to the port labeled L But the L port may be in the lower right hand corner as in Fig D6 or in...

Page 7: ...he projector belongs to a customer return it as unrepairable If you own the projector you can use it for parts or as a practice mechanism Or perhaps you can locate an unrepairable projector you can us...

Page 8: ...rojector housing You ll see the other normal repairs as we proceed But remember that you ll occasionally encounter the repair you can t perform simply because the projector is so old that parts are no...

Page 9: ...er removed FIG D12 Front view front cover removed removing the pressure plate FIG D12 Front view front cover removed removing the film path cover plate FIG D13 Front view front cover removed removing...

Page 10: ...rect Next 1 Use your 1 4 nut driver to remove the screw passing through the center of the eccentric on the forward reverse arm Fig D15 2 Disconnect the spring at the bottom of the forward reverse arm...

Page 11: ...al washer the rubber grommet tries to turn with the screw To turn the screw without tearing the rubber grommet put some shutter oil between the rubber grommet and the screwhead The screw will then bre...

Page 12: ...E About that corrosion on the wirewound resistor the corrosion on the wirewound resistor is normal and presents no problem If the corrosion is severe you might wipe off the wirewound resistor The corr...

Page 13: ...1 have a snap ring on the cam lever post If you have the snap ring remove the snap ring before you lift out the mechanism 16 Lift out the mechanism Fig D33 Tilt the mechanism slightly until the right...

Page 14: ...Fig D35 runs on a plastic bushing the white bushing pointed out in Fig D34 Replacing the bushing is another normal repair in the projector Again age and humidity are the enemies The plastic bushing d...

Page 15: ...the coil spring from the still mask changeover rod Fig D38 Remove the spring from the projector 2 Pull out the still mask changeover rod toward the top of the mechanism The still mask changeover rod p...

Page 16: ...loser to you as viewed from the bottom of the projector 5 Lift the follower arms slightly and remove the followers TIP Here s one place the hemostat described in the tool section comes in handy Clamp...

Page 17: ...may find additional washers on the shutter drive shaft But only one washer is needed Save any additional washers for spare parts the washers are no longer available from Kodak And if you lose the was...

Page 18: ...show the ball bearings Remember if you lift the claw arms too far the ball bearings can fall out You can lubricate the ball bearings without removing the claw assembly Use your oil syringe to lubrica...

Page 19: ...ebuilt shutter Sending in your old shutter will save you money on the rebuilt shutter The shutters come in either of two sizes according to the diameter of the center hole Here s where you need the ca...

Page 20: ...hutter side bearing has a shoulder a smaller section that faces the shutter A rear bearing for the late model shutter has no extension that s because the shutter has the extended shoulder at the cente...

Page 21: ...claw assembly Fig D63 and insert the shutter drive shaft Hold up the shutter drive shaft as shown in Fig D62 as you seat the parts at the other end Fig D64 shows the end of the shutter drive shaft pa...

Page 22: ...tter drive shaft by turning the pulley Fig D66 in a counterclockwise direction as seen from the pulley end of the shutter drive shaft The shutter drive shaft should turn freely and the claws should mo...

Page 23: ...front of the in and out cam Fig D69 Remove the lever assembly Fig D69 You can now clearly see if you have the early style or late model parts Again if you have the late model parts the bushing has tw...

Page 24: ...ulder that passes through the lever assembly Next we ll modify the in and out cam Make sure you understand what you re doing here you can t get the in and out cam as a replacement part FIG D72 Front o...

Page 25: ...e shaft have already been installed As you install the drive cam assembly you ll time the in and out cam to the shutter The claw then moves the film while the shutter is closed and holds the film in p...

Page 26: ...ith the hole for the follower and simultaneously sliding the follower into place As the spring arm returns the hole passes over the follower Remember that it s critical to put the proper follower in t...

Page 27: ...m passes over the damping arm When you load the film push down the damping arm until it latches in the down position the damping arm does not latch with all models REMOVE LOOSEN THIS SCREW MAY BE MISS...

Page 28: ...seated over the lugs Even though you can t see the lugs with the cover in place you can feel when the flat spring is properly hooked Slide the flat spring through the cover slot as indicated by the a...

Page 29: ...ever and through the slot in the spring tab of the speed lever Replace the snap ring over the end of the still mask changeover rod Fig D97 Remember the position of the snap ring provides an adjustment...

Page 30: ...sm 3 Check all points of alignment between the case parts and the mechanism shown by dashed circles in Fig D100 1 the slot at the top of the speed lever over the pin on the control knob Fig D100 2 the...

Page 31: ...ets Unless the grommet has a metal washer it wants to turn or tear Apply a drop of shutter oil to the screw or to the grommet Fig D102 Fig D102 shows one of the motor screws You can then tighten the s...

Page 32: ...spring connected to the spring hooking tab To check the adjustment on the forward reverse arm eccen tric see Adjustments 1 In fact before connecting the power cord to the projector it s a good practi...

Page 33: ...clip out of the slot the spindle is free Pull the spindle away from the projector until you can see the wire clip Fig D107 Then use your spring hooking tool or a flat screwdriver to pull the bent end...

Page 34: ...n of the supply spindle with the tabs on the rewind pulley and on the rewind driver position the slots at the back of the spindle Fig D109 on the same horizontal line as the tabs on the rewind driver...

Page 35: ...of the shutter Fig D114 Watch the shutter drive shaft as you shift the projector between forward and reverse make sure the dog on the shutter drive shaft engages the proper lug on the shutter If the...

Page 36: ...t on super 8 Or just on regular 8 If the image jumps on one but not the other you may have to adjust the claw engagement see the following topic But if the image jumps on both regular 8 and on super 8...

Page 37: ...want to remove Then use your probe to lift the arm slightly Remember don t lift the arm too far Lifting the arm too far may allow one of the claw ball bearings to fall out it s then necessary to disas...

Page 38: ...ate Likely cause Insufficient claw engagement Solution Adjust claw engagement Malfunction Supply reel doesn t turn on rapid rewind Likely cause Rewind driver broken Solution Replace rewind driver Malf...

Page 39: ...motor However these causes are unlikely LUBRICATION SUMMARY Grease lubrication up and down cams on the shutter drive shaft surfaces of claw levers that ride against in and out cam followers front surf...

Page 40: ...two films regular 8 and super 8 there are two claws mounted on opposite sides of the same claw post assembly Fig K2 A single blade shutter assembly mounted on the shutter drive shaft but free to rotat...

Page 41: ...gest detent on each revolution of the cam 6rps X 3 detents 18 frames per second Position 4 gives 54fps because the follower drops in the 6 short detents in addition to the 2 intermediate detents and t...

Page 42: ...ations If there is any in and out movement it is very shallow When the selector knob is set for super 8 the selector lever has moved the toggle counterclockwise This moves the other nylon spacer under...

Page 43: ...e direction again the directional shift lever releases the shutter shaft and a spring moves the shutter drive shaft and drive dog back to the right the cam drive dog is free to rotate 180 until it aga...

Page 44: ...ken shutter gear The other possibility the in and out cam has come loose from the cam shaft Either of these problems can be repaired with minimum disassembly And only one of the problems the broken sh...

Page 45: ...h probably just needs cleaning it get sticky from dirt and old lubrications The rapid rewind switch then stays closed Use your cleaner and cleaning brush to degrease and scrub the lever You can also t...

Page 46: ...that the screws pass through rubber grommets you may have to oil the rubber grommets to prevent them from turning 4 Turn over the projector to the top Pull the two wires one black wire and one white w...

Page 47: ...NG LAMP HOUSING REMOVE SCREW FIG MD14 Bottom of projector mechanism from back FIG MD15 Bottom of projector viewed from the back lamp housing removed the shutter the tab on the cap aligns with the lamp...

Page 48: ...MD19 Watch for the coil spring that fits over the front end of the shutter drive shaft Lubrication is the same as in the M80 projector Use shutter oil to lubricate the shutter drive shaft between the...

Page 49: ...d out cam Fig MD22 SCREWDRIVER TIGHTENING BRACKET SCREW CAM TENSION SHAFTS FIG MD21 Front of projector viewed from bottom GREASE CAM ON SHUTTER DRIVE SHAFT SHUTTER ARM ON STILL MODE HEAT SHIELD SPRING...

Page 50: ...Compliments of www KodakParts com...

Page 51: ...Compliments of www KodakParts com...

Page 52: ...Compliments of www KodakParts com...

Page 53: ...Compliments of www KodakParts com...

Page 54: ...Compliments of www KodakParts com...

Page 55: ...Compliments of www KodakParts com...

Page 56: ...Compliments of www KodakParts com...

Reviews: