background image

16

www.kodak.com/go/support

Printing without a computer

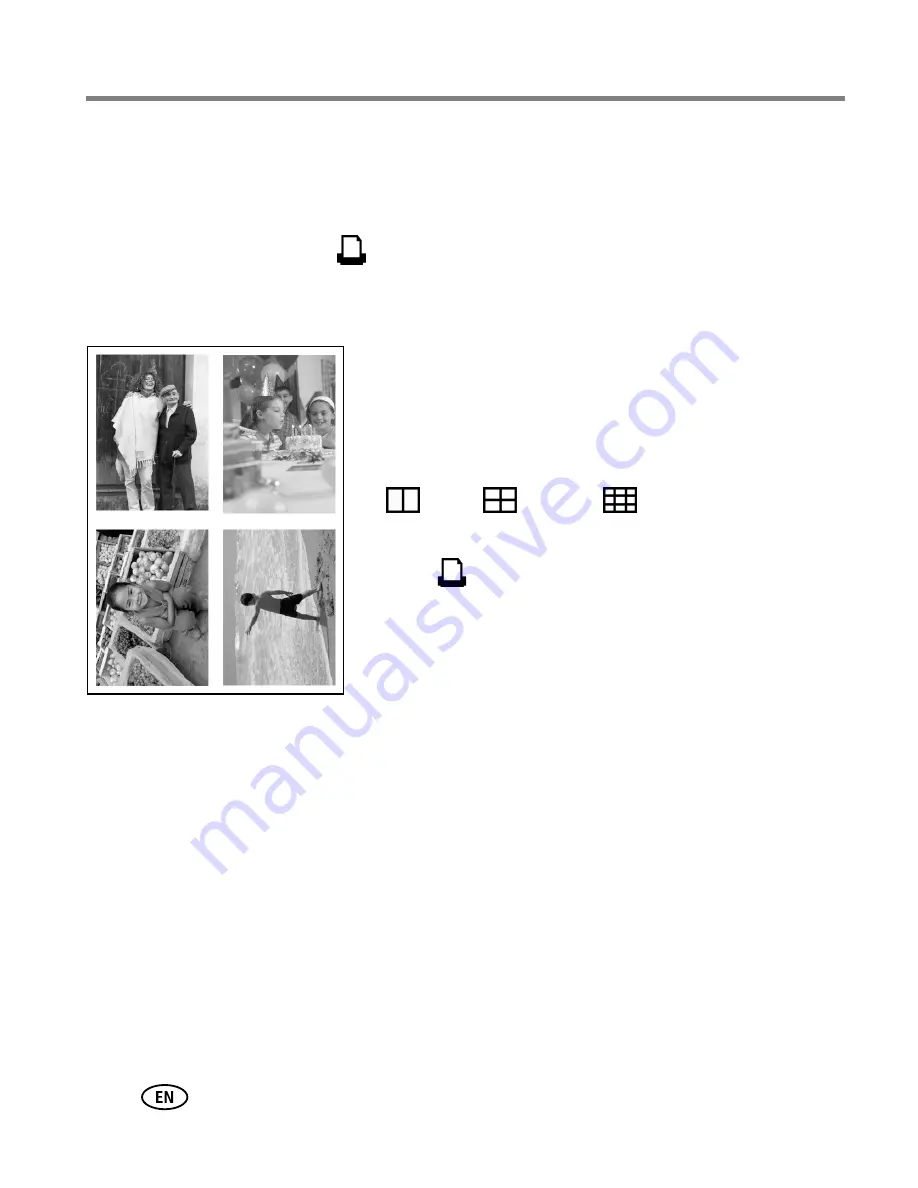
Printing pictures on the same sheet

You can select different pictures or more than one copy of a picture to print on the 
same sheet. 

IMPORTANT: 

Do not press 

until after you choose the print layout.

Different pictures on the same sheet

1

Select one copy of each picture on your docked 
camera (

page 11

) or on your camera prior to 

docking (

page 12

). 

2

Press the printer dock Print Layout button 
repeatedly to scroll through and select either 2-up 

, 4-up 

, or 9-up 

, depending on the 

picture layout you wish to print (see 

page 14

). 

3

Press 

 to begin printing.

Summary of Contents for EasyShare G600

Page 1: ...Kodak EasyShare G600 printer dock User s guide www kodak com For interactive tutorials www kodak com go howto ...

Page 2: ...Eastman Kodak Company Rochester New York 14650 Eastman Kodak Company 2006 All screen images are simulated Kodak EasyShare ImageLink and XtraLife are trademarks of Eastman Kodak Company P N 4J4599_en ...

Page 3: ...utton light 11 Pull out handle 4 Red eye reduction button light 12 USB device connector for compatible USB devices 5 Print Layout button 13 Paper status indicator light 6 Transfer button light 14 Camera connector 7 Paper tray 15 Camera battery status light 8 Paper tray cover 16 Cartridge status indicator light 2 4 7 6 5 9 14 1 13 12 8 3 11 15 16 10 ...

Page 4: ...side view 1 USB connector to computer 6 Connector cover release tab 2 Power connector DC in 7 Color cartridge shown installed 3 Cooling vent 8 Cartridge release tab 4 Paper path slot 9 Cartridge door 5 Connector cover for optional battery 2 5 7 6 1 4 8 9 3 ...

Page 5: ...7 Best camera setting for 4 x 6 inch 10 x 15 cm prints 10 3 Printing without a computer 11 Printing from your digital camera 11 Selecting pictures on your camera for printing 12 Printing tagged pictures 12 Printing from a PictBridge compatible device 13 Changing the printed picture layout 14 Printing pictures on the same sheet 16 Reducing red eye in your prints 18 Canceling printing 19 4 Installin...

Page 6: ...h you 33 Powering your printer dock with a battery 35 8 Maintenance and firmware upgrade 38 Maintaining your printer dock 38 Upgrading your printer dock firmware 40 9 Troubleshooting 41 Printing problems 41 Transfer communication problems 48 Printer dock status lights 49 10 Getting help 55 Helpful links 55 Telephone customer support 56 11 Appendix 57 Printer dock specifications 57 Important safety...

Page 7: ...ucts open doors or frequent passersby might expose the printer dock and paper to high levels of dust and debris Airborne dirt particles can affect picture quality Allow enough space on all sides of the printer dock to let you connect and disconnect cables change the cartridge and add paper Handling and storing the cartridge and paper Cartridge Keep cartridges out of the reach of children For best ...

Page 8: ...ronments such as a vehicle parked in the sun Attaching the custom camera insert IMPORTANT Use the custom insert that came with your digital camera to dock the camera Depending on your camera connector you may need the Kodak dock adapter kit D 26 See the instructions included with the dock adapter Place the insert tabs into the back slots of the dock Then press the front tabs down and snap into pla...

Page 9: ...ower cord to the AC power adapter then to the back of the printer dock NOTE The AC power adapter included with your printer dock may not require assembly and may be different from the one shown 3 Connect the AC power adapter into a power outlet Purchase an AC power adapter and other accessories at www kodak com go accessories 4 Press the Power button to turn on off the printer dock IMPORTANT When ...

Page 10: ... retailer of Kodak products or visit www kodak com go accessories Paper IMPORTANT Do not load more than 30 sheets of paper see upper limit line inside tray To avoid fingerprints do not touch the glossy side of the paper page 2 1 2 Open the paper tray cover then load the paper logo side down Fan the sheets of paper to separate and prevent sticking 3 Close the paper tray cover then flip open the hin...

Page 11: ...e the paper light is off before you remove the cartridge 1 2 3 Cartridge light Cartridge release tab Open the cartridge door Insert the cartridge into the chamber until it clicks into place 4 Close the cartridge door Rotate the cartridge spool clockwise just enough to remove the ribbon slack IMPORTANT Too many rotations may reduce the number of prints you can make To remove the cartridge push up o...

Page 12: ...ut to remove it When storing or traveling with your printer dock close the paper tray cover and paper tray door to keep out dust and debris IMPORTANT Make sure you store the paper tray in the space provided on the bottom of the printer dock see page 33 1 Open the paper tray door Paper light Slide the paper tray into the paper tray chamber until it snaps into place Make sure the hinged section is o...

Page 13: ... cameras are compatible for charging on the G600 printer dock See your camera user s guide for dock compatibility Docking the camera 1 Attach a custom camera insert to the printer dock see page 2 2 Load a Kodak Ni MH rechargeable digital camera battery KAA2HR or a Kodak Li Ion rechargeable digital camera battery into the camera for charging See your camera user s guide NOTE Your printer dock charg...

Page 14: ... MH rechargeable digital camera battery pack and Kodak Li Ion rechargeable digital camera battery charge up to 3 hours The Camera battery status light on the printer dock blinks green when the camera battery is charging Charging is complete when the light stops blinking and glows a steady green see Printer dock status lights on page 49 You may leave the camera on the printer dock to maintain the c...

Page 15: ... charges it See Extending battery life page 60 1 Make sure the Ni MH rechargeable battery is in the camera 2 Place your EasyShare camera on the printer dock page 7 3 Press and hold the Print Layout button and the Red eye Reduction button on the printer dock at the same time until the Battery status light blinks amber approximately 5 seconds then release the buttons To purchase a Kodak Ni MH rechar...

Page 16: ...rints Before taking pictures change the Picture size setting or resolution on your digital camera to 3 2 This ensures that the pictures you take are proportional to the printer dock paper preventing unwanted cropping of your pictures See your Kodak EasyShare digital camera user s guide for more information ...

Page 17: ...tures on your camera Press on the printer dock to locate a picture To fast scroll press and hold Press to select the print quantity Repeat for each picture you want to print Press The print screen appears NOTE If you don t press any buttons after 5 seconds printing starts automatically When the printing starts the Print light blinks The paper cycles four times during the printing process The first...

Page 18: ...ange it 5 Press the OK button 6 Press the Share button to exit Printing tagged pictures If your camera or memory card contains pictures tagged for printing see page 12 or your camera user s guide the printer dock gives you the option to print tagged pictures first If your camera is docked a message appears on the camera screen indicating that tagged pictures have been found To print tagged picture...

Page 19: ...igital camera or camera phone 1 Plug the USB cable from the PictBridge compatible device into your printer dock s USB connector NOTE If the PictBridge device is already plugged in but the connection is no longer available disconnect the USB cable then reconnect it to re establish the connection 2 Use the PictBridge compatible device to review pictures choose printing options and print See your dev...

Page 20: ...3 Press to return to the main review screen Press again to begin printing To change the default picture layout Select a picture layout then press and hold the Print Layout button for 4 5 seconds The cartridge and paper status lights blink red for 2 seconds then turn off The selected picture layout appears on the docked camera screen Picture Layout setting Number and size of prints per sheet 1 up f...

Page 21: ...ted three 2 x 3 in 51 x 76 mm pictures are printed on one sheet of paper For best results use your camera s 3 2 picture size setting to avoid cropping see your camera user s guide NOTE When printing from a PictBridge compatible device seepage 13 picture size and number of copies are determined by the device s multi up and copies settings Change these settings on your device before printing If the ...

Page 22: ...NT Do not press until after you choose the print layout Different pictures on the same sheet 1 Select one copy of each picture on your docked camera page 11 or on your camera prior to docking page 12 2 Press the printer dock Print Layout button repeatedly to scroll through and select either 2 up 4 up or 9 up depending on the picture layout you wish to print see page 14 3 Press to begin printing ...

Page 23: ...her 2 up 4 up or 9 up depending on the picture size you wish to print see page 14 3 Press to begin printing Method 2 using the printer dock and docked camera 1 Place the camera on the printer dock The current or most recent picture appears on the camera screen 2 Press 4 way button on the printer dock to review and choose a picture to print 3 Press on the printer dock to select the print quantity I...

Page 24: ...mages that were captured using the flash on your digital camera The Red eye reduction button is disabled when printing from a computer If printing from a computer see page 24 make sure Kodak EasyShare software is installed on the computer Printing may slightly increase when using red eye reduction Your printer dock may apply red eye reduction to an area such as a sunburn which darkens the area in ...

Page 25: ...tion screen appears Printing is cancelled when you select that you are sure you want to cancel printing Press and hold for 2 seconds Printing is cancelled automatically NOTE When printing is cancelled the paper is ejected from the printer dock If you cancel a print during the fourth pass clear coat the print is ejected upon completion ...

Page 26: ...e Select Complete to automatically install the most commonly used applications Select Custom to choose the applications you wish to install IMPORTANT To use the printer dock with a computer you must install the printer driver If you choose Custom make sure the printer dock is selected The printer driver is automatically installed if you choose Complete Add the printer for Mac OS X a Open the finde...

Page 27: ...nected to your Internet service provider to register electronically To register later visit www kodak com go register 5 Restart the computer if prompted If you turned off anti virus software turn it back on See the anti virus software manual for details For more information on installing the software see the ReadMe file on the Kodak EasyShare software CD For information on the software application...

Page 28: ...docked when you connect the printer dock to the computer 1 Make sure Kodak EasyShare software is installed on the computer page 20 2 Plug the labeled end of the USB cable included into the labeled USB port on your computer See your computer documentation for details 3 Plug the other end of the USB cable into the square USB connector ...

Page 29: ...rinter dock Transfer light blinks green 4 Use Kodak EasyShare software to transfer pictures from the camera to your computer See the Kodak EasyShare software Help for details NOTE The Transfer lightblinks whilethepictures arebeing transferred The Transfer light continues to blink until the connection is no longer available or is ended from the computer NOTE With the software installed pressing the...

Page 30: ...EasyShare software is installed page 20 and the printer dock is connected to your computer page 22 2 Click the My Collection tab 3 Select the pictures you wish to print 4 Click the Print at Home tab 5 Make sure the printer dock is selected as the current printer 6 Change any other settings such as print layout then click Print NOTE The Picture size button on the printer dock is disabled when print...

Page 31: ...electing Print or Page Setup from the File menu depending on your application and operating system 4 Make sure the printer dock is selected as the current printer 5 Change any other settings as needed then click OK or Print Depending on your application and operating system you may first need to return to the main menu and select Print from the File menu NOTE The Print Layout button on the printer...

Page 32: ...ryday picture making None to disable automatic color correction To change the color mode Windows 2000 XP OS 1 From the Start menu select Settings then select Printers NOTE Depending on your Start menu configuration you may need to select Printers and Faxes from the Control Panel 2 Right click the Kodak EasyShare G600 printer dock icon then select Printing Preferences 3 Click the Color Correction t...

Page 33: ...Select Color Control from the Copies Pages pop up menu 4 Select Kodak color 5 Select a color mode option Canceling printing Windows 2000 XP OS 1 Double click the printer icon in the system tray 2 Click the print job you want to cancel 3 Select Document then select Cancel Mac OS X 10 3 or higher 1 In Print Center double click the printer icon 2 Click the print job you want to cancel then select Del...

Page 34: ...device connector on your printer dock Either a print screen or the flash drive images appear on the camera screen depending on whether or not your camera can display images from other devices NOTE If the flash drive is already plugged in but the connection is no longer available disconnect then reconnect the flash drive to re establish the connection 3 Follow the steps for printing from your digit...

Page 35: ... confirmation screen appears Printing is cancelled when you select that you are sure you want to cancel printing Press and hold for 2 seconds Printing is cancelled automatically NOTE When printing is cancelled the paper is ejected from the printer dock If you cancel a print during the fourth pass clear coat the print is ejected upon completion ...

Page 36: ...r button on a printer dock that is not connected to a computer you have the option to transfer one or all your pictures from your camera to the USB flash drive To copy one or all your pictures from your camera to the USB flash drive without a computer connected 1 Make sure your camera is docked see page 7 and your USB flash drive is connected to the printer dock see page 28 2 Press the Transfer bu...

Page 37: ...e and manage files on the new drives on the computer See your computer documentation for details To copy one or all your pictures from your camera to the USB flash drive with a computer connected 1 Make sure your camera is docked see page 7 your USB flash drive is connected see page 28 and your printer dock is connected to the computer see page 22 2 Press the Transfer button on the printer dock Th...

Page 38: ...SB flash drive Canceling copying to a USB flash drive To cancel copying do one of the following Press the Transfer button NOTE A cancel confirmation screen appears when you press the Transfer or Print button Use the buttons on your camera to make your selection ...

Page 39: ...ur printer dock IMPORTANT Keep the printer dock accessories and supplies away from direct sunlight and out of high temperature environments such as a vehicle parked in the sun Consider purchasing a printer dock travel bag and other accessories at a retailer of Kodak products or visit www kodak com go accessories IMPORTANT Before you pack your printer dock remove the paper tray printer battery cabl...

Page 40: ...ort Printer dock portability 1 3 Close the paper tray door on the printer dock Close the paper tray cover Slide the paper tray into the bottom of the printer dock until it clicks into place 2 4 Pull out the handle to transport ...

Page 41: ...o charge the attached printer battery sold separately Purchase the Kodak Li Ion rechargeable printer battery KPB 100 at www kodak com go accessories Attaching the printer battery optional 1 Push down on the connector cover release tab 2 Remove the connector cover and store it in a safe place 3 Snap the battery into place Remove the battery and reattach the connector cover when the battery is not b...

Page 42: ...he printer battery is charged and you do not use the printer dock immediately your printer dock and lights may turn off automatically Print number Actual number of prints your fully charged printer battery produces may vary based on usage battery age temperature and other room conditions Approximately 3 hours for full charge Blinking green Battery charging Steady green Battery fully charged Blinki...

Page 43: ...le and non rechargeable batteries Do not mix lithium Ni MH and Ni Cd batteries together Do not mix batteries of different chemistry types grades or brands Failure to observe this precaution may cause leakage Remove batteries when the product is stored for an extended period of time In the unlikely event that battery fluid leaks inside the product contact your local Kodak Customer Service represent...

Page 44: ...lock the cooling vents Avoid blocking the back of the printer dock and paper tray exit Keep power and USB cables away from the paper path Keep the surrounding area vacuumed and litter free Protect the printer dock from tobacco smoke dust sand and liquid spills Avoid placing objects on the printer dock Keep the printer dock accessories and supplies away from direct sunlight and out of high temperat...

Page 45: ...aning the paper feed rollers 1 Unplug the AC power cord from the power outlet 2 Remove the paper tray from the printer dock and leave the paper tray door open 3 Lightly moisten a lint free cloth with water IMPORTANT Do not use cotton swabs to clean the paper feed rollers 4 Use the moistened cloth to gently wipe clean the surface of the paper feed rollers Advance the feed rollers with your thumb as...

Page 46: ...ur USB flash drive System or Service folder 2 Connect your printer dock to the AC power adapter see page 3 and dock your camera to the printer dock see page 7 3 Connect the USB flash drive to your printer dock s USB device connector see page 28 The printer dock automatically checks the firmware file version on the flash drive 4 Press Print on your printer dock to begin the firmware upgrade To exit...

Page 47: ...k the paper 1 Remove the paper tray page 6 2 Inspect the paper supply Make sure the paper is not damaged Replace with new paper if necessary 3 Carefully fan the paper to keep the sheets from sticking together 4 Reload the tray Do not load more than 30 sheets of paper see upper limit line inside tray 5 Re install the tray then press to resume printing Clean the paper feed rollers page 39 Multiple s...

Page 48: ...r jammed paper 3 Remove the paper supply from the tray Carefully fan the paper to keep the sheets from sticking together 4 Reload the tray Do not load more than 30 sheets of paper see upper limit line inside tray 5 Re install the tray then press to resume printing If the Color cartridge light glows red check the color cartridge IMPORTANT The cartridge may lock in place if there is a paper error Do...

Page 49: ... not load more than 30 sheets of paper see upper limit line inside tray 6 Re install the tray then press to resume printing Clean the paper feed rollers page 39 Print is smudged Fingerprints may be on glossy side of paper Handle paper by the edges page 2 Print is spotted Check for dirty paper wipe paper gently with a dry lint free cloth to remove dirt For excessive dirt or debris thoroughly clean ...

Page 50: ...rint is too dark overexposed or discolored Reposition the camera for more available light then take the picture See your camera user s guide for details Use fill flash or change your position so light is not behind the subject then take the picture See your camera user s guide for details Turn the flash on then take the picture See your camera user s guide for details Adjust the exposure compensat...

Page 51: ...nter battery connection page 35 Check the USB cable page 13 and camera connections page 7 Remove the paper tray Check that paper is properly loaded then re load the tray page 6 Load paper if the Paper light glows amber page 4 Make sure the color cartridge is properly installed page 5 Install a new cartridge if the Cartridge light is on Nothing happens when you try to print from docked camera Resea...

Page 52: ... printer menu for your system Remove check marks next to Pause Printing and Offline if checked Install Kodak EasyShare software page 20 If you choose Custom installation make sure to install the printer driver Uninstall then reinstall Kodak EasyShare software page 20 Printing is slow NOTE When printing a large number of prints printing may slow down to prevent the print head from overheating Move ...

Page 53: ...tridge may advance to the next picture slot on the ribbon resulting in a supply mismatch Paper runs out before the color cartridge or vice versa Supply mismatch can result from several different situations including Scrapping of paper as a result of jams or other errors Gradual advancement of the color cartridge ribbon from removing ribbon slack or clearing jams Advancement of the color cartridge ...

Page 54: ...dock and the USB flash drive disconnect then reconnect them to re establish the connection Close unnecessary software applications and minimize remaining application windows Follow any messages on the screen that may have been hidden by other windows Disconnect then reconnect the USB cable from the printer dock to the computer page 22 Make sure your computer meets the minimum system requirements U...

Page 55: ...status Color cartridge light Light status Cause Action solution IMPORTANT The cartridge may lock in place if there is a paper error Do not attempt to remove the cartridge without first clearing the paper error Make sure the Paper light is off before attempting to remove the cartridge see Paper light Light is off Cartridge properly installed and working normally None required Light glows amber Cart...

Page 56: ...Paper jam Clear the jam page 41 then press Printing stopped during mid print damaged paper Remove loose paper Check the paper supply Reload with new paper if necessary then press Paper tray empty Load paper page 4 then press Paper tray not installed or improperly installed Remove the paper tray check that paper is properly loaded and re install tray page 6 Press to resume printing Paper did not fe...

Page 57: ...ord page 3 Light glows green Camera just placed on printer dock None dock is checking the charge status of the battery Battery fully charged None required Light blinks green Battery charging Leave the camera on the dock to continue charging or to maintain charge Light glows amber Battery not properly installed Re install the battery Battery or connector pin damaged Check for damage Camera and batt...

Page 58: ...not properly seated on the connector Reseat the camera on the printer dock page 7 Camera transferring pictures to the computer established active connection to the computer None required PictBridge compatible device connected None required The Print button is disabled print command is controlled from the PictBridge compatible device To print from another source unplug the PictBridge compatible dev...

Page 59: ...r 1 Connect printer dock to computer page 22 2 Take pictures 3 Dock the camera Camera not docked Printer dock not connected to computer Camera not properly seated on connector Reseat the camera on the printer dock page 7 Computer off Turn on the computer Red eye reduction button light Light status Cause Action solution Light glows green Red eye reduction applied to pictures for current print job N...

Page 60: ...g status Light blinks amber Printer battery power nearly depleted Printer battery able to provide power for only a limited number of prints Charge the printer battery see page 36 Light glows amber Printer battery less than fully charged Printer battery working normally Light blinks green Battery charging None required Light glows green Battery fully charged None required Light blinks red Battery e...

Page 61: ...ls www kodak com go howto Software Get information on EasyShare software www kodak com go easysharesw or click the Help button in the EasyShare software Get help with the Windows operating system and working with digital pictures www kodak com go pcbasics Other Get support for Kodak docks cameras software accessories more www kodak com go support Get information on Kodak EasyShare printer docks ww...

Page 62: ...9 567 357 Norway 23 16 21 33 Belgium 02 713 14 45 Philippines 1 800 1 888 9600 Brazil 0800 891 4213 Poland 00800 4411625 Canada 1 800 465 6325 Portugal 021 415 4125 China 800 820 6027 Russia 8 495 929 9166 Denmark 3 848 71 30 Singapore 800 6363 036 Ireland 01 407 3054 Spain 91 749 76 53 Finland 0800 1 17056 Sweden 08 587 704 21 France 01 55 1740 77 Switzerland 01 838 53 51 Germany 069 5007 0035 Ta...

Page 63: ... US and Canada only 100 V to 240V AC 50 60 Hz via AC power adapter all other countries Consumption while printing 60 watts maximum Print speed Approximately 60 seconds for full 4 x 6 in 102 x 152 mm print NOTE First print may take an additional 15 seconds when printing from camera Print speed is dependent on picture size number of continuous prints and environmental conditions Size Without paper t...

Page 64: ...emble this product there are no user serviceable parts inside Refer servicing to qualified service personnel Do not expose this product to liquid moisture or extreme temperatures Kodak AC adapters and battery chargers are intended for indoor use only The use of controls adjustments or procedures other than those specified herein may result in exposure to shock and or electrical or mechanical hazar...

Page 65: ...n rechargeable batteries Do not mix lithium Ni MH and Ni Cd batteries together Do not mix batteries of different chemistry types grades or brands Failure to observe this precaution may cause leakage Remove batteries when the product is stored for an extended period of time In the unlikely event that battery fluid leaks inside the product contact your local Kodak Customer Service representative In ...

Page 66: ...camera Battery performance is reduced at temperatures below 5 C 41 F When using your camera in cold weather carry spare batteries and keep them warm Do not discard cold batteries that do not work when they return to room temperature they may be usable If you are getting fewer than 20 pictures per charge with your Kodak Ni MH rechargeable digital camera battery and if none of the tips above seem to...

Page 67: ...or at least 24 hours before using the printer dock again If this does not resolve the problem contact customer support see page 56 Connect a tripod directly to the camera do not connect a tripod to the camera dock or printer dock Service agreements are available in some countries Contact a dealer of Kodak products for more information This equipment is considered to be electronic equipment and con...

Page 68: ...e will include all labor as well as any necessary adjustments and or replacement parts Such repair or replacement is the sole remedy under this warranty If replacement parts are used in making repairs these parts may be remanufactured or may contain remanufactured materials If it is necessary to replace the entire product it may be replaced with a remanufactured product Limitations Request for War...

Page 69: ...oss of the use of the equipment cost of substitute equipment facilities or services or claims of your customers for such damages resulting from the purchase use or failure of the product regardless of cause or for breach of any written or implied warranty is expressly disclaimed and excluded herefrom Your rights Some states or jurisdictions do not allow exclusion or limitation of incidental or con...

Page 70: ...tion which can be determined by turning the equipment off and on the user is encouraged to try to correct the interference by one or more of the following measures 1 reorient or relocate the receiving antenna 2 increase the separation between the equipment and the receiver 3 connect the equipment to an outlet on a circuit different from that to which the receiver is connected 4 consult the dealer ...

Page 71: ...a norme NMB 003 du Canada Australian C Tick Waste Electrical and Electronic Equipment labeling Korea Class B ITE English translation As this equipment has obtained EMC registration for household use it can be used in any area including residential areas In the European Union do not discard the product as unsorted municipal waste Contact your local authorities or go to www kodak com go recycle for ...

Page 72: ...oduct based on the standard of the Voluntary Control Council for Interference from Information Technology Equipment VCCI If this is used near a radio or television receiver in a domestic environment it may cause radio interference Install and use the equipment according to the instruction manual ...

Page 73: ... i preparing for use with printer dock 7 printing from 11 tagging pictures for printing 12 transferring pictures from 23 Canadian compliance 65 canceling printing 19 27 29 care maintenance general 61 paper feed roller 39 cartridge See color cartridge charging light battery i lights battery 51 Class B ITE 65 color cartridge door ii 4 light i 49 loading removing 4 release tab ii color automatic corr...

Page 74: ...insert custom camera 2 inserting paper tray 6 installing software 20 J Japanese compliance 66 K Kodak EasyShare software help 55 installing 20 printing with 24 Kodak web sites 55 L layout See picture size light battery charging i color cartridge i red eye reduction 18 lights battery charging 51 color cartridge 49 paper 50 picture size 49 53 54 print i 52 status 49 transfer i M Macintosh OS install...

Page 75: ...DC in ii 3 print button light i 52 print order bypassing 12 printing 12 printer battery attaching 35 printer battery charging 36 printer battery information 36 printer dock maintenance 38 transporting 33 travelling 33 turning on off 3 printer dock firmware upgrading 40 printer dock portability 33 printer dock storage 38 printer driver installing 20 updating 55 61 printing canceling 19 27 29 from a...

Page 76: ...57 status lights 49 supplies accessories ordering 55 support technical 56 T tagging pictures for printing 12 telephone support 56 transfer button light i 52 transferring pictures 30 from camera to computer 23 problems 48 travelling with printer dock 33 tray paper See paper tray troubleshooting printing problems 41 status lights 49 transferring pictures 48 turning printer dock on off 3 U upgrading ...

Reviews: