background image

 5-34

May 12, 2004

Configuring your Camera
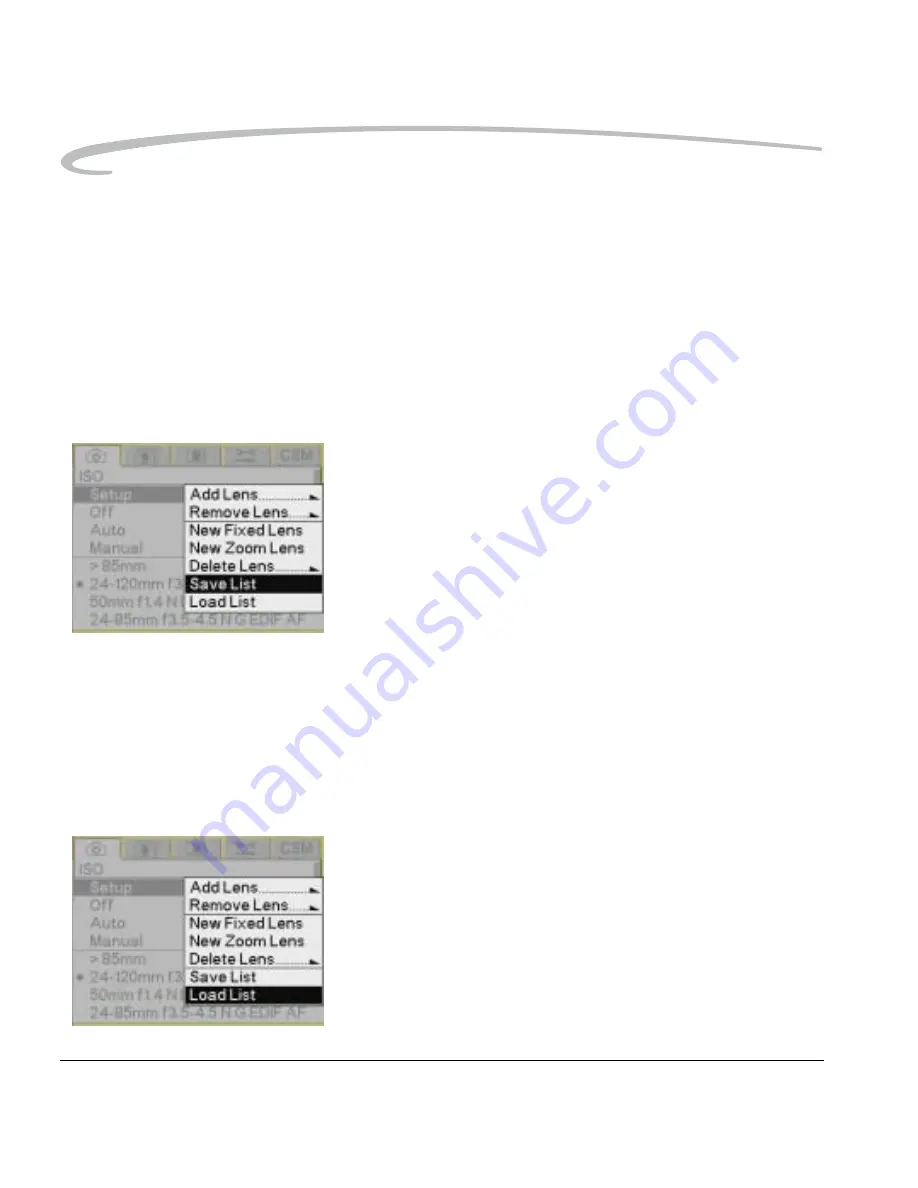
Saving a List

If you have made any changes to a list in the camera, we recommend that 
you save the list to a memory card. This combines the user list and master 
list and provides a backup copy. If your camera needs repair and the 
original list cannot be saved, your backup copy can be loaded.
If you use more than one KODAK PROFESSIONAL DCS Pro SLR/n Digital 
Camera, you can save time by creating the user list of commonly used 
lenses on one camera, then loading it into the others.

1. Insert a memory card in the camera.

2. Choose Lens Optimization from the Capture menu, choose Setup, then 

choose Save List.

3. Press the OK button.

The list is saved to the root directory of the memory card as lens.txt.

IMPORTANT: 

Do not edit or rename this file. If you do, it may not 
work properly in the camera.

Loading a List

IMPORTANT: 

Save your current user list to your computer before 
loading a new one. The new list will be merged with 
your current list and new lenses or changes not already 
in the camera will be applied. If you change the 
strengths for a lens, and there are changes for that lens 
in the new list, your changes will be overwritten.

1. Insert the memory card containing the list in the camera.

2. Choose Lens Optimization from the Capture menu, choose Setup, then 

choose Load List.

3. Press the OK button.

4. Press OK in response to the confirmation screen.

If a file named lens.txt is in the root directory of the memory card, it is 
saved to the camera.

Summary of Contents for DCS PRO SLR-N - LENS OPTIMIZATION GUIDE

Page 1: ...KODAK PROFESSIONAL DCS Pro SLR n Digital Camera User s Guide Lens Optimization Section P N 4J1533 ...

Page 2: ... Lenses from the Master List 5 31 Removing Lenses from the User List 5 33 Saving a List 5 34 Loading a List 5 34 Defining New Lenses 5 35 Defining New Fixed Lenses 5 35 Defining New Zoom Lenses 5 36 Deleting Defined Lenses 5 37 Editing the Lens Name 5 38 Changing the Strength 5 40 Determining the Optimum Strength 5 40 Assigning Optimum Strengths to Lenses in the User List 5 41 Resetting to Default...

Page 3: ...election see page 5 29 This method determines the correction strength by selecting the specific lens you are using Since the camera cannot uniquely identify every lens attached you must select the lens from a list Your camera contains a master list of commonly used current model lenses from several manufacturers You can easily add additional lenses to the master list There is a conveniently access...

Page 4: ...ethod of Lens Optimization There are three methods for optimizing your lens Auto 1 Choose Lens Optimization from the Capture menu 2 Choose Auto 3 Press the OK button NOTE Auto is the factory default If you reset defaults the camera resets to the Auto method ...

Page 5: ...ength must be between zero and 99 4 Press the OK button Select a Lens from the User List Once you add a lens to the user list see page 5 31 or define a new lens see page 5 35 you can select it 1 Choose Lens Optimization from the Capture menu then choose a lens 2 Press the OK button NOTE Most long lenses require a correction strength of zero Select the 85mm option for these lenses This is more conv...

Page 6: ...ain which lens you are using One of the following events will occur If there is one possible match in the user list or the master list that lens is automatically selected If there are two or more possible matches in the user list or the master list the list of possible matches appears If there are no possible matches in the user list or the master list the camera switches to Auto NOTE If you use t...

Page 7: ...user list Add lenses from the master list see page 5 31 Remove lenses see page 5 33 Select lenses see page 5 29 Save the user list see page 5 34 Load the user list see page 5 34 Adding Lenses from the Master List Use this option to move a lens from the master list to the user list 1 Choose Lens Optimization from the Capture menu choose Setup then choose Add Lens 2 Choose the appropriate lens manuf...

Page 8: ...3 Choose the lens that is mounted on your camera NOTE If your lens does not appear in the master list add a new fixed see page 5 35 or a new zoom lens see page 5 36 4 Press the OK button The lens is moved from the master list to the user list ...

Page 9: ...r List Use this option to move a lens from the user list to the master list 1 Choose Lens Optimization from the Capture menu choose Setup then choose Remove Lens 2 Select the lens to be removed 3 Press the OK button The lens is moved from the user list to the master list ...

Page 10: ...ist 3 Press the OK button The list is saved to the root directory of the memory card as lens txt IMPORTANT Do not edit or rename this file If you do it may not work properly in the camera Loading a List IMPORTANT Save your current user list to your computer before loading a new one The new list will be merged with your current list and new lenses or changes not already in the camera will be applie...

Page 11: ...e page 5 36 Delete a defined lens from the user list see page 5 37 Edit the name of a defined lens see page 5 38 Defining New Fixed Lenses 1 Mount the appropriate lens on the camera 2 Choose Lens Optimization from the Capture menu choose Setup then choose New Fixed Lens 3 Focus at infinity then capture one image 4 Press the OK button The lens is selected and appears at the top of the user list 5 C...

Page 12: ...m the Capture menu choose Setup then choose New Zoom Lens 3 Focus at infinity set the lens to its shortest focal length then capture one image 4 Set the lens to its longest focal length then capture one image 5 Press the OK button The lens is selected and appears at the top of the user list 6 Change the strengths for the lens see page 5 40 ...

Page 13: ...hat you defined 1 Choose Lens Optimization from the Capture menu choose Setup then choose Delete Lens A list of user defined lenses appears 2 Select the lens to delete 3 Press the OK button The lens is removed from the user or master list and all information about the lens is deleted from the camera ...

Page 14: ...ormation to help you identify the lens While you can add any text we recommend that the first letter be the first letter of the lens manufacturer Predefined first letters are C CANON K TOKINA N NIKON Q QUANTARAY S SIGMA T TAMRON V VIVITAR Select an appropriate first letter for other lenses 1 Choose Lens Optimization from the Capture menu then highlight the lens in the user list 2 Press the right s...

Page 15: ... press the right or left side of the Four way switch to highlight the character then press the OK button b To change a character highlight or then press the OK button to move to the next or previous character in the folder name c When finished highlight and press the OK button ...

Page 16: ...an image of a gray card at normal exposure Fill the frame with the gray card 2 On your computer open the image in Photo Desk If the lens optimization strength is too low the corners of the image appear green or yellow If the lens optimization strength is too high the corners of the image appear blue or magenta 3 In Photo Desk use Click Balance at the center of the image 4 Click Lens Optimization t...

Page 17: ...the master list 1 With the appropriate lens mounted and set to infinity choose Lens Optimization from the Capture menu then highlight the lens in the user list 2 Press the right side of the Four way switch to display the Strength screen 3 Select the focal length and aperture 4 Press the right side of the Four way switch to display boxes where you can enter the strength determined in Photo Desk 5 P...

Page 18: ...t available for lenses that you have defined You can reset strength values for a lens in the user list to the values in the master list 1 Choose Lens Optimization from the Capture menu then highlight the lens in the user list 2 Press the right side of the Four way switch to display the Strength screen 3 Choose Reset to Default 4 Press the OK button ...

Reviews: