background image

9

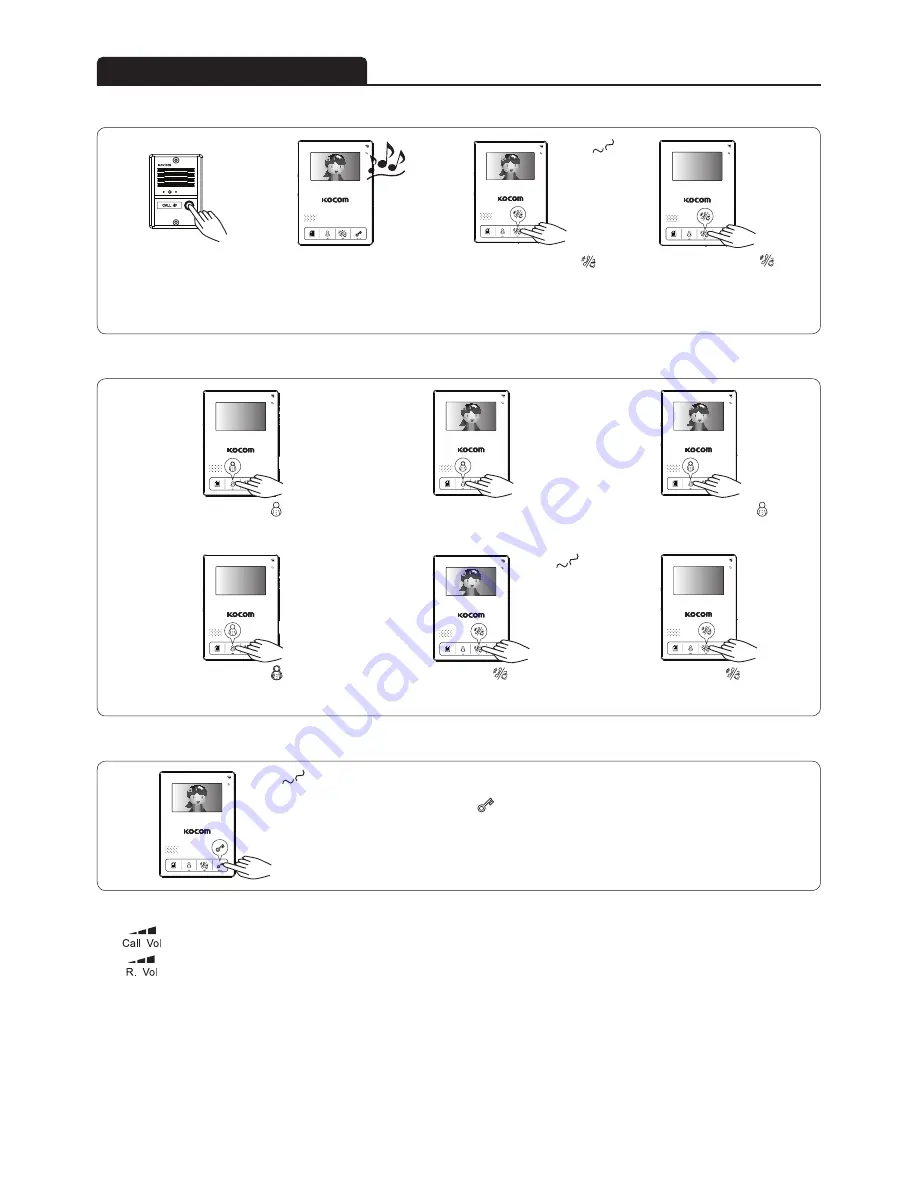
While 'Talk' on, the door open button [      ]
and the door will be opened.
About 5 seconds after pushing the button, 
stop the communication automafically.

Push the talk button [      ] again 
and stop the communication.

Call Adjustment : See the side of monitor and find Call Vol. consisting of 3 level(High/Mid/Mute).

Receiver Adjustment : While communicating, adjust R. Vol. consisting of 3 level(High/Mid/Low).

On Monitoring(or talking), push [Menu] and the brightness icon will appear.
At this point, adjust the brightness with the keys, UP / DOWN / ENTER.

Press Open Door button under Standby Condition for two seconds or longer and "MELODY MUTE ON" will appear on the screen. 
If it has been set, you will not hear any sound when there is a call from Porch, Lobby or Guards. Repeat the Setup method to cancel. 
Then, "MELODY MUTE ON" will appear on the screen.

■ Communication with door camera

■ Camera monitoring

■ Door open

■ Sound Adjustment

■ Brightness Adjustment

■ Call Sound (MELODY) MUTE Function

Instructions for operation

Push the call button.
The camera melody is
turned on.

You can hear call sound from
monitors,  and  camera  image 
comes out on screen.
(Standby time : 30 sec)

Push  the  talk/guard  button  [          ] 
andcommunicate with the door camera
(Communication time : 3 minutes)

Push  the  talk/guard  button  [          ] 
again and stop the communication.

Hello

Press the talk button [      ] while
monitoring and start to communicate
with the calling camera.

Push the monitor button [     ] when
there is no image on monitor screen.

Push the monitor button [     ]
again and stop the communication.

Hello

Push  the  monitor  button  [          ] 
2 time and the image of camera
2 appears.

Camera image appears on screen.
(Monitoring time : 1 minute)

Hello

Summary of Contents for KCV-434SD

Page 1: ...corder Motion Detection Memory Size up to 32GB SD Card interface Video Format Moving picture MPEG 4 Still cut JPEG Multiple language support English Spanish French and Russian Connection up to 2 Door...

Page 2: ...ot install it slanted place of water leakage which can a short circuit Fix the product on the wall safely according to the installation guideline to prevent any damage or injury Don t put any stuff in...

Page 3: ...xing and picture distortion may occur Do not drop this product Glass is used for monitor and might break or cause other circuit inferiority In such case immediately turn down the power switch and call...

Page 4: ...t and check to see if the power switch is ON on the left side of monitor Wall Screw 2X8mm Main body supporter Screw 3X5mm Wall Screw 4X16mm Camera front Screw 4X10mm Wall baby support Upward support S...

Page 5: ...ting supporter for lens angle Maximum Available Capacity 32GB SDHC SAND DISK MLC Method CLASS 4 KING MAX MLC Method CLASS 6 Bareun Electronics MLC Method CLASS 4 Do not use any SD card besides the one...

Page 6: ...rophone State LED Menu Button Monitor Button Talk Guard Button Door open Button The back side FG FRAME GROUND KC MC30 KC MC20 KC MC24 KC C60 VCC GND Audio Video Door Non Polarity Camera angle knob Onl...

Page 7: ...Door opener DC Door opener External power input External power input 2wire 2wire Polarized 4wire Polarized 4wire Door Camera Door Camera KCV 434SD DC Door opener Lobby Phone Guard Phone External powe...

Page 8: ...vironment you may view the images somewhat unclear However they do not result from any defect or trouble of the product Orange W Orange Green W Orange Blue W Orange Brown W Orange VCC double up GND do...

Page 9: ...orch Lobby or Guards Repeat the Setup method to cancel Then MELODY MUTE ON will appear on the screen Communication with door camera Camera monitoring Door open Sound Adjustment Brightness Adjustment C...

Page 10: ...ly when using a lobby phone Press the talk guard button to call While calling press the talk guard button to end Call time 3 minutes While Guard Talk on Push the talk guard button and Guard Talk finis...

Page 11: ...re will be no recording All recording excluding motion recording will be saved according to Menu REC SET SAVE MODE SET CAMERA Still Images and MOVIE Moving Images files Still images are saved in Image...

Page 12: ...in 5min Motion Set Set up motion recording OFF Motion record setup OFF ON Motion record setup ON Motion sensitivity 1 10 OverWrite Set up overwriting 4 Digital Frame Set up an electronic album OFF Ele...

Page 13: ...13 MEMO...

Page 14: ...pection procedures 2 If this product breaks down during proper use as a result of product defect KOCOM will repair it within one year from date of purchase free of charge 3 The following cases will be...

Reviews: