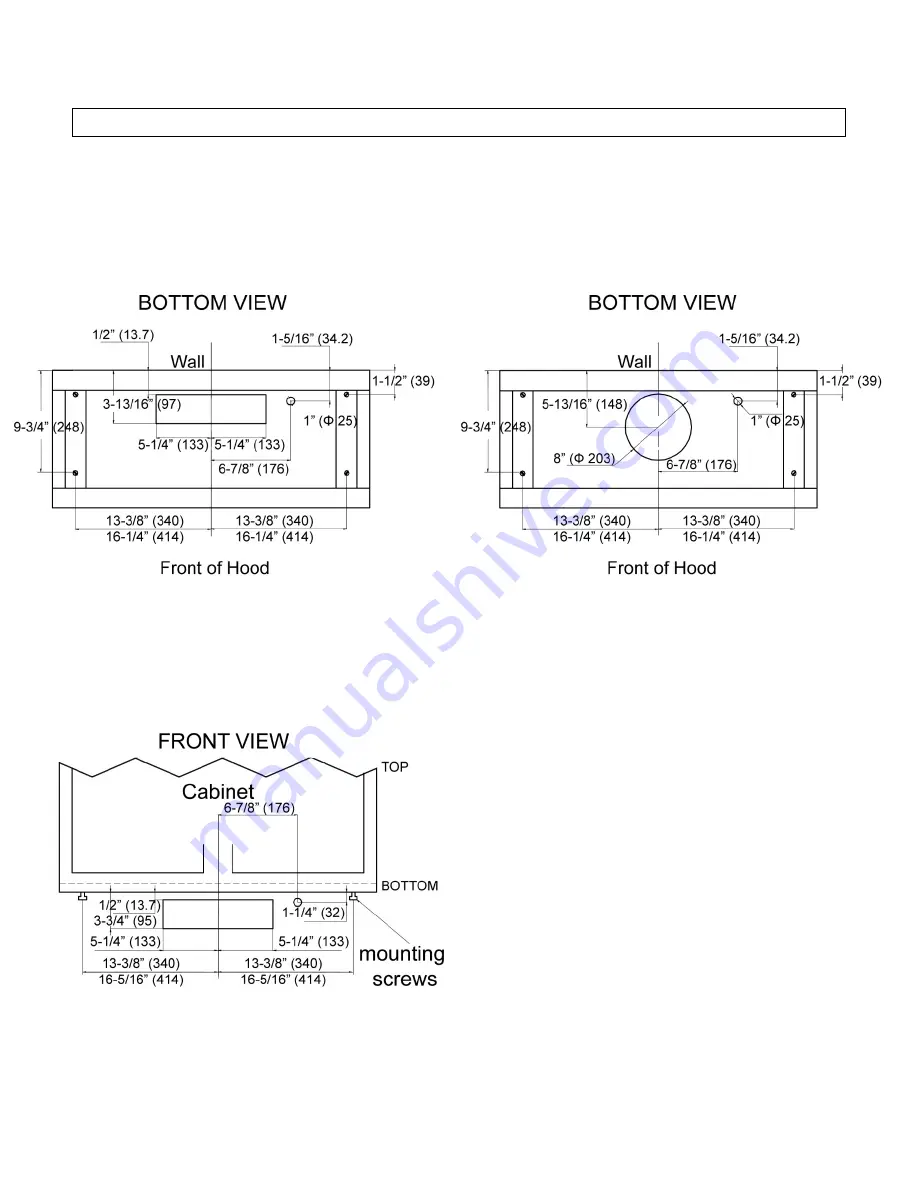
MEASUREMENTS & DIAGRAMS
All measurements in ( ) are millimeters.
All inch measurements are converted from millimeters. Inch measurements are estimated.
- FOR TOP VENTING -
- FOR REAR VENTING -
Page 1: ...KOBE Range Hoods Brillia Series CHX 30 Series 400 CFM with LED Lights INSTALLATION INSTRUCTIONS AND OPERATION MANUAL...
Page 2: ...T INSTALL THE UNIT AND KEEP ALL ORIGINAL PACKAGING MATERIAL 2 Have your original invoice as proof of purchase and product serial number ready 3 Contact your merchant for product replacement due to shi...
Page 3: ...E 10 SPECIFICATIONS 11 MEASUREMENTS DIAGRAMS 12 PARTS LIST 14 CIRCUIT DIAGRAM 16 TROUBLE SHOOTING 17 WARRANTY 18 WARRANTY INFORMATION FORM 20 READ ALL INSTRUCTIONS CAREFULLY BEFORE STARTING A L L W I...
Page 4: ...proper use mistreatment negligence or any other circumstances beyond the control of KOBE authorized agents Any repair carried out without the supervision of KOBE authorized agents will automatically v...
Page 5: ...u still smell gas call the Gas Company and Fire Department right away CAUTION 1 For general ventilation use only Do not use to exhaust hazardous or explosive materials and vapors 2 To reduce the risk...
Page 6: ...ood 1 B Warranty Registration Card 1 C Instruction Manual 1 D Round Exhaust Plate with damper 1 E Rectangular Exhaust Plate with damper 1 F Light bulb 2 G Parametric Panel 1 A B C D E F G FOR MORE INF...
Page 7: ...A Height of Floor to Ceiling B Height of Floor to Counter Top Standard 36 C Preferred Height of Counter Top to Hood Bottom Recommended 27 to 30 D Height of Hood E Height of the Cabinet SAFETY WARNING...
Page 8: ...Peel protective film off the hood if any For installing under the cabinet with recessed bottom attach 4 inch wide wood filler strips not included on each side Refer to Figure 2 Using reference on Page...
Page 9: ...g 8 screws provided Refer to Figure 6 3 For 3 1 4 x 10 vent installation only Using a flat head screwdriver to remove the top OR the rear 3 1 4 x 10 duct knockout Refer to Figure 7 Attached the 3 1 4...
Page 10: ...5 Connect the electrical wires Connect three wires black white and green to house wires and cap with wire connectors Connect according to color black to black white to white and green to green Hood I...
Page 11: ...c panel forward into the notch to secure the panel Refer to Figure 15 Flip the parametric panel upward until it clicks into place Refer to Figure 16 CAUTION MAKE SURE THE PARAMETRIC PANEL IS SECURE BE...
Page 12: ...any preparation or cooking and keep fans running while cooking Adjust speed as needed To operate the fan function Press button to choose from speed o 1 Low speed o 2 Medium speed o 3 High speed Press...
Page 13: ...ve on too long as this may cause damage to hood finish Use soft towel to wipe off the cleaning solution gently rub off any stubborn spots Use dry soft towel to dry the hood 3 DO NOT allow deposits to...
Page 14: ...EXHAUST Top 7 Round with damper Top 3 1 4 x 10 Rectangular with damper Rear 3 1 4 x 10 Rectangular with damper CONTROLS Push Button control system LIGHTS 3 Watt LED x 2 HOOD DIMENSION W x D x H 30 mo...
Page 15: ...MEASUREMENTS DIAGRAMS All measurements in are millimeters All inch measurements are converted from millimeters Inch measurements are estimated FOR TOP VENTING FOR REAR VENTING...
Page 16: ...DIMENSIONS OF THE MODEL...
Page 17: ...276 Q 8 Light fixture For LED lighting system Y53 0442 9 Motor K Y54 0005 1 1 10 Turbine Impeller K Y23 0049 11 Bottom Casing CHX3030PD 30 K Y21 2743 6 CHX3036PD 36 K Y21 2693 6 12 Parametric Panel su...
Page 18: ...PART DIAGRAM FOR CHX30SERIES 400 CFM...
Page 19: ...CIRCUIT DIAGRAM SERIES CHX30 SERIES 400 CFM For models equipped with Push Control...
Page 20: ...of hood tighten the mounting bracket The motor is working but the lights are not working Light bulb s is defective Try placing the trouble light bulb s to a working socket if the bulb s still doesn t...
Page 21: ...include but are not limited to Service technician travel charges if the requested service location is 30 miles out of KOBE s authorized service area Parts shipping expenses Un installation of defecti...
Page 22: ...o qualify for warranty service you must 1 Have the ORIGINAL proof of purchase 2 Be the ORIGINAL purchaser of the product 3 Have the model number 4 Have the serial number 5 Have a description of the na...
Page 23: ...ervice purpose 1 Date of purchase 2 Model No 3 Serial No For warranty service or spare parts purchase contact KOBE Service Center Toll Free 1 855 800 KOBE 5623 Email kobe adcoservice com For service i...
Page 24: ...mand d utiliser cette hotte l tranger puisque l alimentation lectrique pourrait ne pas tre compatible et enfreindre le code de l lectricit de ce pays L usage de la hotte KOBE l tranger est votre propr...