background image

kobalttools.com

9

Understanding your chain saw safety devices
Low kickback saw chain
The rakers (depth gauges) ahead of each cutter can  
minimize the force of a kickback reaction by preventing  
the cutters from digging in too deeply at the kickback  
zone. Only use replacement chain that is equivalent 

to original chain or has been certified as low kickback 

chain per ANSI B175.1. Low kickback chain is a chain 
that has met the kickback performance requirements of 
ANSI B175.1 - 1991. (American National Standard for 
Power Tools - Gasoline-Powered Chain Saws-Safety 
Requirements) when tested on the representative  

sample of chain saws below 3.8 c.i.d. specified in ANSI 

B175.1 - 1991. As saw chains are sharpened during their 
useful life, they lose some of the low kickback qualities 
and extra caution should be used.

•   Push and Pull - This reaction force is always  

opposite to the direction the chain is moving where 
wood contact is made. Thus, the operator must be 
ready to control the PULL when cutting on the bottom 
edge of the bar, and PUSH when cutting along the  
top edge.

SAFETY INFORMATION

PREPARATION

Before beginning to operate this product, make sure all parts are present. Compare parts with 
package contents list. If any part is missing or damaged, do not attempt to operate the product.

Summary of Contents for KCS 180B

Page 1: ...EM 0670251 MODEL KCS 180B Français p 34 Español p 69 Questions problems missing parts Before returning to your retailer call our customer service department at 1 888 3KOBALT 1 888 356 2258 8 a m 8 p m EST Monday Friday ATTACH YOUR RECEIPT HERE Serial Number Purchase Date ...

Page 2: ...ing 32 Warranty 33 Replacement Parts List 33 PRODUCT SPECIFICATIONS SPECIFICATIONS B Motor ar length 1 80V DC 8 in 458mm Chain pitch 3 8 in 9 50 mm Chain gauge 0 05 in 1 27 mm Chain type Replacement Part Model 91P062X Oregon Accessory Model S62 Guide bar type Model 180SCEA041 Oregon Chain oil tank capacity 6 oz 177 44 ml Unit weight without battery 11 lbs 4 98 kg ...

Page 3: ...kobalttools com 3 PACKAGE CONTENTS PART DESCRIPTION QUANTITY A Chainsaw 1 B Scabbard 1 A B ...

Page 4: ...tection Wear eye protection that is marked to comply with ANSI Z87 1 as well as hearing protection when operating this product Gloves Wear non slip heavy duty protective gloves when handling the chain saw and the blade Safety Footwear Wear non slip safety footwear when using this equipment Kickback Tip contact can cause the guide bar to move suddenly upward and backward which can cause serious inj...

Page 5: ...tch the chain or underbrush Secure hair so it is above shoulder level SYMBOLS The following signal words and meanings are intended to explain the levels of risk associated with this product Save these Instructions SYMBOL SIGNAL MEANING DANGER Indicates an imminently hazardous situation which if not avoided will result in death or serious injury WARNING Indicates a potentially hazardous situation w...

Page 6: ...may explode Check with local codes for possible special disposal instruction Do not open or damage the batteries released electrolyte is corrosive and may cause damage to the eyes or skin and may be toxic if swallowed Exercise care in handling battery in order not to short the battery with conducting material such as rings bracelets and keys The battery or conductor may overheat and cause burns Do...

Page 7: ...this tool loan them these instructions also WARNING Proposition 65 Some dust created by power sanding sawing grinding drilling and other construction activities contain chemicals known to cause cancer birth defects or other reproductive harm Some examples of these chemicals are Lead from lead based paints Crystalline silica from bricks and cement and other masonry products and Arsenic and chromium...

Page 8: ...m obstructions Do not let the nose of the guide bar contact a log branch fence or any other obstruction that could be hit while you are operating the saw Always cut with the unit running Fully squeeze the trigger switch and maintain cutting speed Use only the replacement guide bars and low kickback chains specified by the manufacturer for the saw With a basic understanding of kickback you can redu...

Page 9: ...d Chain Saws Safety Requirements when tested on the representative sample of chain saws below 3 8 c i d specified in ANSI B175 1 1991 As saw chains are sharpened during their useful life they lose some of the low kickback qualities and extra caution should be used Push and Pull This reaction force is always opposite to the direction the chain is moving where wood contact is made Thus the operator ...

Page 10: ...lly inspected and satisfactorily operated the product If any parts are damaged or missing please call 1 888 3KOBALT 1 888 356 2258 for assistance WARNING If any parts are damaged or missing do not operate this product until the parts are replaced Failure to heed this warning could result in serious personal injury Do not attempt to modify this product or create accessories not recommended for use ...

Page 11: ... order to familiarize yourself with the location of various controls and adjustments Save this manual for future reference PART DESCRIPTION E Safety lock F Trigger switch G Front handle H Low kickback chain I Guard Chain brake J Guide bar K Chain cover lock nuts L Chain cover M Battery release button N Oil cap O Wrench 13 mm P Adjustment screw G H K F O M I J L P E N ...

Page 12: ... and chain oil added The level should also be checked after every 20 Remove oil cap N Carefully pour the bar and chain oil into the tank Wipe off excess oil and replace cap indicator is below the MIN line Repeat as needed Note Do not use dirty used or otherwise contaminated oils Damage may occur to the bar or chain It is normal for oil to seep from the saw when not in use To prevent seepage empty ...

Page 13: ...instructions contained in the charger manual WARNING To install the battery 1 Align the battery not included with the battery opening 2 Insert the battery into the battery opening until the battery release button M locks into place 3 Push down on the battery until it locks into place You should hear a click once it is installed To remove the battery 1 Press the battery release button M on the chai...

Page 14: ... If it is pull back on the chain brake I to disengage the brake Press and hold the trigger switch F and keep it pressed for continued operation Release the safety lock E during operation B To stop the chain saw Release the trigger switch F LED Indicator Lights Power Indicator LED will illuminate GREEN indicating that the chain saw is active Alert Indicator LED will illuminate RED indicating an abn...

Page 15: ...enever the motor the thumb is wrapped under the handlebar This grip is least likely to be broken by a kickback or other sudden reaction of the saw Any grip in which the thumb and dangerous because a slight kick of the saw can cause loss of control Proper hand grip position Proper grip Improper grip OPERATING INSTRUCTIONS Electronic Chain Brake This saw is equipped with an electronic chain brake I ...

Page 16: ... the end of the cut Do not cut above chest height as a saw held higher is difficult to control against kickback forces Do not fell trees near electrical wires or buildings Leave this operation for professionals Cut only when visibility and light are adequate for you to see clearly DO NOT operate the trigger switch with your left hand and hold the front handle with your right hand Never allow any p...

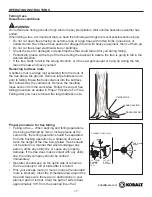
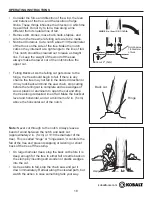
Page 17: ...d from the bucking operation by a distance of at least twice the height of the tree being felled Trees should not be felled in a manner that would endanger any person strike any utility line or cause any property damage If the tree does make contact with any utility line the utility company should be notified immediately Operator should keep on the uphill side of terrain as the tree is likely to r...

Page 18: ... made Notched Undercut Cut a notch about 1 3 the diameter of the trunk on the side of the tree Make the notch cuts so they intersect at a right angle to the line of fall This notch should be cleaned out to leave a straight line To keep the weight of the wood off the saw always make the lower cut of the notch before the upper cut Note Never cut through to the notch Always leave a band of wood betwe...

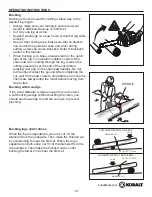
Page 19: ...without relaxing your grip on the chain saw handles Do not let the chain contact the ground After completing the cut wait for the saw chain to stop before you move the chain saw Always stop the motor before moving from tree to tree Bucking with a wedge If the wood diameter is large enough for you to insert a soft bucking wedge without touching the chain you should use the wedge to hold the cut ope...

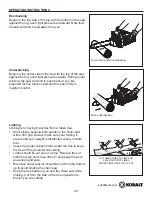
Page 20: ...tree Work slowly keeping both hands on the chain saw with a firm grip Always make sure your footing is secure and your weight is distributed evenly on both feet Leave the larger support limbs under the tree to keep the tree off the ground while cutting Limbs should be cut one at a time Remove the cut limbs from the work area often to help keep the work area clean and safe Branches under tension sh...

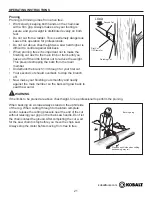
Page 21: ...r Underbuck the branch 1 3 through for your first cut Your second cut should overbuck to drop the branch off Now make your finishing cut smoothly and neatly against the main member so the bark will grow back to seal the wound If the limbs to be pruned are above chest height hire a professional to perform the pruning WARNING When bucking on a slope always stand on the uphill side of the log When cu...

Page 22: ...rator WARNING Cutting springpoles A springpole is any log branch rooted stump or sapling which is bent under tension by other wood so that it springs back if the wood holding it is cut or removed On a fallen tree a rooted stump has a high potential of springing back to the upright position during the bucking cut that separates the log from the stump Watch out for springpoles they are dangerous SPR...

Page 23: ...Lubrication of the unit under normal operating conditions Therefore no further lubrication is required for the bearings Replacing the guide bar and chain WARNING DANGER Never start the motor before installing the guide bar chain chain cover and chain cover lock knob injury WARNING To avoid serious personal injury read and understand all the safety instructions in this section Before performing any...

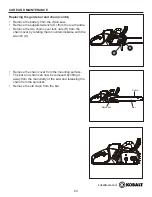
Page 24: ...rear handle Remove the two chain cover lock nuts K from the chain cover by rotating them counterclockwise with the wrench O Remove the chain cover from the mounting surface The bar and chain can now be removed by lifting it away from the main body of the saw and releasing the chain from the sprocket Remove the old chain from the bar Chain Sprocket Bar O K ...

Page 25: ...r studs ensure that the adjusting pin is in the chain tension pin hole Replace the chain cover Remove all slack from the chain by turning the chain adjustment screw P clockwise until the chain seats snugly against the bar with the drive links in the bar groove Bar Groove Chain Drive Links Cutters Chain Rotation Chain Drive Links CARE AND MAINTENANCE Lift the tip of the guide bar up to check for sa...

Page 26: ...nuts K with the supplied wrench O The chain cover lock nuts K do not have to be completely removed in order to adjust the chain tension Rotate the chain adjustment screw P clockwise to increase the chain tension and rotate counterclockwise to decrease the chain tension Once the chain is at the desired tension tighten the chain cover lock nuts K Adjusting the chain tension WARNING Never touch or ad...

Page 27: ...ng or the chain cuts to one side During maintenance of the chain consider the following Improper filing angle of the side plate can increase the risk of severe kickback Raker depth gauge clearance Too low increases the potential for kickback Not low enough decreases cutting ability If the cutter teeth hit hard objects such as nails or stones or are abraded by mud or sand on the wood have an author...

Page 28: ... an authorized service center if there are any signs of wear or damage If you do not fully understand the correct procedure for sharpening the chain after reading the instructions that follow have the saw chain sharpened by an authorized service center or replace with a recommended low kickback chain Tension the chain prior to sharpening Refer to the Adjusting the chain tension section on page 26 ...

Page 29: ...e other side and file the right hand cutters in the opposite direction Remove filings from the file with a wire brush WARNING Improper chain sharpening increases the potential of kickback Failure to replace or repair a damaged chain can cause serious injury Top plate filing angle CORRECT 30 file holders are marked with guide marks to align file properly to produce correct top plate angle 30 80 TOP...

Page 30: ...causes excessive wear to the bar and chain Results from using a file with a diameter too large or file held too high Side plate angle Maintain the depth gauge at a clearance of 1 32 in 0 79 mm Use a depth gauge tool for checking the depth gauge clearances Every time the chain is filed check the depth gauge clearance Depth Gauge Jointer Flat file Raker Depth Gauge Clearance 1 32 0 79 mm Hook Incorr...

Page 31: ...y over sideways Bent guide bar Cracked or broken rails Spread rails Lubricate guide bars after each use with a sprocket at their tip Using a grease syringe lubricate weekly in the lubricating hole Turn the guide bar and check that the lubrication holes and chain groove are free from impurities Restore Original shape by Rounding the front Lubricating hole Transport Storage When storing or transport...

Page 32: ...ion of chain Chain saw does not run 1 Battery is not charged 2 Battery is not correctly installed in the chain saw 3 Chain brake is engaged 1 Check the battery charge If there is no charge remove the battery and follow the charging procedures in the charger manual 2 Make sure the battery is completely installed in the chain saw Refer to page 13 3 Pull back on the chain brake to disengage Alert Ind...

Page 33: ... Lithiuim Ion Cordless 18 in Chain saw is defective at any time during the specified warranty period simply return the 80 V Lithiuim Ion Chain saw along with proof of purchase to the place of purchase for a free replacement or refund or call 1 888 3KOBALT 1 888 356 2258 for warranty service This warranty is void if defects in materials or workmanship or damages result from repairs or alterations w...

Reviews: