9
OPERATING INSTRUCTIONS
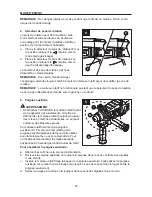
4. Direction-of-Rotation Selector
The direction of bit rotation is reversible and is
controlled by a selector located above the lock-on
button (E). With the rotary hammer held in the
normal operating position:
a. Position the direction-of-rotation selector (F) to
the position marked
for forward rotation.
b. Position the direction-of-rotation selector to
position marked
for reverse rotation.
The rotation direction setting is not available while
in chiseling mode.
NOTE:
To prevent gear damage, always allow the
rotary hammer to come to a complete stop before
changing the direction of rotation.
NOTE:
The rotary hammer will not run unless the direction-of-rotation selector is fully engaged to
the left or to the right.
5. Auxiliary Handle
WARNING
• ALWAYS unplug the rotary hammer before
making any adjustments. Failure to unplug the
rotary hammer could result in accidental starting,
which can cause serious personal injury.
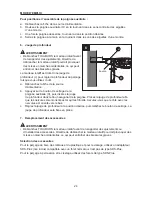
This rotary hammer is equipped with an auxiliary
handle (H). For ease of operation, you can use the
handle with either the left or right hand. For optimal
operation, the handle can be positioned at any
location around the tool.
To assemble the auxiliary handle:
a. Disconnect the plug from the power source.
b. Loosen the auxiliary handle by turning the handle counterclockwise.
c. Insert the rotary hammer through the auxiliary handle ring. Slide the auxiliary handle over
the locking sleeve (B) until it is resting in the auxiliary handle recess (I).
d. Hand-tighten the handle by turning the handle clockwise.
To adjust the auxiliary handle assembly:
a. Disconnect the plug from the power source.
b. Loosen the auxiliary handle (H) by turning the handle counterclockwise.
c. With the handle loosened, rotate the auxiliary handle to the desired position.
d. Hand-tighten the handle by turning it clockwise.
4
5
I
B
F
F
H
Summary of Contents for K7RH-03
Page 44: ......


