Page 3 of 4.
Part three: The EasyReader for reading Daisy books on a CD.
Press the square button below at the centre to switch to the CD player. When no CD is loaded
in the device, the CD tray at the right will open automatically. Press the pause/start button to
start reading. Navigating through the book is done at the exact same way as with the reader.
To eject a CD, you must first stop reading by pressing the pause button. This allows the
device to save the exact text position. You can eject the CD by pressing the scan button,
which is the round button at the top centre.
Bear in mind that many books have not been recorded to meet navigation requirements. As a
consequence, peculiar leaps within the text are possible. Many Daisy books were made by
recording the old cassettes on a CD one after the other. Reading from chapter to chapter is
like reading from cassette to cassette.
Part four: Separate keyboard for saving
When you have purchased the separate keyboard, you can use it to save texts on the hard disk,
on an MP3 player or a USB flash drive.
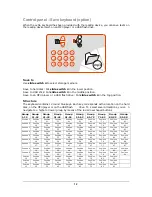
Above on the right are two buttons for navigating through groups of ten positions on the hard
disk, the MP3 player or USB flash drive. Above on the left is the switch to select the storage
location. You can either select the hard disk or the MP3 player. The 12 buttons which are
grouped together (4 columns and 3 rows) represent the positions depending on the group. A
position is a location on the hard disk or MP3 player and is marked by a number.
For example:
- Group 1 to 12 represents the first button, position 1, and the last, position 12;
- Group 10 to 22 represents the first button, position 10, and the last, position 22.
To read a text that has been saved on a position, briefly press the button. Then press the same
button to confirm or any other button to cancel. To save a text, keep the button pressed in.
Press once more to confirm or press any other button to cancel.
To delete a text, replace the current text by a new one, overwriting the old one.
Part five: Maintenance and service.
•
Place the device in a dry, well-vented, clean spot. Do not place the device into direct
sunlight or next to a source of heat.
•
To avoid electrocution, do not place the device in a spot where it can come into
contact with liquids.
•
The design of the connectors allows for them to be used in one way exclusively. Never
force a connector.
•
Never attempt to repair the device by yourself. You must contact KOBA Vision or
your dealer in case of defects.


