background image


19


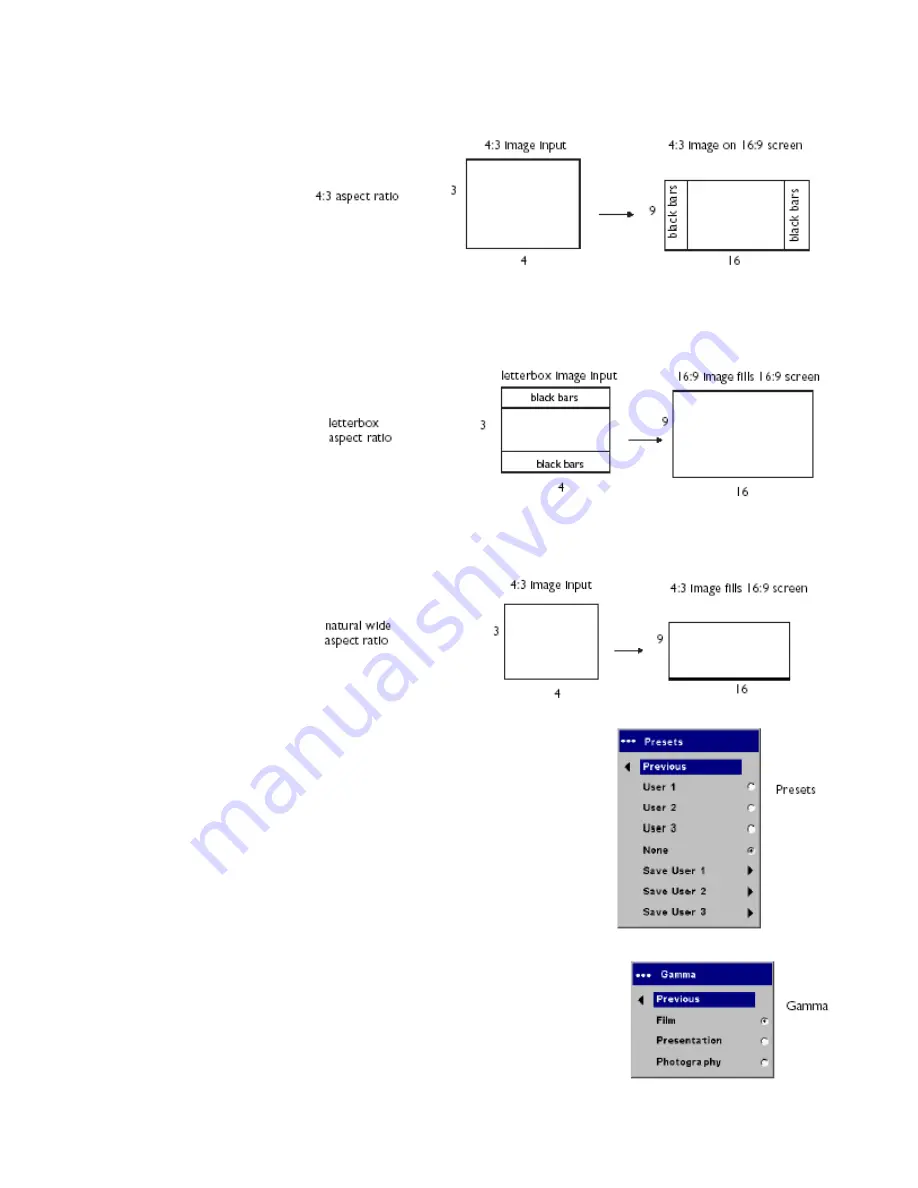
4:3

: resizes the image 

from its original version 
to fit a standard 4:3 
aspect ratio screen. If 
you have a 4:3 source 
on a 16:9 screen, the 
image is placed in a 
16:9 space, so black  
bars appear at the  
sides of the image. 


Letterbox text

: preserves  

the 16:9 aspect ratio and 
maximizes readability of 
the text. 
 

Letterbox

: preserves the 

16:9 aspect ratio. If you 
have a 16:9 source and 
screen, the image fills the 
screen. If your source is 
letterboxed, the image is expanded to fill the screen. 


Natural Wide

: this 

mode stretches a 4:3 
image to fill the entire 
16:9 screen. The center 
two-thirds of the image 
is unchanged; the 
edges of the image are 
stretched. 


Presets

: You can customize the settings for each source and save 

them as a preset. There are three user-definable presets. To set a 
preset for the current source, adjust the image; then choose Save 
User 1, 2, or 3. You can recall these settings in the future by 
selecting the appropriate user presets. 


Gamma

: Gamma tables contain preset intensity configurations 

optimized for the input source. You can select a gamma table that has 
been specifically tuned for film, presentation, or photography. 
 

NOTE

: Your viewing preferences may vary. Cycle through the gamma 

options and pick the one you like the best.


Summary of Contents for HD225

Page 1: ...HD225 HDTV Projector Users Manual v1 1 ...

Page 2: ...ada This Class B digital apparatus complies with Canadian ICES 003 Cet appareil numérique de la classe B est conforme à la norme NMB 003 du Canada Safety Certifications UL CUL TUV GOST Other specific Country Approvals may apply Please see produce certification label Declaration of Conformity Knoll Systems 11791 Machrina Way Richmond BC V7A 4V3 Canada EMC Directive 89 336 EEC Amended by 93 68 EEC E...

Page 3: ... audio 16 Customizing the projector 16 Optimizing video images 17 Using the menus 17 Picture menu 18 Settings menu 21 Maintenance 23 Cleaning the lens 23 Replacing the projection lamp 23 Cleaning the dust filters 25 Using the security lock 25 Red LED behavior and projector errors 26 Projected image size 26 If you are experienced in setting up presentation systems use the included Quick Set Up card...

Page 4: ...A surge protected power strip is recommended Refer to this manual for proper startup and shutdown procedures In the unlikely event of the lamp rupturing discard any edible items placed in the surrounding area and thoroughly clean the area along all sides of the projector Wash hands after cleaning the area and handling the ruptured lamp This product has a lamp that contains a very small amount of m...

Page 5: ...cap tether ships in the Documentation Pack Attach it to the lens cap and the projector if desired Connector Panel The projector provides two computer and four video connectors one M1 D A HD DVI and computer one VESA HD HD component and computer one S video one composite RCA one component video It also has an RS 232 serial connector for serial control The Command Line Interface CLI specifications a...

Page 6: ...3 m of your power source To ensure adequate cable access place the projector at least six inches 0 15m from a wall or other objects Place the projector at least 5 6 feet 1 7 m from the projection screen If you install the projector on the ceiling refer to the installation guide that comes with the Ceiling Mount Kit for more information To turn the image upside down see page 21 Knoll recommends use...

Page 7: ...le or satellite company the signal must pass through a tuner first Examples of tuners are digital cable boxes VCRs digital video recorders and satellite TV boxes Basically any device that can change channels is considered a tuner If there is more than one output select the highest quality one DVI Component video and RGB M1 HD15 have the best quality followed by S video and then composite video Inp...

Page 8: ...the S video connector on the video device and into the S video 4 connector on the projector Connect the red and white audio connectors from the A V cable to your source and Audio In connector on the projector if desired If the video device uses a yellow composite video connector plug the A V cable s yellow connector into the video out connector on the video device Plug the other yellow connector i...

Page 9: ...ice The video device s image should appear on the projection screen If it doesn t press the Source button on the keypad or remote Adjust the height of the projector by pressing the release button to extend the elevator foot Rotate the leveling foot if necessary Position the projector the desired distance from the screen at a 90 degree angle to the screen See 26 for a table listing screen sizes and...

Page 10: ... with the menus Connecting a computer Connect either a VESA cable or M1 cable into the appropriate connector on the projector Vesa 1 or DVI 2 Connect the other end to the video port on your computer If you are using a desktop computer you first need to disconnect the monitor cable from the computer s video port Connect the black power cable to the connector on the back of the projector and to your...

Page 11: ...ature that automatically turns the lamp off after no signals have been detected for five minutes After three additional minutes with no signal the projector powers down If an active signal is received before the projector powers down the image is displayed You must press the Power button to display an image after 30 minutes have passed When Power Save is enabled Screen Save is disabled See page 22...

Page 12: ...12 ...

Page 13: ...13 ...

Page 14: ... the back cover for support contact information This product is backed by a limited warranty When sending the projector in for repair we recommend shipping the unit in its original packing material or having a professional packaging company pack the unit Please insure your shipment for its full value ...

Page 15: ...wo provided AAA batteries They are easily installed by sliding the cover off the remote s back aligning the and ends of the batteries sliding them into place and then replacing the cover To operate point the remote at the projection screen or at the projector not at the video device or computer The range of optimum operation is up to 30 feet 9 14m Press the remote s Menu button to open the project...

Page 16: ...r turn off the projector s chime use the Audio menu see page 16 Troubleshooting audio If there is no sound check the following Make sure the audio cables are connected Make sure mute isn t active in the Audio menu Make sure the volume is turned up enough Adjust the audio source If playing a video make sure the playback has not been paused Customizing the projector You can customize the projector f...

Page 17: ...arrow buttons to move up and down to highlight the desired submenu then press the Select button To change a menu setting highlight it press Select then use the up and down arrow buttons to adjust the value select an option using radio buttons or turn the feature on or off using check boxes Press Select to confirm your changes Use the arrows to navigate to another setting When your adjustments are ...

Page 18: ...video image from black and white to fully saturated color Tint NTSC video sources only adjusts the red green color balance in the image Aspect Ratio aspect ratio is the ratio of the image width to image height TV screens are usually 1 33 1 also known as 4 3 HDTV and most DVDs are 1 78 1 or 16 9 The default is16 9 Native this mode bypasses the internal scaler displaying the image with no resizing S...

Page 19: ...a 4 3 image to fill the entire 16 9 screen The center two thirds of the image is unchanged the edges of the image are stretched Presets You can customize the settings for each source and save them as a preset There are three user definable presets To set a preset for the current source adjust the image then choose Save User 1 2 or 3 You can recall these settings in the future by selecting the appr...

Page 20: ...e a different setting turn off Auto then choose RGB for computer sources choose either SMPTE240 REC709 or REC601 for component sources Color Temperature changes the relative warmth of the colors Color Control allows you to individually adjust the gain intensity of the color the offset the amount of black in the color and the gamma of the red green and blue colors The following four options are for...

Page 21: ...ox if you are using a DVD player with RGB output System Rear reverses the image so you can project from behind a translucent screen Ceiling turns the image upside down for ceiling mounted projection Auto Ceiling automatically senses when the projector is inverted and turns the image upside down This is On by default Auto Power When Auto Power is checked the projector automatically goes into the st...

Page 22: ... computer highlight Capture New then press Select twice When complete the projector confirms the capture The next time you start the projector the custom logo you captured displays Blank Screen determines what color is displayed when you press the Blank button on the remote PiP Picture in Picture allows you to overlay a smaller window showing the video source on top of the larger computer source w...

Page 23: ...ectly to the lens Abrasive cleaners solvents or other harsh chemicals might scratch the lens 2 Lightly wipe the cleaning cloth over the lens in a circular motion If you don t intend to use the projector immediately replace the lens cap Replacing the projection lamp The lamp hour timer in the About menu counts the number of hours the lamp has been in use When the lamp timer reaches the estimated to...

Page 24: ...moving it Before replacing the lamp clean the lamp compartment and dispose of cleaning materials Wash hands after lamp replacement This product has a lamp which contains a very small amount of mercury Dispose of it as required by local state or federal ordinances and regulations For more information see www eiae org 5 Carefully remove the lamp module by grasping and lifting the metal bail wire Dis...

Page 25: ...er attached to the dust filter door and one metal grid filter adjacent to the lamp door 1 Turn off the projector and unplug the power cable 2 Wait 60 minutes to allow the projector to cool thoroughly WARNING To avoid burns allow the projector to cool for at least 60 minutes before you clean or replace the dust filter 3 Turn the projector upside down and remove the lamp door See page 23 4 Remove th...

Page 26: ...tact Technical Support for repair if replacing the lamp does not solve the problem Four 4 blinks A fan has failed Contact Technical Support for repair Five 5 blinks The projector is overheating Check for a blocked air vent Contact Technical Support for repair if clearing The air vent does not solve the problem Projected image size Table 4 Image sizes Distance to screen feet m Minimum Diagonal feet...

Page 27: ...tured Product Warranty for applicable warranty information WARRANTY LIMITATION AND EXCLUSION Knoll shall have no further obligation under the foregoing limited warranty if the Product has been damaged due to abuse misuse neglect accident unusual physical or electrical stress unauthorized modifications tampering alterations or service other than by Knoll or its authorized agents causes other than f...

Reviews: