background image

Oven electrical connection

Ensure  the  electric  current  has  been  disconnected  before 

connecting the oven to the electric mains.

The oven requires single-phase alternate current 220-230-240 

V~ 50-60 Hz, using flexible cable. Ensure the household power 

supply  can  support  the  electric  load  of  the  device.  (See 

serial  plate).  The  electric  safety  of  this  appliance  is  only 

assured if the same is correctly connected to a system having 

efficient earth connection, according to the legal standards in 

force.

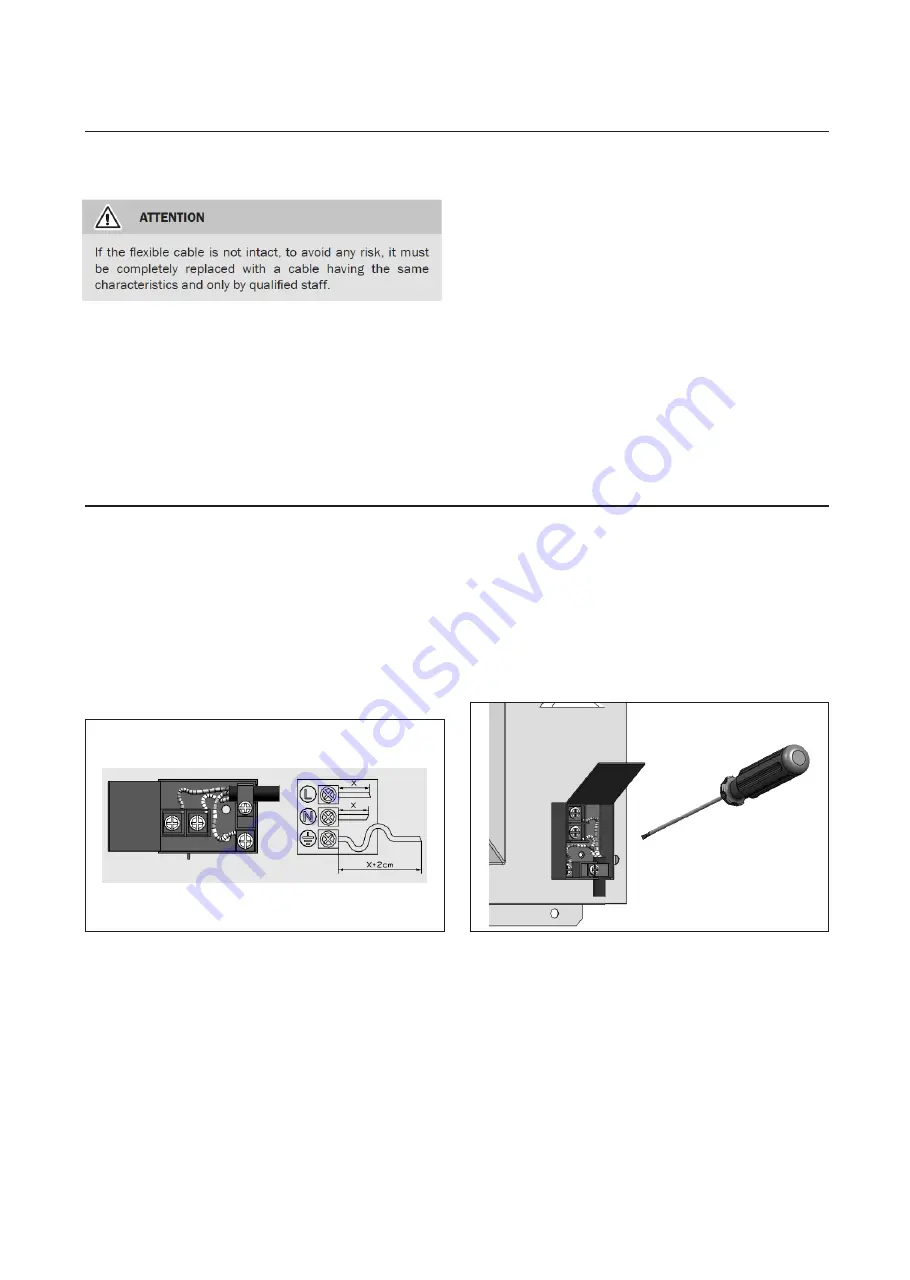
Assembly/replacement of the power supply cable

In case of permanent connection to the electric mains, apply a 

bipolar switch dimensioned to the corresponding load, with opening 

for each contact of at least 3 mm in accordance with the current local 

regulations.

The installer must ensure that the switch is suitable for the

power absorbed by the oven as indicated on the serial

plate.

The switch must be easily accessible. Disconnection of

the appliance from the electrical supply must

be allowed for.

If the power supply cable is damaged, it must be replaced

by the manufacturer, its after-sales assistance or by other

qualified persons.

The electric cable must be kept secured to the terminal block

by means of a cable fix so that it cannot come out. Connect the

line cable to terminal L, the neutral cable to terminal N and the

yellow/green cable to the earth terminal The yellow/green

cable must be longer than the other two by at least 20 mm.

Ensure the electric cable does not pass near or come into

contact with the surfaces reaching a temperature above 75°C.

16

Summary of Contents for cooking OMF6032

Page 1: ...cooking collection Instructions for use and warranty details Built In Oven 0RGHO 1R OMF6031...

Page 2: ...sults carefully read the instructions on how your new appliance is to be installed Correct installation will avoid delays and unnecessary service call costs Once installation is complete please read t...

Page 3: ...the shelves 13 Removing mounting the telescopic guides and Replacing the oven light bulb 14 Instructions for installation 14 Inserting the oven into the cabinet 15 Oven electrical connection 16 Assem...

Page 4: ...without forewarning This household appliance is compliant with the provisions of the European Community Directives Low voltage Directive 2014 35 EU Electromagnetic compatibility Directive 2014 30 EU...

Page 5: ...ndle as to do so could damage the product Make sure the ventilation slots are not obstructed During use the appliance becomes hot Care should be taken to avoid touching heating elements inside the ove...

Page 6: ...E PRODUCT Control panel Fan cover panel Telescopic guides Support grids Sauce collection tray Grill cooking resistance CONTROL PANEL Thermostat Programs selector Power LED C Clock Timer BT6 programmer...

Page 7: ...ing Power indicator LED When on it indicates that the oven is live and on Oven operating LED The LED on indicates the heating phase the LED off indicates that the temperature set has been reached Flas...

Page 8: ...to exit programming mode Semi automatic operation with cooking end time set Touch the OK symbol until appears By operating on the symbols set the desired cooking end time After a few seconds the symbo...

Page 9: ...This is a function that can block access to the functionality of the electronic programmer keys both when the oven is running and as prevention when the oven is off To activate this function press fo...

Page 10: ...the knobs can be damaged if dirt remains for an excessively long period on them Dirt residue must be removed immediately but use products specifically for steel as other overly abrasive ones could cau...

Page 11: ...cleaning of interior glasses without having to remove the oven door Follow the steps below to extract the internal panes Open the oven door and immediately lock the hinges There are two buttons on the...

Page 12: ...in a way that it can release itself from its seat post Fig 1 Fig 2 Lift it off the bottom 2 seat posts and lift out of the oven cavity fig 2 Repeat on the opposite side of the oven To re mount the gui...

Page 13: ...telescopic guides until they are fully extended then lift it by holding it firmly Make sure that the holes of the drip pan front are placed inside the end stops of the telescopic guide fig 3p To remo...

Page 14: ...iven below ATTENTION Before replacing the bulb make sure that the appliance is switched off and the mains electricity has been disconnected to avoid the possibility of electric shock Ensure that the o...

Page 15: ...t minimum ventilation apertures of the cabinets as given in the drawings The oven must not be installed behind a decorative door in order to avoid overheating Fig 01 Fig 02 Built in measurements The d...

Page 16: ...h contact of at least 3 mm in accordance with the current local regulations The installer must ensure that the switch is suitable for the power absorbed by the oven as indicated on the serial plate Th...

Page 17: ...owing data 1 Model of oven code MOD and production number N L found on the product label positioned on the lower front part of the oven and on the first page of the booklet 2 Description and number of...

Page 18: ...tance W 800 Resistance Grill W 1800 Base resistance W 1200 Circular resistance W 2200 Oven light W 25 Oven fan W 20 Tangential fan W 20 EXTERNAL DIMENSIONS Width cm 59 5 Height cm 59 5 Depth cm 55 INT...

Page 19: ...This page intentionally left blank...

Page 20: ...This page intentionally left blank...

Page 21: ...This page intentionally left blank...

Page 22: ...chased and no charges or refunds will be made based on the replacement product or part cost difference and iv is only applicable when the Product is used and operated in accordance with the Manufactur...

Page 23: ...edit card may be required prior to the commencement of such services 17 Extra charges will be payable by the customer should the Product not be readily accessible without special equipment such as but...

Page 24: ...Clothes dryers Dishwashers Ovens Cooktops Steam ovens Microwave ovens Built in espresso coffee machines Rangehoods Freestanding ovens Refrigerators Freezers Beverage Serving Cabinets Water Dispensers...

Reviews: