


7
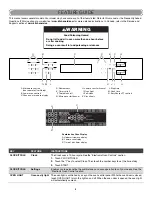
Time of Day, Timer Display
When the lower oven is not in use, this display shows the time of
day or time countdown.
Upper Microwave Oven Display
(combination oven models)
When the upper microwave oven is in use, this display shows the
upper oven heat source(s), cooking power, quantities, weights and/
or help prompts and time countdown.
When the upper microwave oven is not in use, this display is blank.
Start
START begins all oven functions except Sabbath Mode. If the Start
key is not touched within 5 seconds after touching another key,
“START?” will appear on the lower oven display as a reminder.
Depending on your model, if the Start key is not touched within
5 minutes after touching another key, the lower oven display will
return to inactive mode and the programmed function will be
canceled.
Cancel
Lower Oven CANCEL stops oven functions except for the Clock,
Kitchen Timer and Control Lock. The oven cooling fan(s) may
continue to operate even after an oven function has been canceled
or completed, depending on the oven temperature.
Tones
Tones are audible signals, indicating the following:
One beep
■
Valid key touch
■
Function has been entered
One chime
■
Preheat cycle has been completed
Three beeps
■
Invalid key touch
Three chimes
■
End of a cooking cycle
Four chimes
■
When timer reaches zero
Includes using the Kitchen Timer for functions other than
cooking.
Tone Volume
The volume is preset at low, but can be changed to high.
To Change: Touch CLOCK/TOOLS, and then “4” to toggle volume
between high and low settings.
All Tones
All tones are preset on, but can be turned off.
To Turn Off/On: Touch CLOCK/TOOLS, and then “3” to toggle
tones between on/off settings.
End-of-Cycle and Reminder Tones
The Timed Cooking end-of-cycle and reminder tones are preset
on, but can be turned off. If all tones have been turned off, the end-
of-cycle and reminder tones cannot be independently turned on.
To Turn Tones Off/On: Touch CLOCK/TOOLS, and then “5” to
turn On. Touch CLOCK/TOOLS and then “5” to turn Off.
NOTE: Turning off this reminder tone does not turn off the Kitchen
Timer tone.
Fahrenheit and Celsius
The temperature is preset in Fahrenheit; however, it can be
changed to Celsius.
To Change: Touch CLOCK/TOOLS, and then “2” to toggle
temperature between Fahrenheit and Celsius settings.
When the temperature is in Fahrenheit, “°F” follows the oven
temperature.
When the temperature is in Celsius, “°C” follows the oven
temperature.
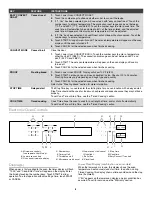
Tools
(Combination Oven Models)
The TOOLS selection key allows you access to 10 hidden
functions within the Electronic Oven Control. These hidden
functions allow you to set the clock, change the oven temperature
between Fahrenheit and Celsius, turn the audible signals and
prompts on and off, adjust the oven calibration, change language
and turn on demo mode. The Sabbath Mode is also set using the
TOOLS selection key.
To Use: Touch TOOLS. The oven display will scroll through the
various tools, starting at “1” and ending automatically at “0.” You
can also touch CLOCK/TOOLS repeatedly to manually scroll
through the list of tools.
Clock
This is a 12-hour clock. Before setting, make sure the oven(s),
Kitchen Timer and Timed Cooking are off.
To Set:
1. Touch CLOCK/TOOLS.
2. Touch the “1” key.
3. Touch the number keys to set the time of day.
4. Touch START.
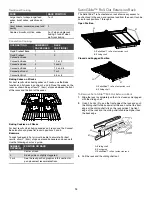
TOOLS
HIDDEN FUNCTION
1
Clock
2
Fahrenheit and Celsius conversion
3
Sound On/Off
4
Sound High/Low
5
End tone On/Off
6
Calibration
7
Sabbath Mode
8
Turntable On/Off
9
Language
0
Demo Mode