


17
Try the solutions suggested here first in order to avoid the cost of an unnecessary service call.
Nothing will operate
■
Has a household fuse blown, or has a circuit breaker
tripped?
Replace the fuse or reset the circuit breaker. If the problem
continues, call an electrician.
■
Is the appliance wired properly?
See Installation Instructions.
Oven will not operate
■
Is the electronic oven control set correctly?
See “Electronic Oven Control” section.
■
Has a delay start been set?
See “Timed Cooking” section.
■
Is the Control Lock set?
See “Control Lock” section.
■
Is the Sabbath Mode set?
See “Sabbath Mode” section.
■
On double oven models, is one oven self-cleaning?
When one oven is self-cleaning, the other oven cannot be set
or turned on.
Oven temperature too high or too low
■
Does the oven temperature calibration need adjustment?
See “Oven Temperature Control” section.
Warm air coming from oven vent
■
Warm air coming from the oven vent is normal. During a self-
clean cycle, the air stream is increased.
■
The cooling fan may operate both during an oven's cycle and
after the cycle has ended, causing warm air to exit from the
oven vent.
Display shows messages
■
Is the display showing a letter followed by a number?
Clear the display. See “Display(s)” section. If a letter followed
by a number reappears, call for service. See “Warranty”
section.
Fan runs during Bake function
■
It is normal for the convection fan and element to operate
during Bake mode to enhance performance and heat
distribution.
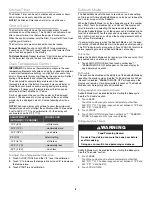
Long preheat times
■
Not all cycles require preheating. See cycle instructions for
preheat recommendations. Most cycles preheat to 350°F
(177°C) in 12 to 17 minutes. Higher temperatures will take
more time. Removing unused oven racks prior to preheating
can help reduce preheat time.
Self-Cleaning cycle will not operate
■
Is the oven door open?
Close the oven door all the way.
■
Has the function been entered?
See “High Temp Self-Cleaning Cycle” section.
■
On some models, has a delay start Self-Clean cycle been
set?
See “High Temp Self-Cleaning Cycle” section.
■
Has a delay start been set?
See “Timed Cooking” section.
■
On double oven models, is one oven self-cleaning?
When one oven is self-cleaning, the other oven cannot be set
to self-clean.
Oven cooking results not what expected
■
Is the proper temperature set?
Double-check the recipe in a reliable cookbook.
■
Is the proper oven temperature calibration set?
See “Oven Temperature Control” section.
■
Was the oven preheated?
See “Baking and Roasting” section.
■
Is the proper bakeware being used?
See “Bakeware” section.
■
Are the racks positioned properly?
See “Rack and Bakeware Positions” section.
■
Is there proper air circulation around bakeware?
See “Rack and Bakeware Positions” section.
■
Is the batter evenly distributed in the pan?
Check that batter is level in the pan.
■
Is the proper length of time being used?
Adjust cooking time.
■
Has the oven door been opened while cooking?
Oven peeking releases oven heat and can result in longer
cooking times.
■
Are baked items too brown on the bottom?
Move rack to higher position in the oven.
■
Are pie crust edges browning early?
Use aluminum foil to cover the edge of the crust and/or reduce
baking temperature.
Uneven browning of baked items
■
See “Rack and Bakeware Positions” section.
■
Center the baking pan(s) on the rack and allow a minimum of
2" (5 cm) of clearance around all sides of the pan(s).
■
Allow a minimum of 2" (5 cm) of clearance between the oven
door and the front edge of baking pans.
TROUBLESHOOTING